Using the Changes in this Release
This section explains how to use the changes in the version 27 release.
-
To review the major release changes in this release, see the Major Features.
-
To review defect resolutions for this release, see the Resolution Log.
New Private Supply Network (PSN) Supports Better EDI Transmissions
LBMH03-156 – The Private Supply Network (PSN) is ECI's own Private Value-Added Network product that receives, stores, and transmits EDI messages both securely and efficiently. The Private Supply Network offers services beyond basic data transmission, such as message tracking, error detection, and data translation. The onboarding process is more streamlined and simplified, which reduces the time and effort required to establish new Vendor EDI connections. Your business will now have a centralized and scalable system to manage EDI communications as well as provide better support for issues typically associated with EDI connections.
The first implementation of this Private Supply Network (PSN) technology will be for retrieving and updating your database with the Ace Hotsheets, promotions, and purchase order updates. After you set the PSN infrastructure up, the data retrieval process will work as it did before, but you will have more retrieval options, they will be more efficient, and there will be new features in place to prevent errors, which we will discuss below.
Setting up the Private Supply Network (PSN) (Internal Teams Only)
Most PSN settings will be enabled automatically for current customers. These instructions help when a customer needs a change.
LBMH03-1229 – System Administrators can complete the PSN setup process as follows:
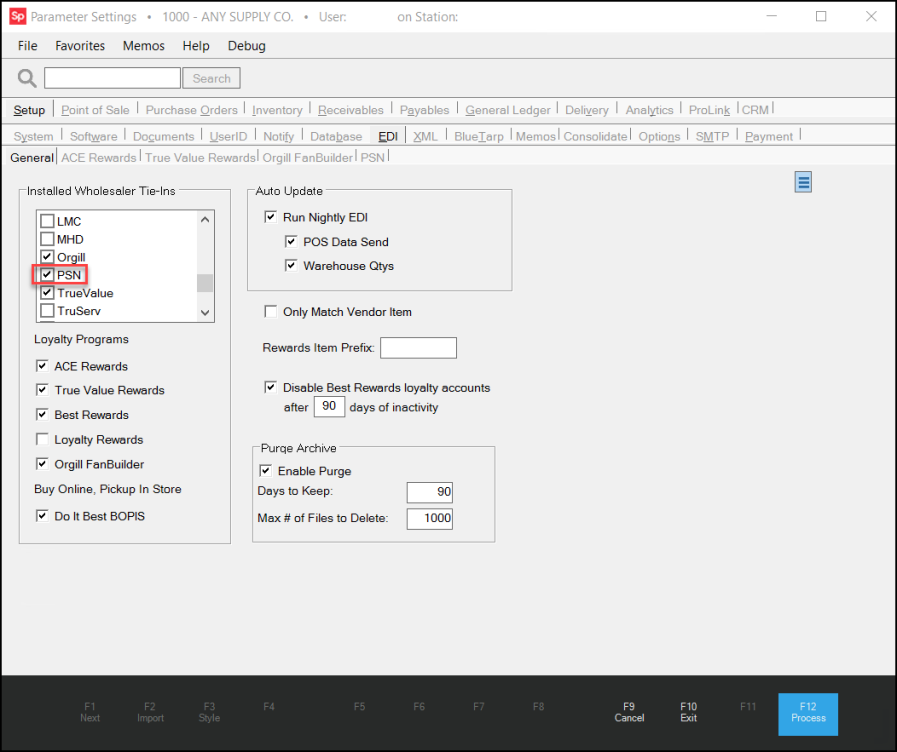
1. From the Main Menu, choose Maintenance > Database > Parameters. The Parameter Settings form displays.
2. From the Setup tab, choose the EDI subtab to display the General tab options.
3. From the Installed Wholesaler Tie-Ins list, scroll down and select the PSN check box. The PSN tab displays.
4. Choose the PSN tab and complete the following settings:
-
PSN URL
In this field, paste this link: https://admin.privatesupplynetwork.com -
Logging Level
This sets the amount of logging the system uses to track the PSN processes. This is set to Minimal by default, but if you are having issues later, you can switch this to Verbose or Debug to learn more about what may be causing the problem. We recommend the Minimal setting to improve performance. -
Poll Interval
This refers to how frequently the application will check to see the status of the PSN request. After the vendor receives the request, it will collect the records that match your settings. This setting determines how frequently the API will check to see if all the records you requested have been collected. This is set to 10 seconds by default, but you can select 5, 15, 20, 25, or 30 if you prefer. -
Vendor Subscriptions
From the PSN Vendor list, choose the vendor whose data you are requesting. Then from the resulting list, select the check box beside each record type you will be requesting.
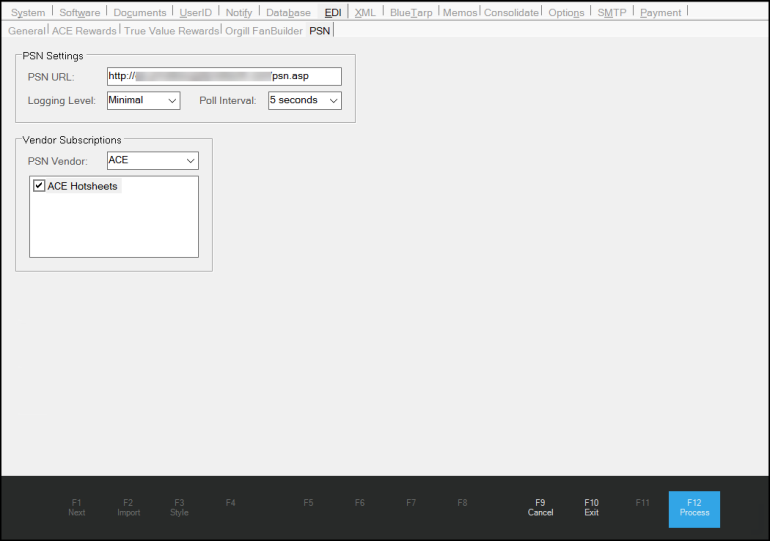
Parameter Settings > EDI > PSN > PSN Settings
As time goes on, there will be additional vendors and subscription options associated with this feature. You should select only the vendors and subscription options that meet your needs.
5. When you have completed these settings choose Process (F12).
6. Log out of the application and then back in to enable the feature.
Understanding and Using the New PSN Endpoint
LBMH03-1253, LBMH03-1521, LBMH03-2184 — We have updated the application’s EDI processes to download ACE Hotsheets using the new PSN endpoint. Hotsheets contain the changes in item pricing that are built over the course of a single day, so each day, ACE builds a new hotsheet containing that day’s changes. To ensure you receive a full day of these changes, this endpoint provides access to the previous day’s hotsheet only.
You do not have to do anything differently to take advantage of this change. The process for requesting updated hotsheet information is the same as before.
The manual process for retrieving records is the same as before. We have added a new Date field to the Vendor EDI Communications form for ACE Hotsheet and Purchase Order Update transmission requests. This field lets you specify the date the hotsheet or invoice was generated.

The Date field defaults to the previous date. The application ensures the transmission accounts for any server offset hours that may apply to the transmission request.
Note: You cannot retrieve data for the current date because the vendor can add new information all day; making a request before the day ends could result in an incomplete list of updates.
For invoices, we have added an Invoice Action Flag to ensure that you do not download the same invoice twice. However, if you request it, you may download the same Hotsheet twice.
Ace Hotsheets Now Include Promotion Information
LBMH03-1473—When you download and review the ACE Hotsheets, you may also notice that they contain ACE promotion information. As part of the Hotsheet download process, we also collect ACE promotion files (both the header and detail), which include changes to inventory pricing promotions (both added and deleted). The application adds this promotion information to the ACE Hotsheets so it can process it together. Combining these resources into one process is more efficient.
Retrieving ACE Hotsheets using the PSN Process
LBMH03-1521 – After you enable the PSN parameter settings and the branch and vendor settings are complete, you can send and retrieve vendor information using largely the same process as before. For the PSN-based transmissions, we have added a Date field to allow you to specify the date for these EDI requests. When you select a date in this field, the vendor sends the records you requested for the previous day.
Note: If the vendor sent you the current day’s records, any records that change after the time you send the request would not reach you; therefore, they send the complete records for the previous day.
It may be possible to retrieve data from another day. Contact your vendor’s customer services team to see if they can respool your data so you can download it again.
To retrieve ACE Hotsheets and Promotions using the PSN:
1. From the Main Menu, choose Purchasing and from the Left Menu choose Vendor EDI. The Vendor EDI Communications form displays.
2. From the EDI Interface list, choose the vendor’s name, in this case, ACE.
3. From the Vendor list, choose the vendor’s vendor ID, in this case, ACE.
4. Choose the Hotsheets button in the list.
5. In the Date field, leave the previous date selected.
6. Select the Include Items With No Price Change check box if you want to include all items or leave this check box blank to retrieve items with price changes only.
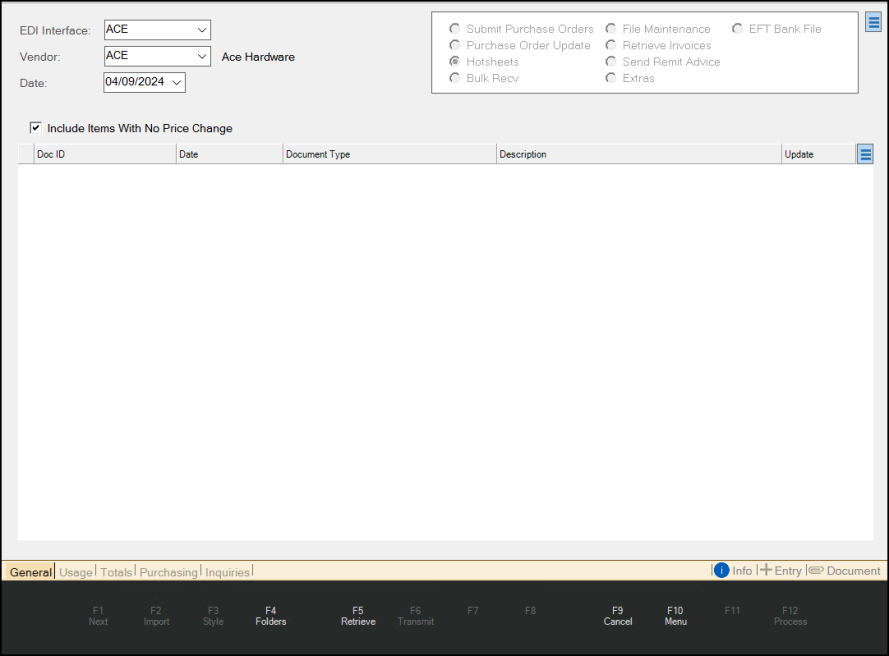
Vendor EDI Communications with ACE PSN Entries
7. Choose the Retrieve (F5) key. The Retrieve File confirmation message displays:
-
Scripting is enabled, meaning the software may connect externally to your vendor when you press OK. Press OK to Continue Retrieving.
8. Choose OK to continue. The Open box displays.
9. In the Open box, choose a folder for the new file and enter a file name in the Filename field. Then, choose Open. The application retrieves the hotsheets and promotions that are available.
The application retrieves the file(s) you requested and saves it/them to the folder you specified. A confirmation message displays when the retrieval process is complete. The application also reports if the retrieved file(s) contain(s) no new data.
Importing/Processing Purchase Order Invoices using PSN
LBMH03-1464 – PSN also allows you to import and process purchase order invoices as you did before. This process assumes you have set up the Branch EDI settings for the vendor as discussed above. The results of this process are the same, they just use a different endpoint.
To retrieve purchase order updates and create invoices:
1. From the Main Menu, choose Purchasing and from the Left Menu choose Vendor EDI. The Vendor EDI Communications form displays.
2. From the EDI Interface list, choose the vendor’s name, in this case, ACE.
3. From the Vendor list, choose the vendor’s vendor ID, in this case, ACE.
4. Choose the Purchase Order Update button in the list. The Date field displays the current date.
5. From the Date list, choose the invoice date of the purchase orders you want to retrieve.
6. Choose the Retrieve (F5) key. The Retrieve File confirmation message displays:
- Scripting is enabled, meaning the software may connect externally to your vendor when you press OK. Press OK to Continue Retrieving.
7. Choose OK to continue. The Open box displays. The application updates the data grid with the invoice(s) you requested, when they are available.
8. In the Doc ID column of the data grid entry, click the down arrow and choose New to create a new invoice document for the downloaded purchase order. Complete this step for each entry in the data grid.
9. Choose Process (F12) to create the invoice documents.
After you complete this step, you can receive the purchase order(s) in receipts.
10. From the Main Menu, choose Purchasing and from the Left Menu choose Receipts. The Inventory Receiving form displays.
11. From the Vendor list, choose the ACE vendor ID.
12. Choose the Receiving (F5) key to display the context list.
13. Choose Purchase Order. The PO Purchase Orders box displays.
14. From the PO# list, choose the new purchase order (invoice) you just imported and click Accept. The Inventory Receiving data grid updates to show the item associated with the purchase order invoice.
15. Choose Process (F12). The Process Session Document box displays.
16. Choose Finish (F12) to complete the document import process.