Do It Best > Send Retail (PSN)
We worked with Do It Best to add the Send Retail Data feature to the Private Supply Network (PSN), which improves the security of transaction information and enhances communication with the vendor. The Send Retail Data process helps Do It Best to understand trends in member store sales, which helps them make better decisions about the products to keep in inventory. This provides your business with more of the products your customers are asking for and need to be successful. It also helps you evaluate what to keep in stock and how to price those items.
The Send Retail Data process sends your sale information to Do It Best hourly. After you complete the setup process, it runs in the background for you. This feature is set up by branch.
Note: Businesses that do not use the Private Supply Network will still send their retail data the way they did in the past and in the beginning, we will be sending the data using both processes. This gives us a way to ensure that all of the data is transmitted correctly. If there is an issue with the size of the data batch in the send process, there is a way to modify the batch size to ensure it is delivered correctly.
Setting up the Send Retail Data Process (Internal Teams)
We have set up the Send Retail Data process to run automatically for Do It Best-supplied businesses. For new customers, you may need to set up the Send Retail Data process manually, using your administrator permissions. First, you add the vendor’s Send Retail subscription to the application, and then complete the branch settings for each branch that needs to send this information to Do It Best. This process is described below. You can also send the Do It Best retail data manually as described here: Sending the DIB POS Retail Data Manually.
To complete the Send Retail Data setup:
1. From the Main Menu, choose Maintenance > Database > Parameters. Then, choose the Setup > EDI tab to display the General tab settings.
2. In the Installed Wholesaler Tie-Ins list, ensure the Do It Best, the Best Rewards, and the Do It Best BOPIS check boxes are enabled, if the customer participates in these programs.
3. Choose the PSN tab and select the following:
-
From the PSN Vendor list, choose Do It Best. The Subscriptions list updates.
-
From the Subscriptions list, choose the POS Retail Sales check box.
Note: If you do not select this option, the application sends the retail data using the old process. Enable this check box to take advantage of the more secure process.
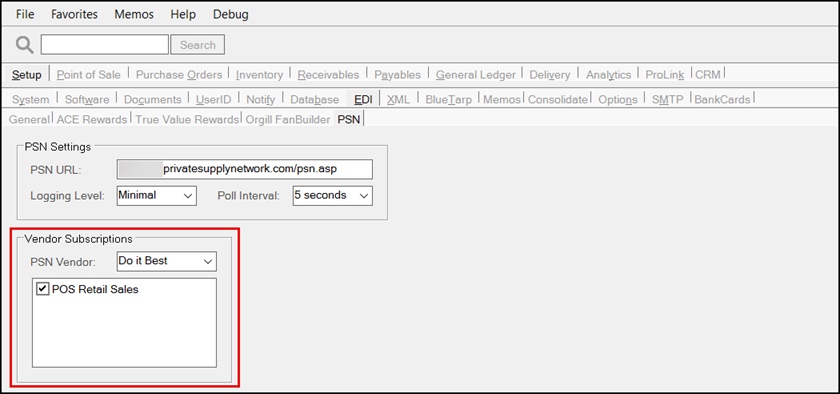
Parameter Settings > EDI > PSN > Vendor Subscriptions for Do It Best
4. Choose Process (F12) to save these settings.
5. Choose Exit (F10) and Yes to return to the Database Menu.
6. From the Database menu, choose Branches. The Branch Setup form displays.
7. From the Branch ID list, choose the branch for which you want to add the Send Retail Data hourly process.
Note: Repeat steps 7 -12 for each branch that needs to send hourly retail data to Do It Best.
8. Choose the EDI tab to display the EDI options.
9. From the Settings for list, choose Do It Best.
10. Choose the Menu Marker and from the context list, choose Automation. The Auto Run Schedule – Do It Best box displays.
11. In the Hourly Routines box, choose Send Retail Sales via API and choose Accept.
Note: If you do not select the POS Retail Sales Vendor Subscription in step 3, this option does not display.
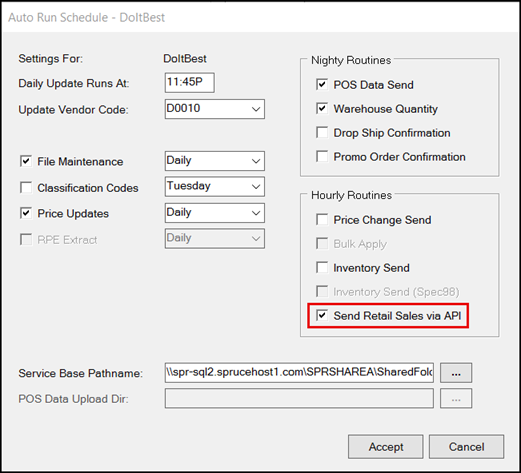
Branch Setup > EDI > Do It Best > Automation > Send Retail Sales via API
12. Choose Process (F12) to save these changes.
Sending the DIB POS Retail Data Manually
Although we have set the POS Data Send process to run automatically, there is also a manual process available, which we describe here. This process assumes you have completed the processes above. Customers might need this if there was a system outage on their end or a data issue on the DIB corporate systems end.
To send the store’s POS data to Do It Best manually:
1. From the Main Menu, choose Purchasing > Vendor EDI. The Vendor EDI Communications form displays.
2. From the EDI Interface and Vendor lists, choose the Do It Best entries.
3. From the bullets list choose Extras.
4. From the Function list, choose POS Data Send to display new options.
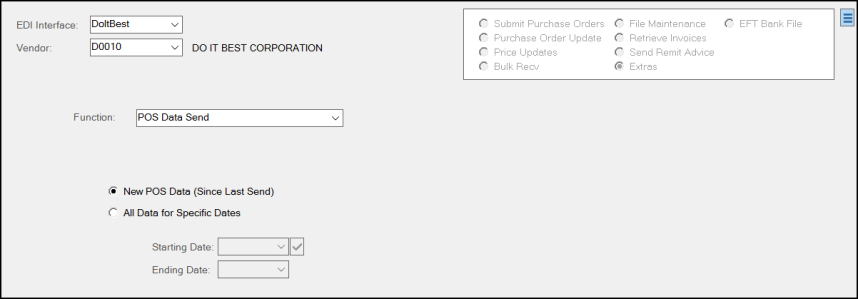
Vendor EDI Communications > Extras > POS Data Send Options
5. Continue based on the needs of the send process:
-
To send only the new data since the last transmission, choose the New POS Data (Since Last Send) button.
Or -
To send all data for a particular date range, click the All Data for Specific Dates button and then choose the dates in the Starting and Ending Date entries based on the data you need to send.
6. When you have completed these entries, choose Transmit (F6).
A scripting message may or may not display. If it does, choose OK. Based on the configuration you have chosen the application creates the files in the path defined and the application sends the file to the wholesaler using the PSN portal.