Spruce eCommerce > Statement and Invoice Discounts
Customers ask us to display discount information applicable to their customer’s receivable accounts online. Before this release, the Spruce eCommerce platform did not display statement and invoice discounts on your website, so when customers paid their balances or invoices online, they sometimes overpaid. Now, when your customers with balance forward, open item, and open item terms accounts access their accounts on your website, they will see the applicable discounts for their accounts and invoices. These discounts will expire on the expiration date (including your Grace Period parameter setting) just as they would in
Discount information and the ability to make account, job, and invoice payments only display for users with the Enterprise User Role AR/Invoices role.
When you create a user profile for a customer’s account, you can review their account balances the way they would see them. You must have administrative permissions in EvolutionX to do this work.
Creating a User Profile for a Customer Account
To see the discount changes from a customer’s point of view, you can create a user account that is specific to a customer account.
To create a user profile for a customer account:
1. From the EvolutionX menu, choose Customers > Accounts. The list of accounts display.
2. Find the account you want to review the account balances for using the search fields at the top.
If you need more search options, click the ![]() icon and choose the field that works best for you. When you find the account you want to review, click the Company name link to display their Account Dashboard.
icon and choose the field that works best for you. When you find the account you want to review, click the Company name link to display their Account Dashboard.
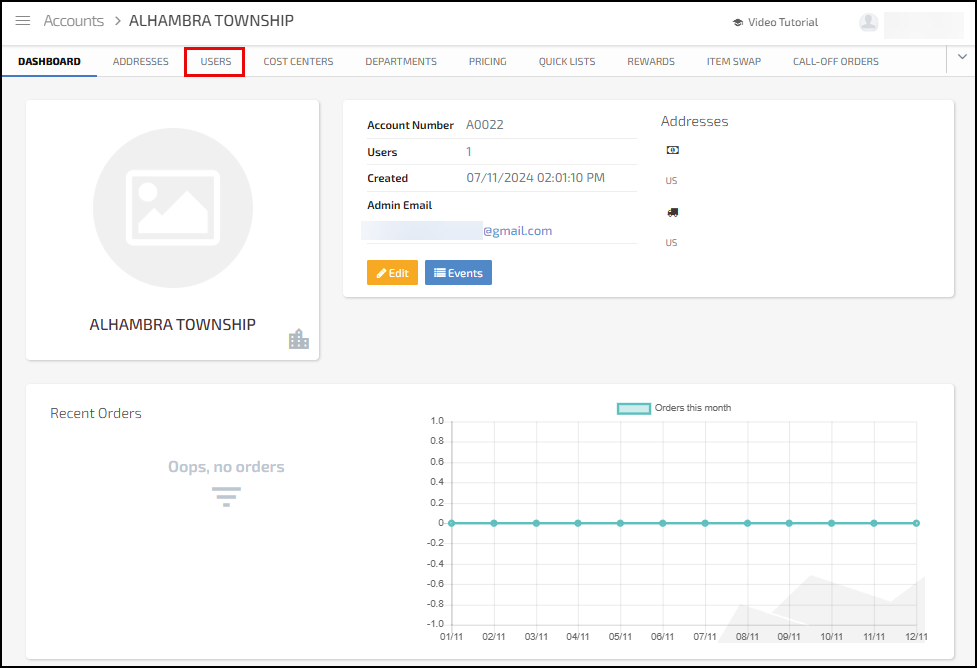
EvolutionX > Account Dashboard with Users Option Highlighted
3. Click the Users option to display the Users list for this account.
If this account already has user profiles, this list will already have entries.
4. Click the + New User option. The New User Profile Details options display.
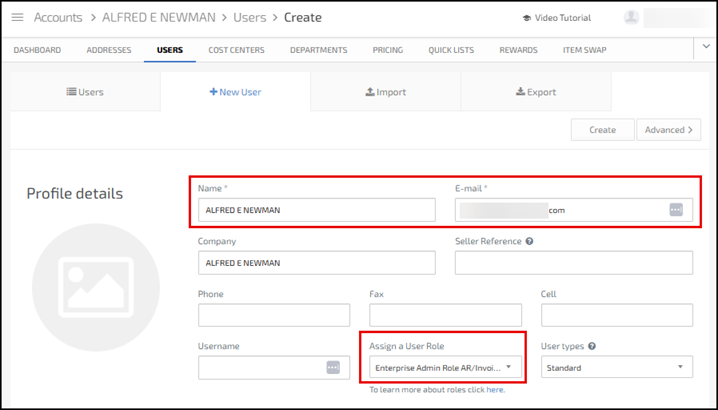
EvolutionX > New User Account > Required Settings
5. In the fields provided, enter a name, a valid email address, and from the Assign a User Role list, choose the Enterprise Admin Role AR/Invoices option.
Note: The application uses the email address to send you an email about this account when you save the user record.
6. Then click the Create button. The Users page updates to show the Login On Storefront option.
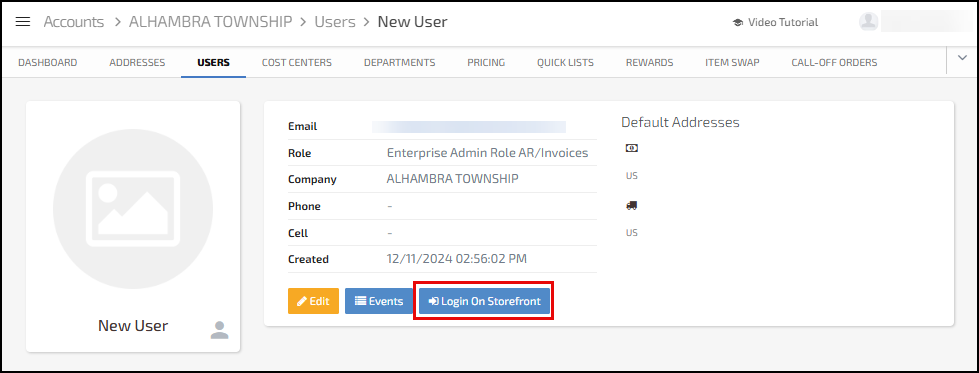
EvolutionX > New User Entry with Login On Storefront Button Highlighted
Typically, when you select the Login On Storefront button, the system displays the account settings as if you are a customer on your website. The Spruce eCommerce application keeps track of the discount dates and the Grace Period settings you have enabled in your parameter settings and displays the discount (and Due Now and Total Amounts) as appropriate to these dates.
When you select the Login On Storefront button, if there is more than one account or job associated with the selected user, you are prompted to select the account you want to review.
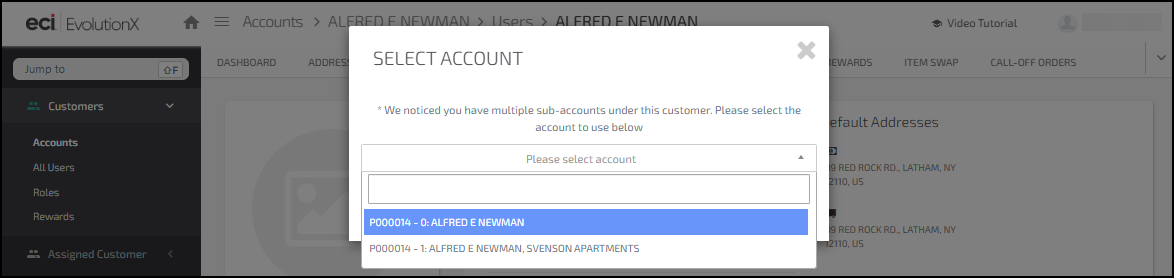
EvolutionX > Select Account List
Using this Login On Storefront feature, we will show you how the current discount shows up on each type of billing account. Since each of these billing accounts are slightly different, the discount features display slightly differently as well. The accounts shown in these examples are Quality Assurance accounts.
Reviewing a Balance Forward Account with a Current Discount
When you click the Login On Storefront button to access a Balance Forward account, the website’s Dashboard page displays.
Convenience Fee Note: If convenience fees are enabled for account payments in the application, Spruce eCommerce calculates the convenience fee based on the user selections and adds it to the payment total for any online payment.
To review the balance forward account details and payment options:
1. Choose the Your Account icon to display the menu options on the right column.
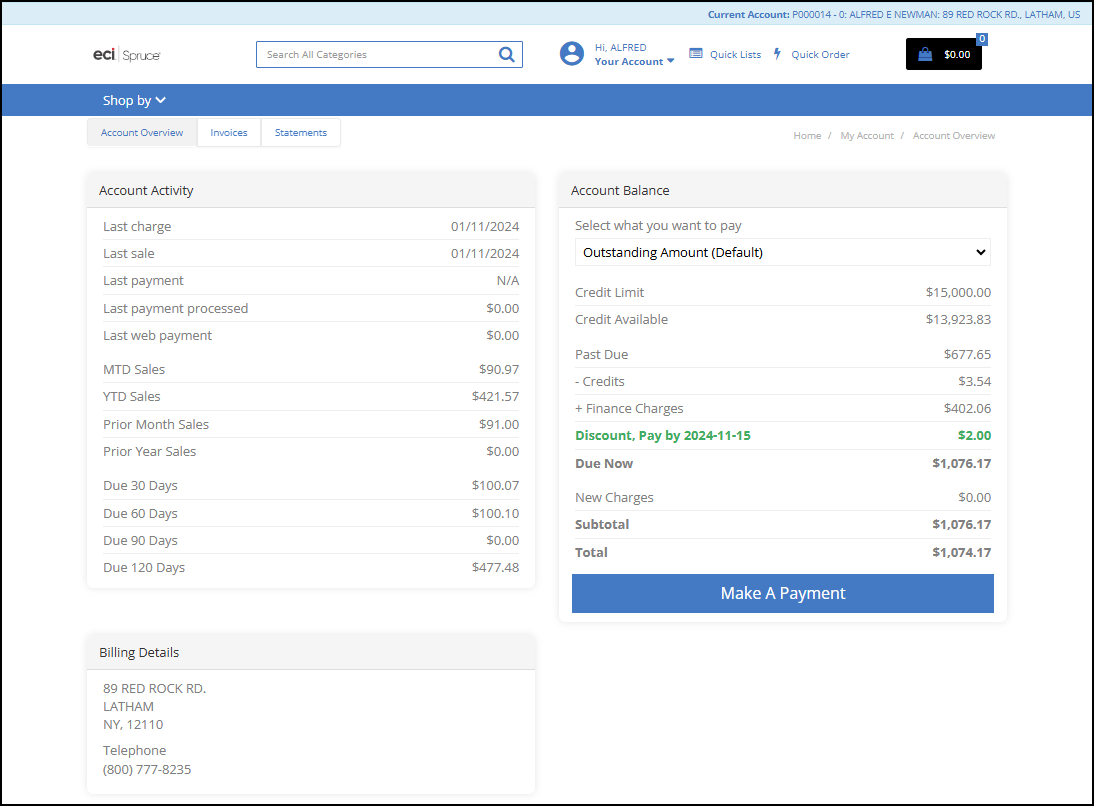
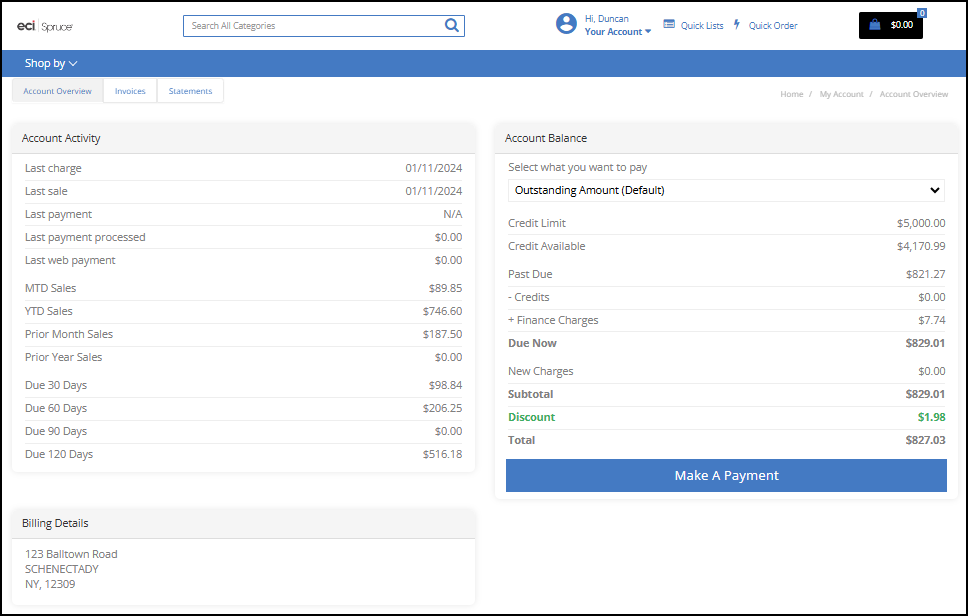
2. From the Management Tools Menu, choose Account Overview. The Account Overview page displays the current Account Activity and Account Balance information.
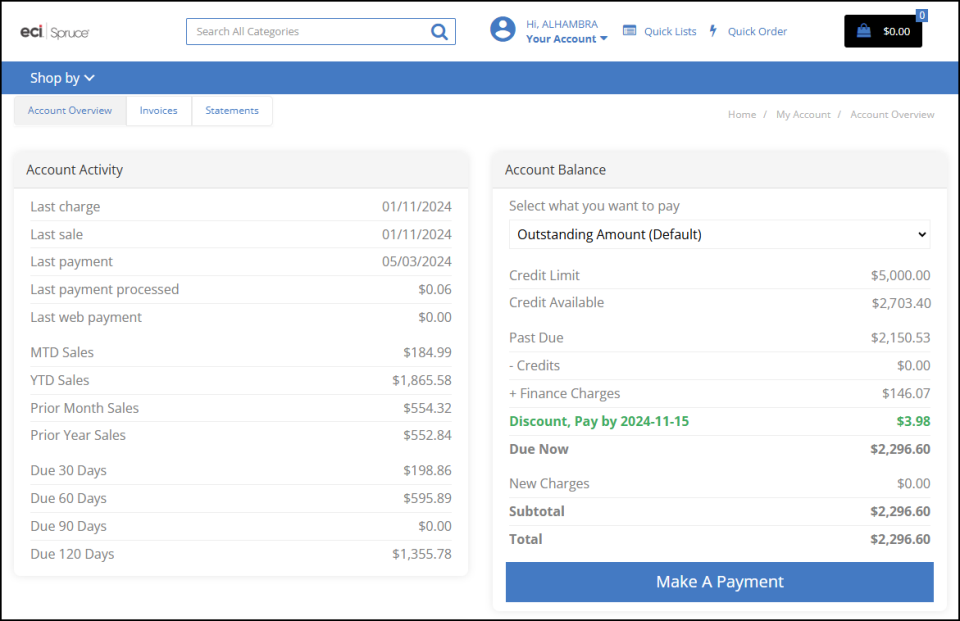
EvolutionX > Balance Forward Account Overview > Discount with Pay Date Shown
Here, the user can make a payment based on the Outstanding Amount, on the Last Statement, or as a Custom Amount, by choosing an option in the Select what you want to pay list.
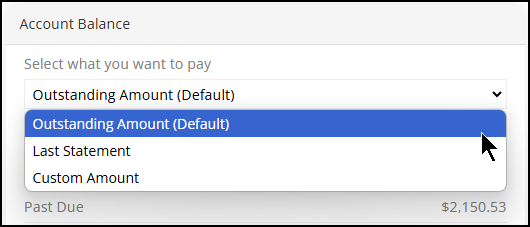
EvolutionX > Balance Forward Account > Select what you want to pay Option
3. Choose one of these payment options from the list:
-
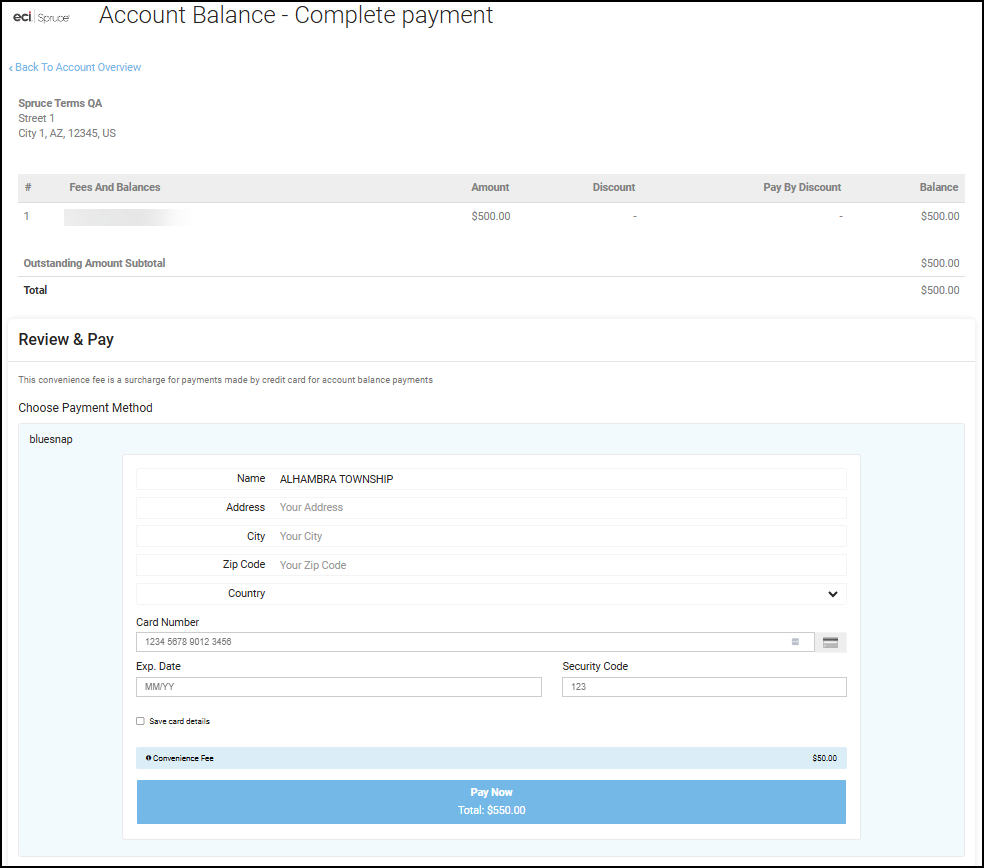
When you select the Outstanding Amount option and choose Make A Payment: this Payment page displays:

EvolutionX > Complete Payment Page > Balance Forward > Outstanding Amount
Note: The discount amount and the discount due date data displays in green.
-
When you select the Last Statement option and choose Make A Payment, this page displays.
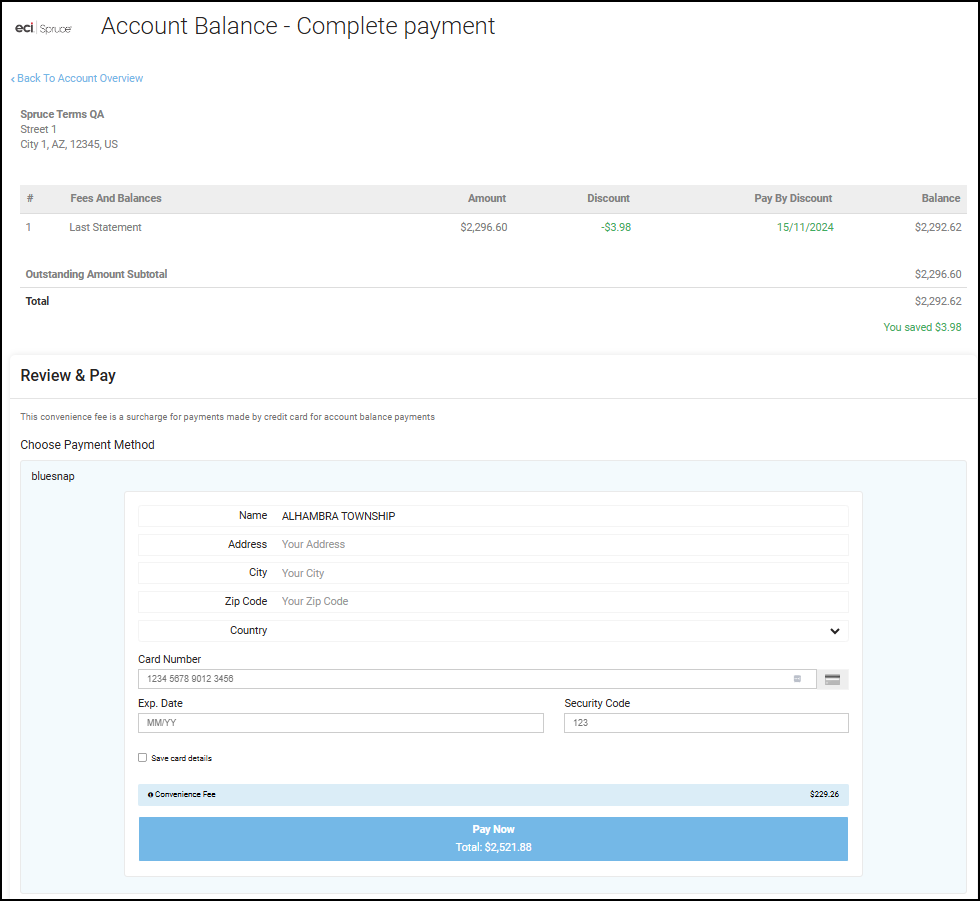
EvolutionX > Complete Payment Page > Balance Forward > Last Statement Amount
Note: The discount amount and the discount due date data displays in green.
-
When you select the Custom Amount option, the Custom Amount field displays.
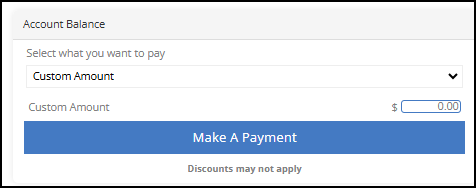
EvolutionX > Custom Amount Entry
a. In the Custom Amount field, enter the payment amount.
b. Click the Make A Payment button. The Complete Payment page displays with the custom amount in it.
EvolutionX >Complete Payment Page > Balance Forward > Custom Amount
Note: Since this custom amount does not pay off the account’s balance, the application does not apply the discount to the transaction.
4. In the Complete Payment page, for all payment types (Outstanding Amount, Last Statement, and Custom Amount), users enter their credit card information and choose the Pay Now option.
After EvolutionX processes the payment successfully, the Account Overview page redisplays and reflects the payment results. In this case, we paid the Outstanding Balance Amount. The application sends a confirmation email to the email address associated with the user account.
EvolutionX > Account Overview > After Outstanding Balance Payment Process
The convenience fee amount is not referenced in the account activity, since it does not apply to the account balance.
Reviewing a Balance Forward, Job Account with a Current Discount
When you access a balance forward account for a user who has access permissions for only one job, you can use that user’s account to access the account information using the Login On Storefront button. The website’s Dashboard page displays.
To review the balance forward, job discount details:
1. Choose the Your Account icon to display the menu options on the right column.
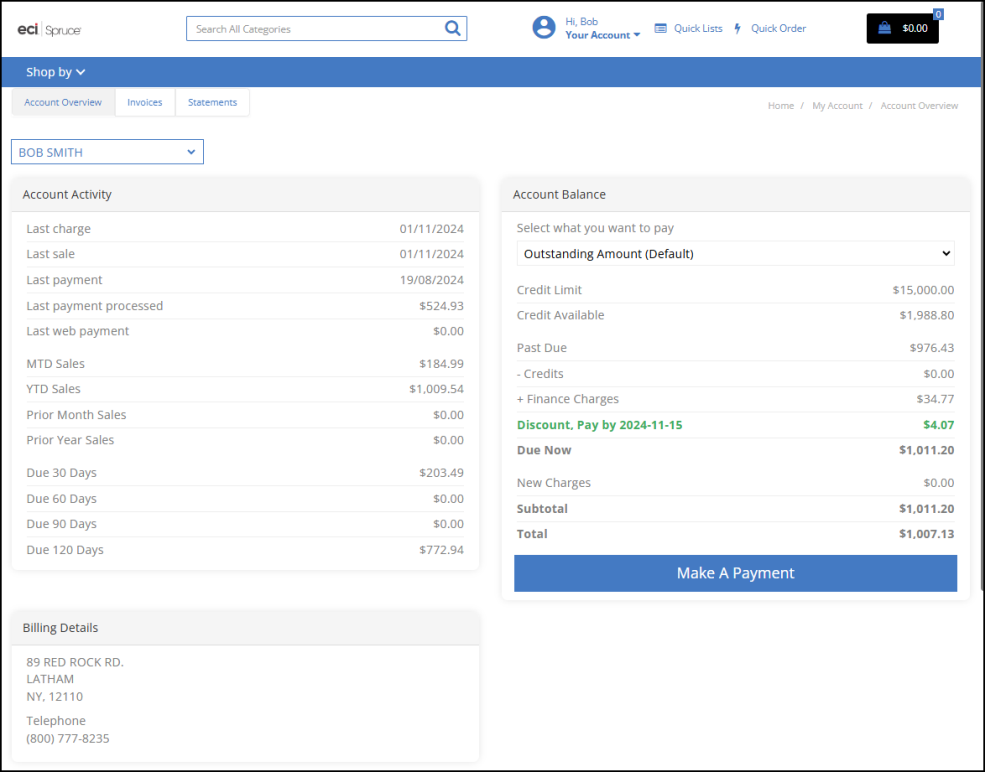
2. From the Management Tools menu, choose Account Overview.
The discount amount and due date information displays in green.
EvolutionX > Account Overview > Consolidated Account > With Discount Amount and Expiration Date
Since this account has many jobs associated with it, and since this user is only authorized to manage the payments for their own job, the Make Payment option does not display.
3. From the Account consolidated list, choose the job that this user is responsible for.
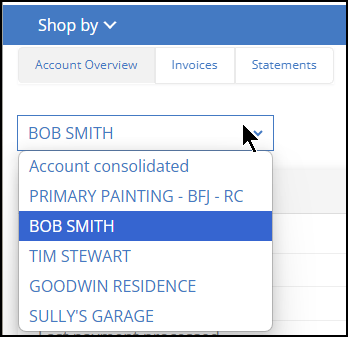
EvolutionX > Account List > Choose Job
The balance details with the discount for the job you selected display.
EvolutionX > Job Balance Details with Discount Amount and Expiration Date
The payment options are the same for balance forward jobs as described in the previous section.
Reviewing an Open Item Account with a Current Discount
After you create an Open Item account user, click the Login On Storefront button to display the Account Dashboard.
To review the discounts associated with an open items account and payment options:
1. Choose the Your Account icon to display the menu options on the right column.
2. From the Management Tools menu, choose Account Overview.
When the user has access to more than one account, a pick list displays so they can choose the account they want to access.
In the case of the account below, the user has access to two related accounts. The row at the top highlighted in blue specifies the account you (the user) selected.

EvolutionX > Open Item Account Overview > Discount with Pay Date Shown
Open Item accounts have different payment options than Balance Forward. When you choose the Select what you want to pay list, these options display.
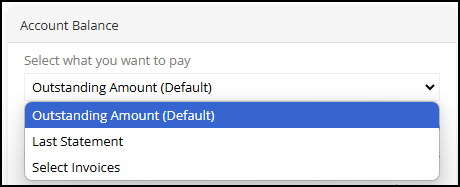
EvolutionX > Open Item > Select what you want to pay Options
3. Choose your payment option from the list:
-
When you select the Outstanding Amount option and choose Make A Payment: this Payment page displays:
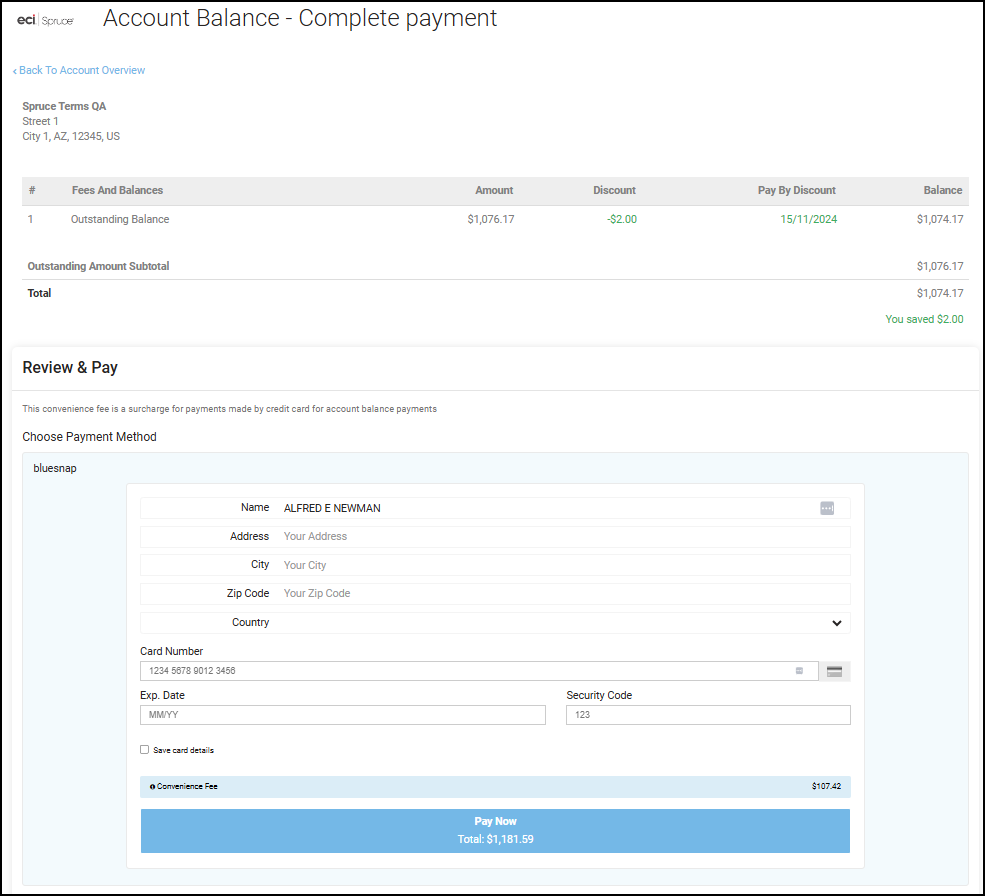
EvolutionX > Complete Payment Page > Open Item > Outstanding Amount
Note: The discount amount and the discount due date data displays in green.
-
When you choose the Select Invoices option, a new Select Invoices button displays.
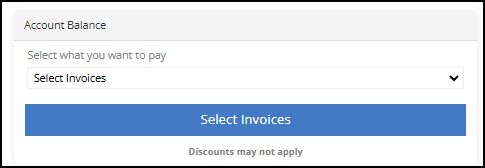
EvolutionX > Open Item > Select Invoices
Note: Because individual invoices may not have current discounts associated with them, discounts may not apply to invoices in the list.
a. Click the Select Invoices button to display the list of invoices associated with this open item account:
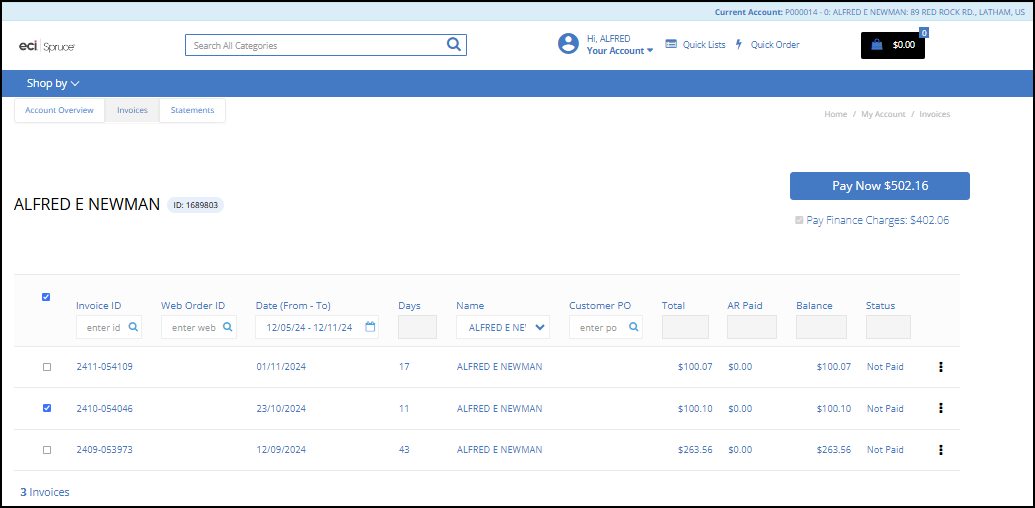
EvolutionX > Open Item > Invoice List
If you have the Pay Finance Charges First parameter enabled in your application, when you select an invoice from the list, the finance charge record is automatically selected by default. The Pay Now button at the top of the page keeps track of the transaction total (minus the convenience fee charges) as you select invoices from the list.
b. Select the check boxes beside the invoice(s) you want to pay.
c. Click Pay Now to continue. The Complete Payment page displays.
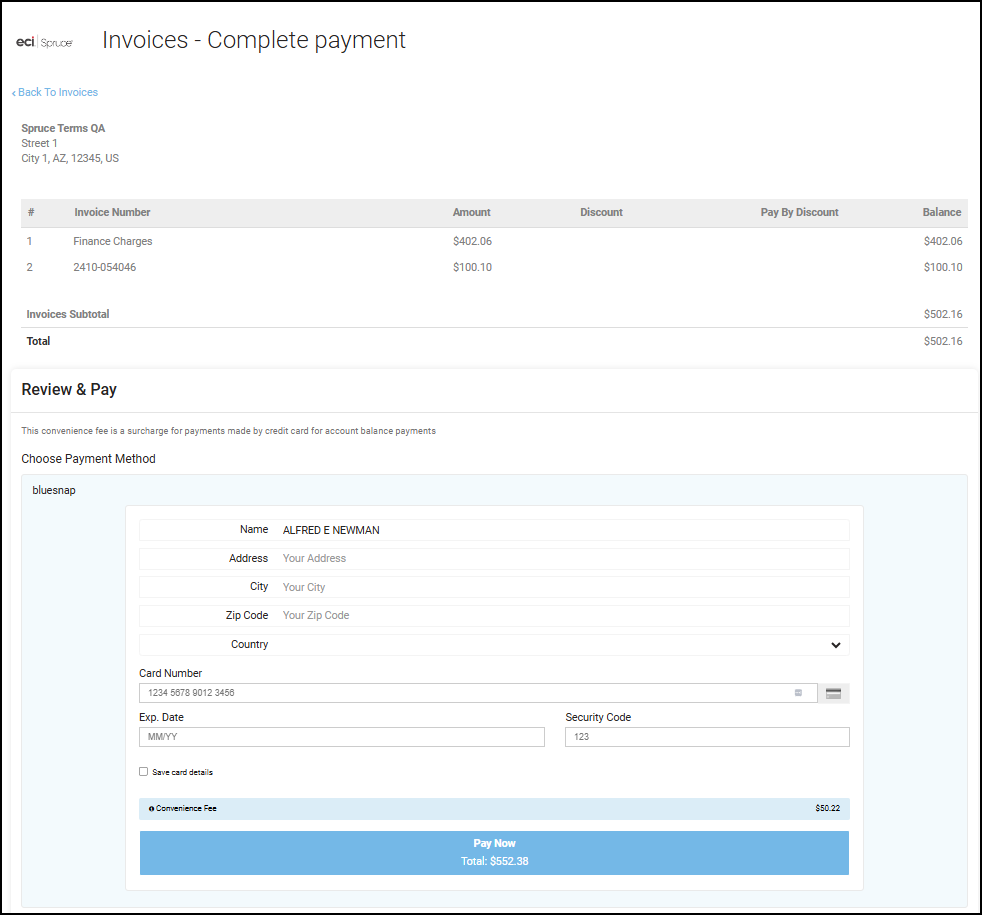
EvolutionX > Complete Payment Page > Open Item > Select Invoices Listed
The list includes the Finance Charges and Invoice(s) you selected. The Convenience Fee amount displays above the Pay Now button.
4. Complete these payment settings with credit card information and choose the Pay Now button.
In this case, we paid the Finance Charge amount and an individual invoice. After Spruce eCommerce processes the payment and it is successful, a message displays listing the invoices that were paid and provides a link to the Invoice History.
The application sends a confirmation email to the email address associated with the user account.
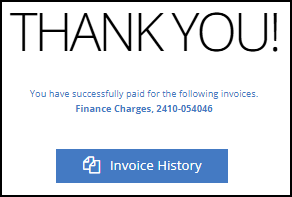
EvolutionX > Open Item > Successful Payment of Individual Invoices Message
When you select the Invoice History button, the application redisplays the invoice list showing the paid invoice.
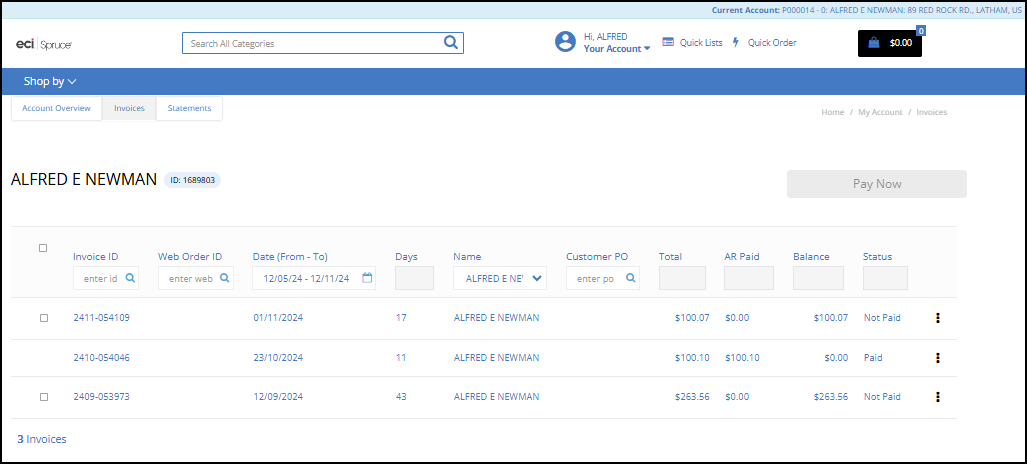
EvolutionX > Open Item > Invoice List after Payment
5. When you return to the Account Overview page, the discount amount and due date entries remain.

EvolutionX > Open Item > Showing Payment Results
The new Total reflects the amount remaining, minus the paid Finance Charges, the paid invoice amount, and the remaining discount.
Reviewing an Open Item Terms Account with Current Discounts
When you access an Open Item with terms account and click the Login On Storefront button, the website’s Dashboard page displays.
Convenience Fee Note: If convenience fees are enabled for account payments in the application, Spruce eCommerce calculates the convenience fee and adds it to the payment total for any online payment.
To review the open item terms account details and payment options:
1. Choose the Your Account icon to display the menu options on the right column.
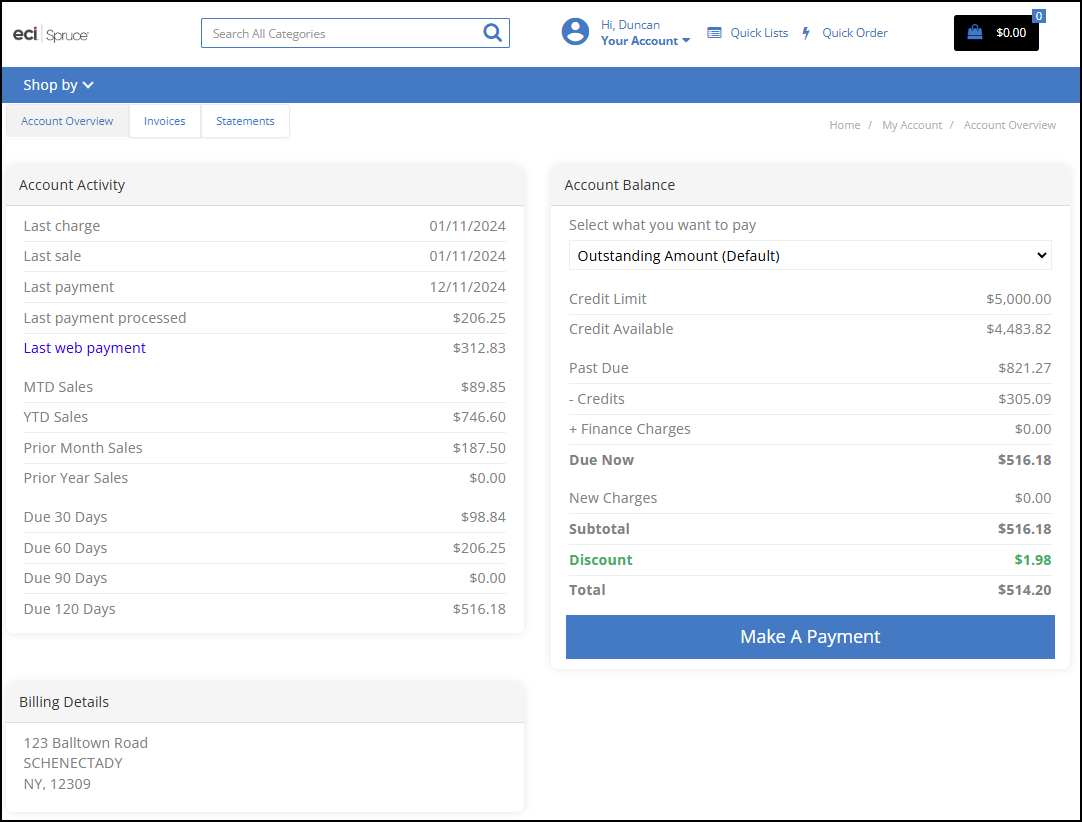
2. From the Management Tools menu, choose Account Overview.
EvolutionX > Open Item Terms > Account Overview Page
For Open Item Terms accounts, the discount only applies if you pay the entire outstanding amount in full. These accounts have different payment options than Open Items accounts do. When you choose the Select what you want to pay list, these options display.
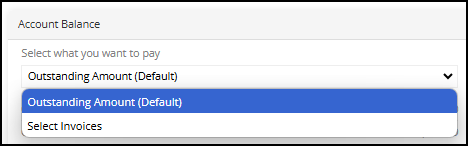
EvolutionX > Open Item Terms Payment Options
3. Choose your payment option from the list to display these options:
-
When you select the Outstanding Amount option and choose Make A Payment: this Payment page displays:
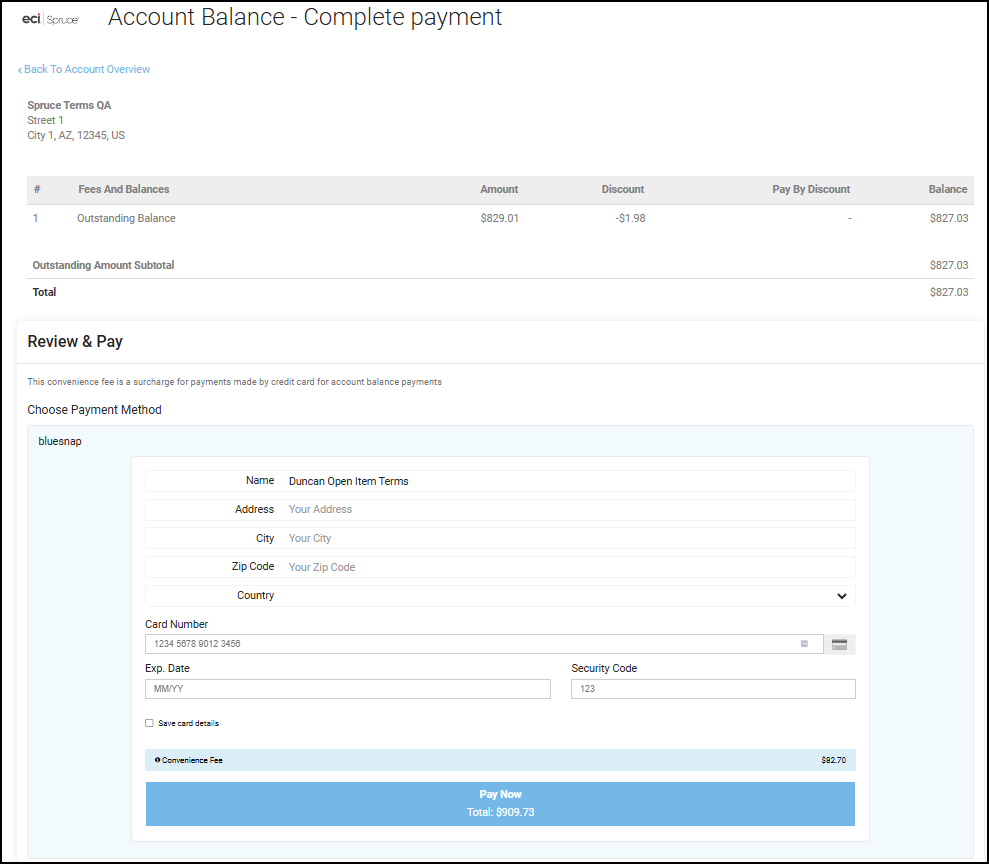
EvolutionX > Open Item Terms > Complete Payment with Outstanding Balance
-
When you choose Select Invoices from the list, the Select Invoices button displays.
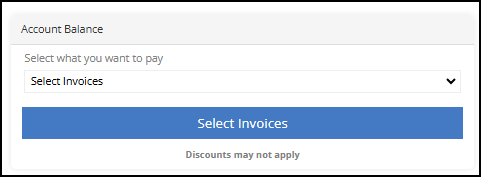
EvolutionX >Open Item Terms > Select Invoices
a. Choose the Select Invoices button to display the list of open invoices associated with this account.
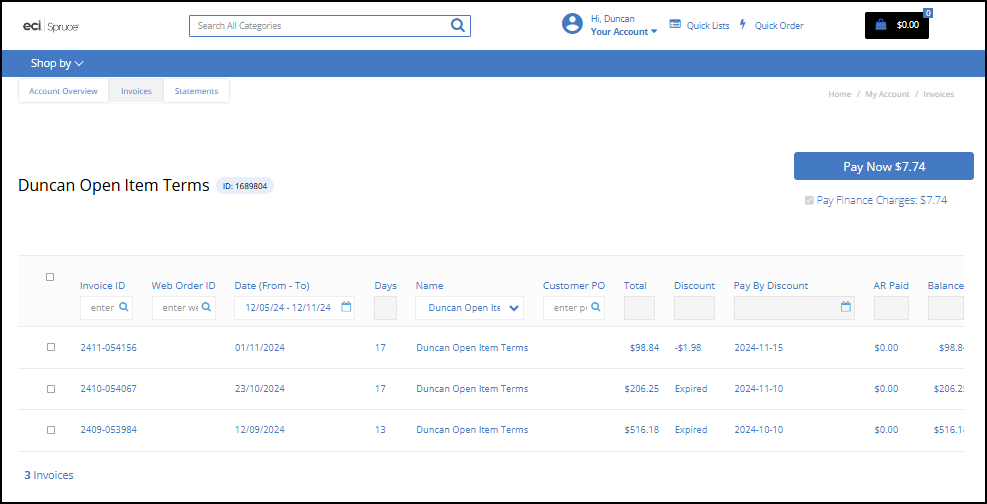
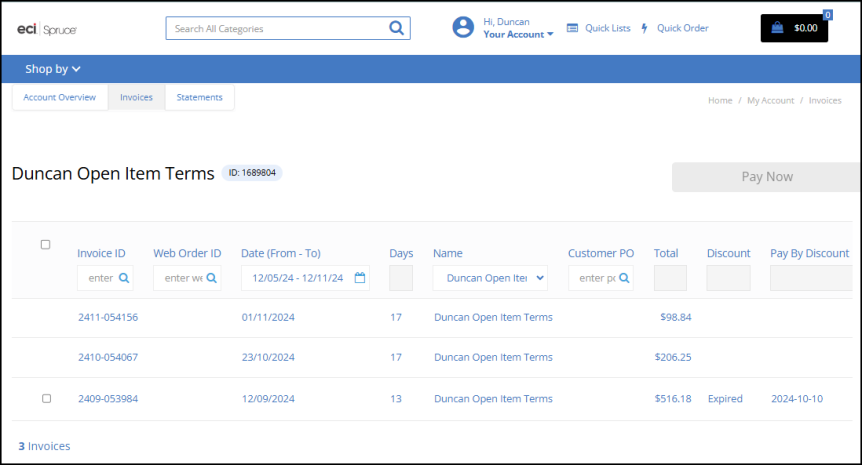
EvolutionX > Open Item Terms > Select Invoices List
If you have the Pay Finance Charges First parameter enabled in your application, when you select an invoice from the list, the finance charge record is automatically selected by default. The Pay Now button at the top of the page keeps track of the transaction total (before convenience fee charges) as you select invoices from the list.
b. Select the check boxes beside the invoices you want to pay.
c. Click Pay Now to display the Complete Payment page. We follow the Invoices payment process in this example. The Outstanding Amount payments are the same for all billing account types.

EvolutionX > Complete Payment > Open Item Terms > Invoices Listed
Note: Because you are not paying off all of the invoices, the discount that is listed is not applicable to the transaction.
4. Complete these payment settings with credit card information and choose the Pay Now option.
In this case, we paid the Finance Charge amount and two invoices. After EvolutionX processes the payment and it is successful, a message displays listing the invoices that were paid and provides a link to the Invoice History, similar to the Open Item example.
The application sends a confirmation email to the email address associated with the user account.
5. Click the Invoice History button to display the list of invoices associated with the open item terms account. The remaining invoice shows that the discount has expired.
EvolutionX > Open Item Terms > Invoice History with Paid Invoices Listed
6. To review the results of the payment, choose the Account Overview tab.
EvolutionX > Account Overview after Payment
The new Total reflects the amount remaining, minus the paid Finance Charges, the paid invoice amounts, and the remaining discount.