As you add a new account to the application in the Account Maintenance form, the application uses the information you enter as the primary contact for the account. This is considered Contact 0 and is used by default for all account communications. Many additional contacts can be associated with the original record and you can modify these contact records at any time.
You can add Contacts (Alt-O) to an account or vendor using various maintenance forms, but adding new contacts works the same way in each form. A number of contact-related fields are included (phone numbers, email, etc.).
The application adds Job Contacts from the originating account's record. To add a new contact to a job record, add the contact to the related account first and select that contact record from the To Contact list on the Select tab in the Job Maintenance form.
Adding a Contact using the Contacts Tab
Contact 0 is typically the person that receives all correspondence that is sent by the application to the business. You can add additional contacts or modify the first contact at any time.
To add or modify a contact associated with an account:
1. From the Main Menu, choose Point of Sale > Database > Account to access the Account Maintenance form.
2. From the Account list, choose the account you want to add the contact to.
3. Click the Contacts tab to display the contact fields.
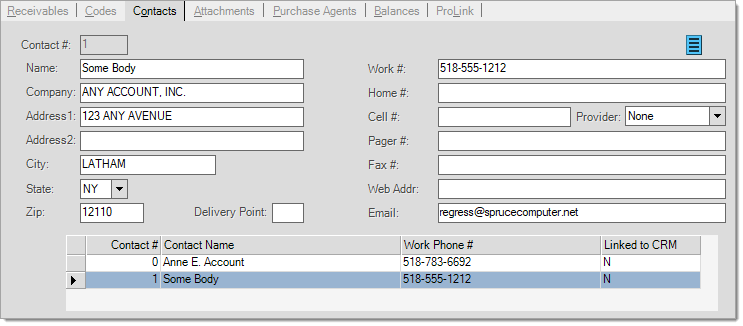
4. In each field enter the information you need to effectively communicate with your customer contact. There may be additional fields in this form if the account participates in a loyalty program that tracks additional information for a contact.
5. When you have completed your entries, choose the appropriate function key to save this new information:
-
When you add a new contact, choose the Save (F6) key before you process the form.
-
When you edit an existing contact, choose the Modify (F6) key before you process the form.
Important: Selecting these function keys saves the contact information to the account record but not to the database. If you choose the Process (F12) key without saving using the F6 key first, the contact information you entered is not saved to the database. If you process a form that contains new or changed contacts without choosing this Save or Modify function key, a warning message displays to remind you to click the F6 key before proceeding:-
Sub folders have unsaved changes
-
6. After you save the contact entries, choose Process (F12) to save the changes to the database.
Some settings at the Contact level, such as a fax number or email address, are required for statement delivery by fax or email. You need to complete these settings before choosing a delivery method that would use them.
You can assign multiple email addresses to the same Contact. To do this, separate each individual address with either a comma (,) or semicolon (;). Multiple addresses are split into separate "mail-to" recipients, and all addresses will be visible to each email recipient.
A Note about Email and DeliveryEmail is a fast, easy, and inexpensive way to deliver copies of documents to customers and vendors; however, users should also keep in mind that email delivery is not always guaranteed. Even with a valid email address, it's possible that any given message may never reach the intended recipient. In addition, there isn't a foolproof way of confirming delivery without some type of response from, or communication with, the intended recipient. From the application, it's possible to see if an email was submitted successfully or not to your designated SMTP server, but this is still no guarantee of delivery. An email may have a valid domain, but not be a valid account. Sometimes the recipient's mail server will bounce the message back to the sender, but not always. It is also possible for the mail server host or the recipient's mail application to automatically delete any messages it thinks are spam. Before you rely on email for important communication, such as statements and billing, we suggest that your company put in place some type of email verification process. This may be as simple as sending one manual test email to the customer and asking them to reply as confirmation they've received the message. After receiving the confirmation, you then enable email delivery. In addition, it may be wise to provide customers who choose email delivery with some form of agreement, disclaimer, or statement regarding possible delivery issues. For example, this might inform them that email delivery is not guaranteed and that they are still responsible for paying their bill even if they don't receive a copy of their statement electronically. This statement could even be included in the initial confirmation email along with a message that their reply constitutes agreement with your company’s terms. |
Cell Phone # and Provider
You can add the cell phone number for informational purposes only or you can use it to send a text message for some Job delivery notifications (via email) to the cell phone listed. To use "text" notifications, a valid cell phone and carrier are required. The list of carriers is used to select the appropriate domain to use when sending text messages. Some providers may block text messages send via email in order to limit spam. In these cases, the customer may have to unblock such messages before they will receive notifications via text message.
 Contact Settings for Canada
When the application has Canadian region settings (as set in the System Parameters), the labels for the State and Zip fields are renamed Province and Postal Code.