Release Details for Version 24
This section shows you how to use the changes in the version 24.0 release.
Key Updates:
Using Cubes to Calculate Volume for Delivery and Storage
Global Contract Update: Group/Section Items and Floating Price Levels
Filtering Statements by "Branch" Made Easy
Using Unlimited Adders in Purchase Orders
Updates to Cayan Device Endpoints Keep You in Sync
Using the ePad Vision to Capture Signatures (AU, CA, Caribbean)
Update to Allow $0 Deposits on Ecommerce Orders
Allowing Customers to Pay Account Balances Online Automatically
Stability and Security Updates
Making Job Payments Using ProLink
Send Your Product Suggestions to the Ideas Portal
Using Cubes to Calculate Volume for Delivery and Storage
We have added a new measurement type, Cubes (cubic unit of measure), which you can use for delivery, purchasing, and storage calculation purposes. It gives you a way to estimate the amount of space a product will take up. You can use weight and cubes together to determine whether an order is sized appropriately for a delivery vehicle, or to determine whether the amount of storage space you have is sufficient for the items you are purchasing. Using Cubes can give you visibility into the dimensions of materials for Point of Sale and Purchasing so you can predict and adjust quantities for specific delivery vehicles and for your available storage space.
Cubes calculations are based on the base unit of measure for each item, calculated using the regional settings appropriate to your region (inches, feet, centimeters, meters, etc.). You use the same calculation method to determine cubic measurement: length x width x height (including packaging) to determine the cubic value per item. If you have already populated the Lumber/Timber/Sheet Dimension fields in the Measures tab of the Item Maintenance form, this calculation is provided:
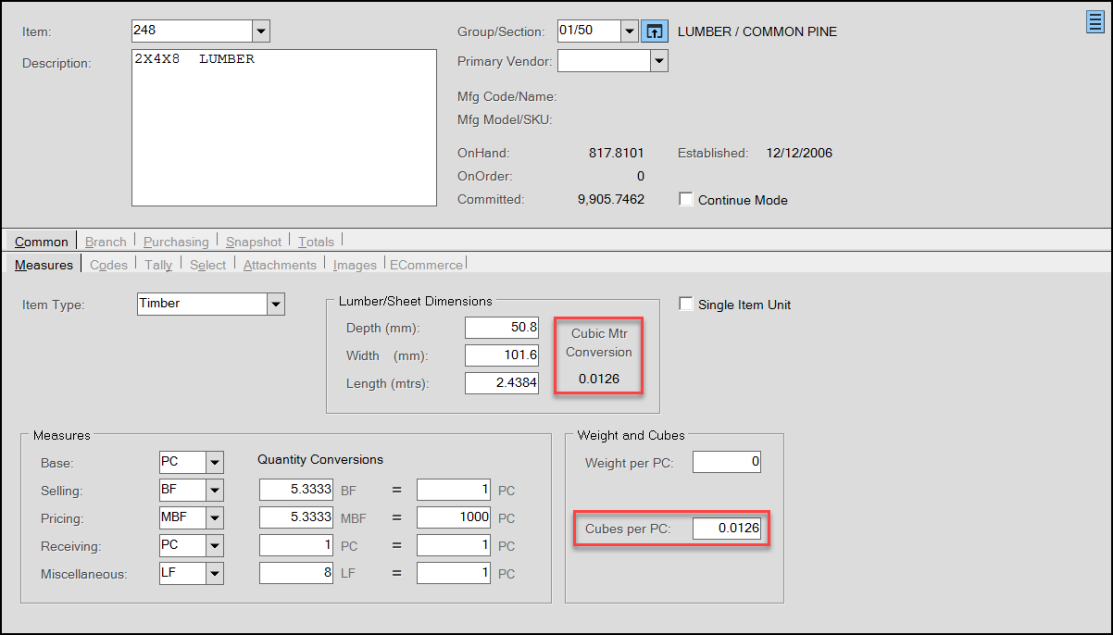
Item Maintenance Form with Cubes Field Highlighted
Important Note: We do not enter this information for you, as only you can determine the appropriate measurement process for your business and products. We recommend that you consider this calculation carefully.
After you add a Cubes entry to an item in Item Maintenance, the application uses it to determine the cubic volume of the items you add in Point of Sale (data grid, folders, and documents), Purchase Order Entry, Delivery, Load Scheduling, and Truck Maintenance, whenever you use these features. We cover these updates in this section.
Note: You do not have to update every item in your inventory with this information. Small items (and you can decide what that means), may not affect storage or transportation that much. Consider the items you transport or purchase in large quantities for this feature.
Defining Cubes Entries
To include Cubes values in Point of Sale, Delivery, Purchasing, etc. you need to add the information to the item records first. The Cubes information you add there is used throughout the application to calculate the volume of the items you sell. It makes sense to use the same measurement unit (feet, meters, etc.) for all inventory items so the application can compare like values when evaluating space. Consider this scenario:
ABC Building Supply decides to use cubic feet (or meters) as the appropriate Cubes measure for their business. When considering the products to sell, they could look at how they measure their inventory to determine the appropriate cubic measurements and use a variety of strategies:
-
for lumber, if you use a base unit of measure of EA, you could divide the board footage for an item by 12 (feet) or 10 (meters)
-
for insulation, you could use the cubic foot/meter value directly from the supplier
-
for sheet goods, which may also use EA as the as the unit of measure, you can use an online calculator tool to define the cubic measurement, like https://everydaycalculation.com/wood-cft.php or https://www.thecalculatorsite.com/misc/cubic-meters-calculator.php
-
for any item type, you can do the math: Length (ft/m) x width (ft/m) x depth (inch/mm) /12 or /10
It makes sense to use the same “units” of measure for all your items that you want to quantify by cubes.
Before you get started, consider these guidelines:
-
Base your cubes calculations on the Base UM of the item.
-
In general, the cubes calculation is Length x Width x Depth of the base unit of measure plus any packaging that may affect the dimensions of the item for storage or delivery
Using a uniform measurement type allows the application to apply the same measurements when you request space assessment for delivery or storage.
When adding Cubes for Unit Tally items, set the Cubes entry to include the Cube values that tally item is based on.
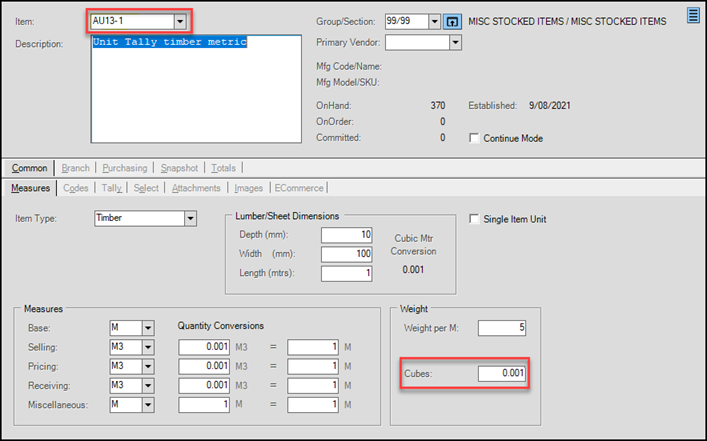
Item Maintenance Form > Cubes Entry for Unit Tally Item
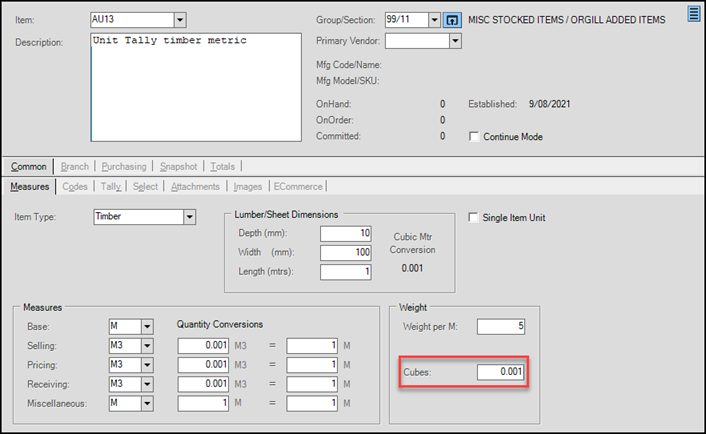
Item Maintenance Form > Base Unit Tally Item with Associated Tally Item Cube Entry
Adding the Cubes Values to Items in Item Maintenance
B-108622 – After you decide how to calculate the Cubes values for your inventory items, you can add them to the Cubes field in the Item Maintenance form. Anyone with inventory entry permissions can add Cubes entries.
To add Cube values to an item:
1. From the Main Menu, choose Inventory > Database > Item to display the Item Maintenance form.
2. In the Item field, select the item you want to update.
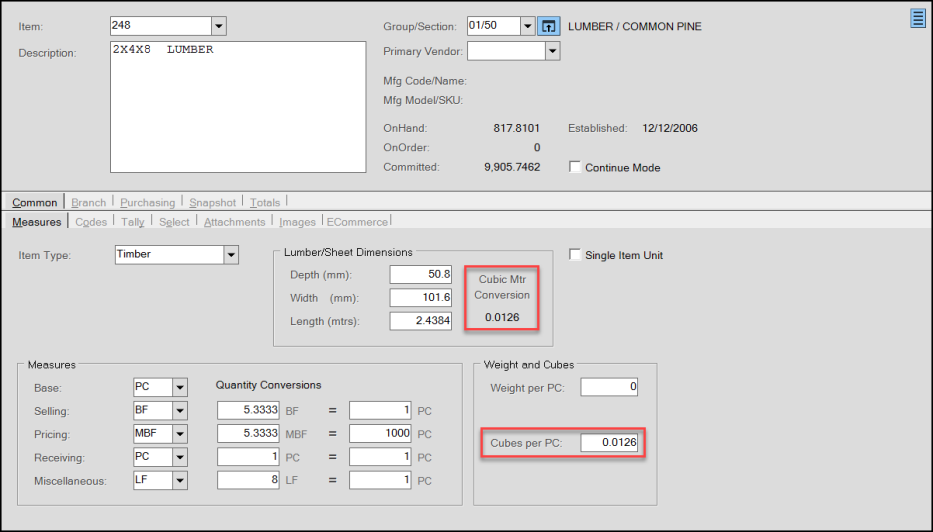
Item Maintenance Form > Cubes Field Highlighted
3. Using the length, width, and depth values of the base item, calculate the cubes value for the item.
4. In the Cubes field, enter the result of the cubes calculation or use your own process to quantify the Cubes entry.
5. Choose Process (F12) to save the Cubes value.
Working with Cube Values in Point of Sale
B-108624, B-108623 – After you add Cubes values in Item Maintenance, you can review and use them in the Point of Sale forms (Sales, Orders, Quotes, Direct Shipments, and Tickets).
Note: We have also added cube values to the e-Commerce API for order requests. Weight and Cube measurements are both recorded in these orders.
To view the Cube settings of items in the data grid:
1. From the Main Menu, choose Point of Sale > Sales to display the Sale Entry form.
2. In the data grid, enter an item that you have set a Cubes value for.
3. To see the Cubes entry for this item, choose Folders (F4) and choose the Info tab.
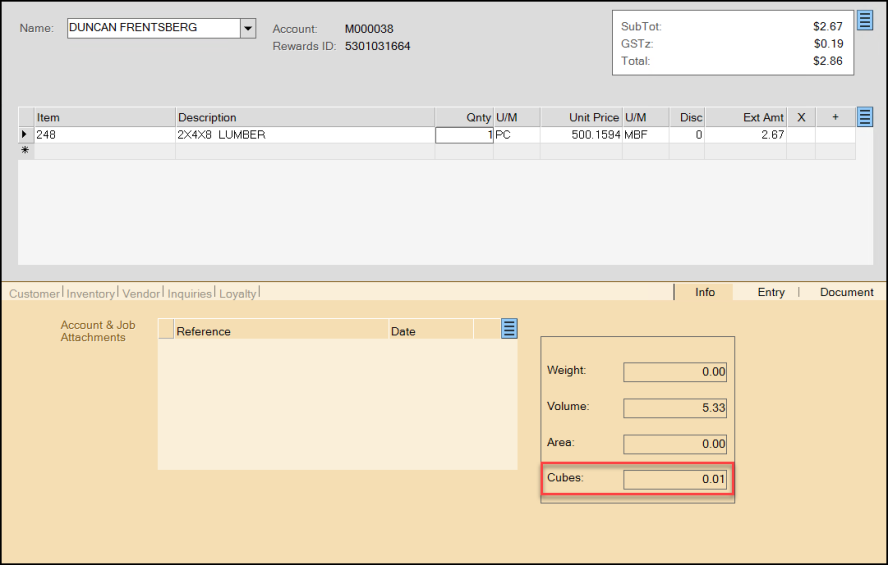
Folders > Info Tab > Total Cubes Entry
4. When you update the quantity in the data grid and check the Total Cubes entry again, the application updates the Total Cubes entry.
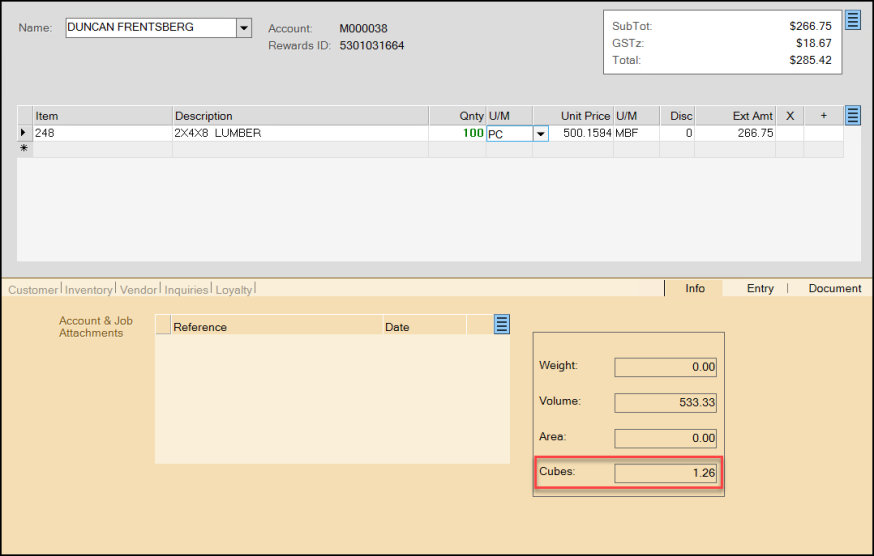
Folders > Info > Updated Cubes Entry
5. If you would prefer to see this information in the data grid and the summary area, you can update the data grid style, by selecting Style (F3) and choosing the Cubes Display option.
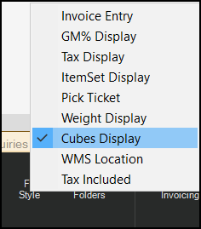
Style > Cubes Display Option Selected
Selecting this option updates the data grid and the summary section of the form.

Sale Entry with Cubes Display Style
Note: In Cubes Display mode, the Cubes Display entries are read-only, If you want to make changes to the settings in the data grid, return to the original Style format (such as Invoice Entry).
The rest of the Point of Sale process is the same.
Cubes Changes in Point of Sale Documentation
B-108625, B-108626, B-108627, B-108628 – We have also added the Cube information to the Point of Sale footage documents, including Invoices, Orders, Quotes, and Tickets. You can review these customer documents with Cubes information after you complete the transaction. This process works the same way for all transaction types.
To display cubes information in your customer-facing documents:
1. From the Tool Bar, choose Documents. The Documents form displays.
2. From the Document # list, choose the Point of Sale document with cubes information in it. The document displays.
3. Right-click the document to display the context menu and choose Format > InvoiceFootage.
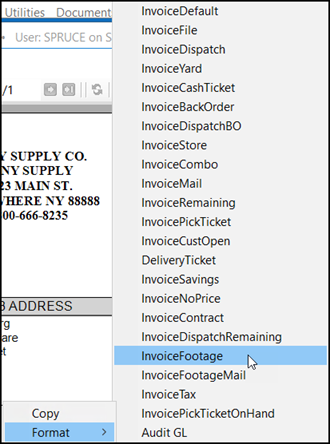
Documents Form > Format > Invoice Footage Option Selected
For Orders, you choose OrderFootage. For Quotes, choose QuoteFootage. For Tickets, choose TicketFootage.
After you select the Footage entry from the list, the customer document redisplays to show the Cubes and other weight information. Here are some examples.
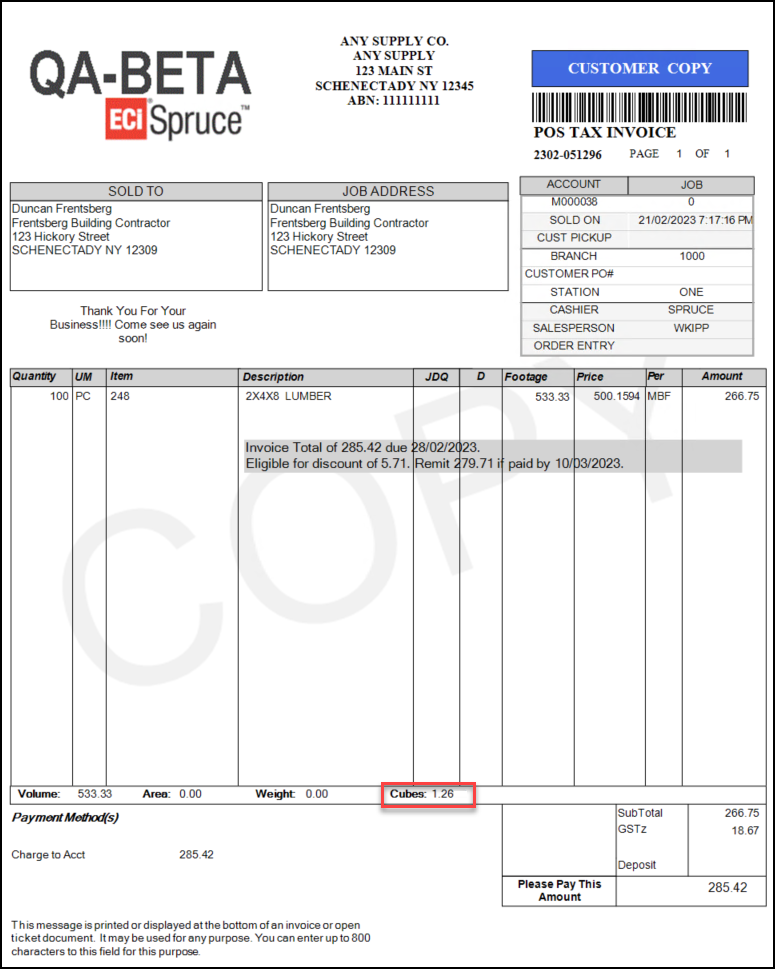
Documents Form > Invoice Footage Format Type with Cubes Amount
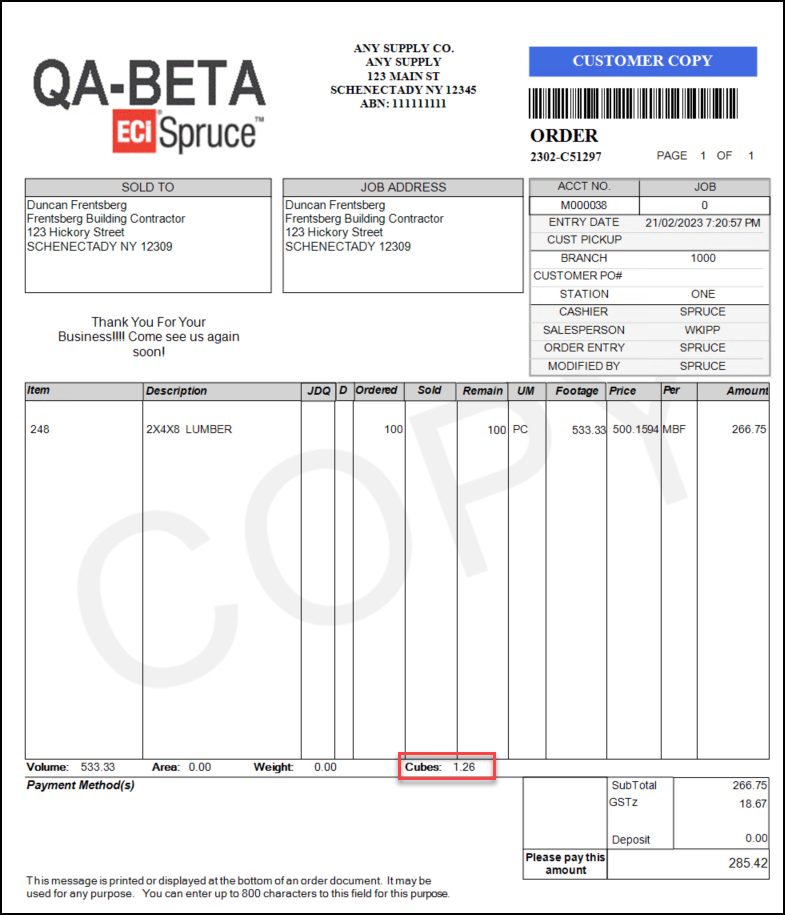
Documents Form > Order Footage Format Type with Cubes Amount
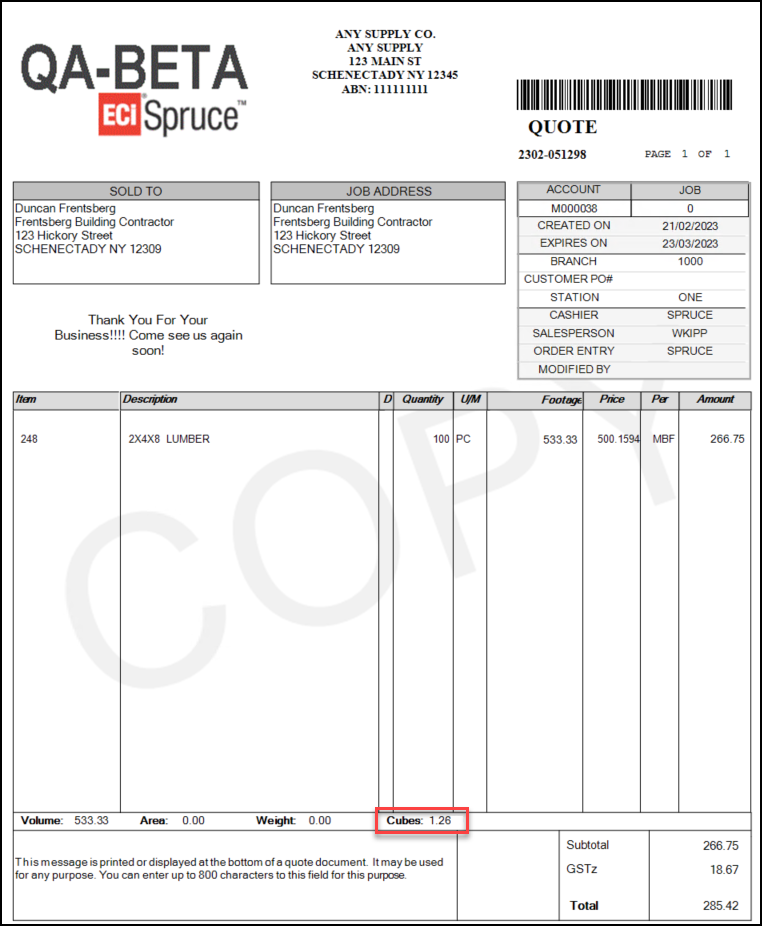
Documents Form > Quote Footage Format Type with Cubes Amount
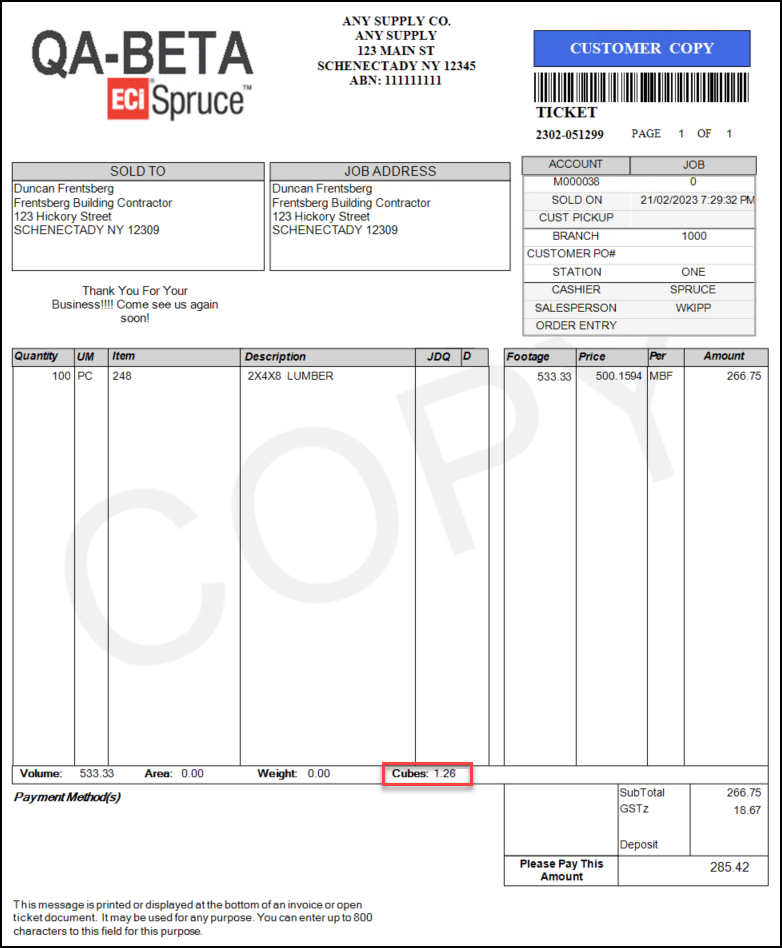
Documents Form > Ticket Footage Format Type with Cubes Amount
Cubes Data Added to Purchase Order Entry
B-108632 – It is helpful to have the Cubes data in the Purchase Order Entry process to ensure you have enough storage space for the materials you are ordering. It would also be useful to know the Cubes values of your supplier’s delivery vehicles so you know if you are ordering more than a single load’s worth of stock.
To see the cubes information in Purchase Order Entry:
1. From the Main Menu, choose Purchasing > Order Entry to display the Purchase Order Entry form.
2. From the PO # list choose New.
3. From the Vendor list, choose the vendor that supplies the item you have added cubes values for.
4. In the data grid, enter an item you have added cubes values for.
The application displays the weight, volume, and cubes values in a new box at the top of the form. These values update when you add more items with cubes, weight, and volume values to the data grid.

Purchase Order Entry with Ext Cubes Values for the Selected Quantity
5. Choose Style (F3) to display the context menu and choose Weight/Volume display.
The data grid updates to display the Ext Cubes value for the quantity you selected.
Note: To make changes in the data grid, return to the Order Entry style. The Weight/Volume display option is view-only.
6. Alternatively, you can choose Folders (F4) and choose the Info tab, to see the Cubes values of the selected item.
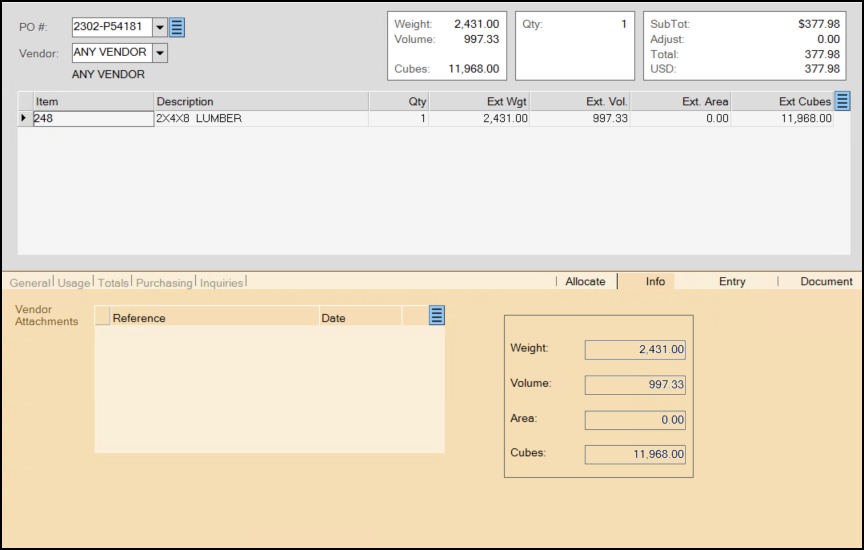
Purchase Order Entry with Cubes Value in Folders
Adding Quantity on Hand to Order Pick Ticket Documents
B-109704, B-109705, B-109946 – When you send someone out to collect items a customer has ordered, you use a pick ticket. It might be useful to see the Quantity on Hand values of those inventory items in the Pick Ticket document to prevent searching for items that are no longer in stock. For this project, we modified the OrderPickTicket style to add the On Hand quantity. This change is for Order-based documents only currently.
We define the term, On-Hand, as the current number of items in stock at the time the document is viewed or printed. This will not be the quantity on hand after the pick ticket task has been completed.
Updating your Pick Ticket Document Settings
To update your current Pick Ticket settings and add On Hand values to the Pick Ticket:
1. From the Main Menu, go to Maintenance > Database > Device to display the Device Maintenance form.
2. Choose the Device Name of a station used to print these documents and choose the Printer button at the top of the form.
3. In the PS Customer Orders row, in the Style # column, choose the down arrow to see the document type options.
Note: Choose the appropriate Selection section you use for the Pick Ticket printing.
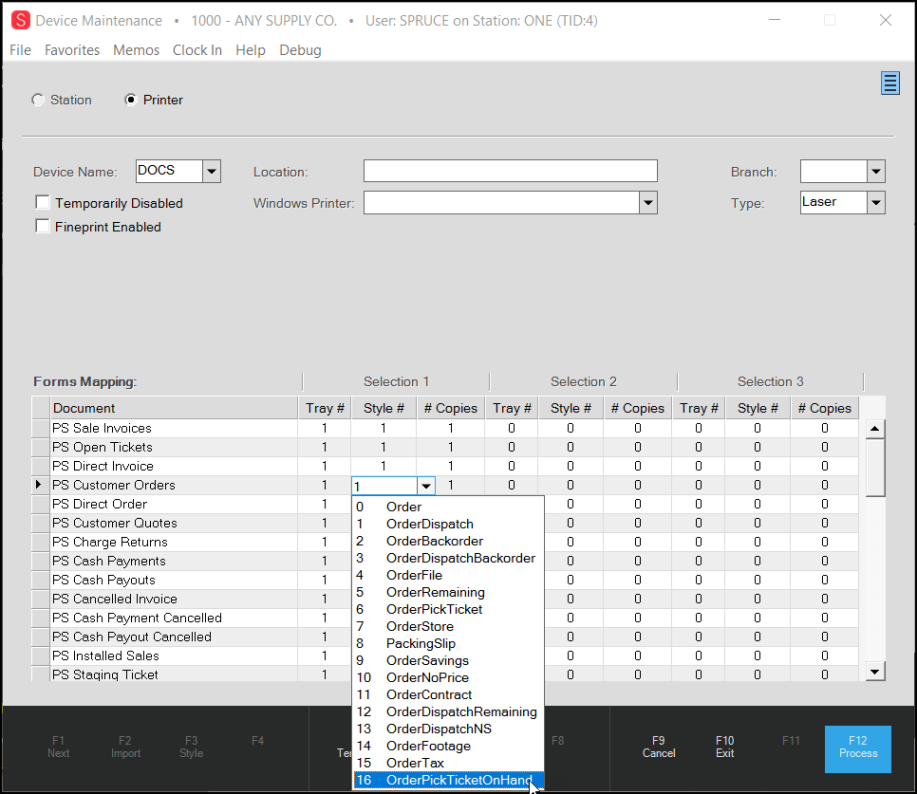
Device Maintenance with OrderPickTicketOnHand Document Style Type Highlighted
4. From the list, choose OrderPickTicketOnHand. The OrderPickTicket style remains in the list; the On Hand column does not display in the document when you leave that style selected.
5. Choose Process (F12) to save this change.
6. Repeat steps 2 -5 for each station that requires this update.
Displaying the Quantity on Hand Information in the Pick Ticket
It is important to remember that the quantity on hand, when printed at the time the order is placed, is accurate as of that time.
When you are ready to review or print the pick ticket:
1. From the Toolbar, choose Documents to display the Documents form.
2. From the Document # list, choose the customer’s order document.
The application displays the customer copy of the order.
3. Right-click the document to display the context menu.
4. Choose Format > OrderPickTicketOnHand.
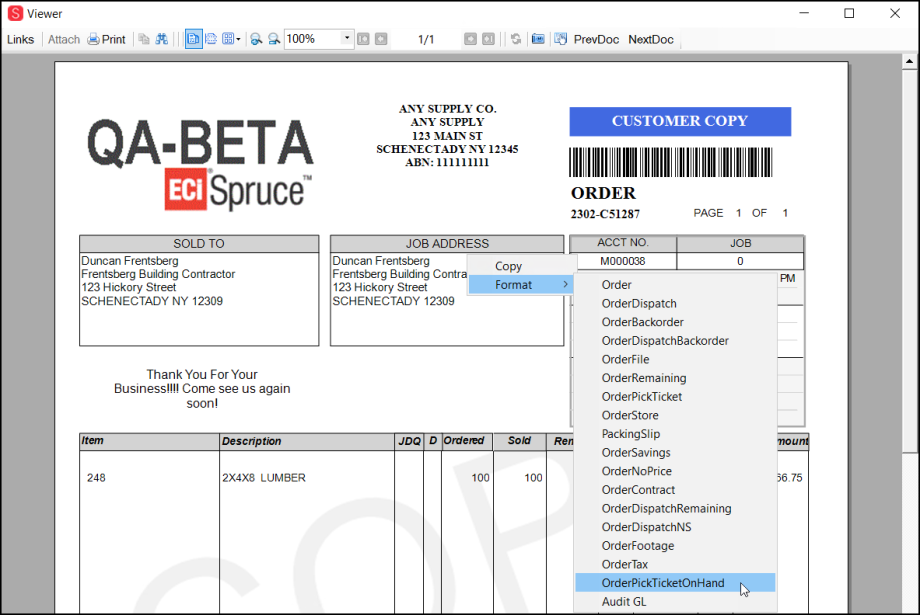
Document Viewer > Context Menu > OrderPickTicketOnHand
The document updates to show the new format. It also specifies when the quantity on hand was last available.
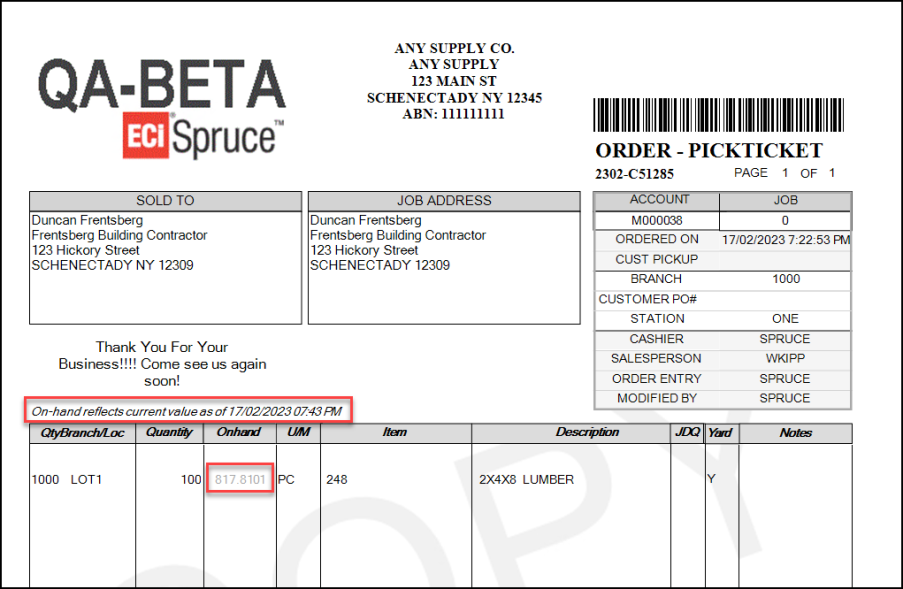
Order Pick Ticket with Quantity On Hand Amount Shown
Updates to Cayan Device Endpoints Keep You in Sync
B-109331, B-109333, B-109335 – As Global Payments Integrated continues to update the MerchantWare Credit and Gift Card APIs, we will continue to help you update your Cayan system settings to stay in sync. This helps you stay competitive with other businesses and improves security of your Cayan-based transactions. The release updates your end points and URL settings for your installed Cayan Point of Sale equipment. This update does not require changes to your device or station settings.
We have updated the business logic used to process your transactions to take advantage of the updated tokenized Card on File features. This update provides better encryption for your customer’s credit card data so that hackers cannot decode it.
As before, when an account customer uses a credit card to pay for a transaction, the application prompts Cashiers to add the card token to the customer’s account:
-
If the customer responds Yes, the application encrypts their card information to a secure token to make the card data available for future account or Point of Sale payments.
-
If the customer responds No, the application processes the current transaction only and does not encrypt the card data, even if the customer chose to save it before.
We tested the Gift Card API to ensure that you can still process stored value gift card activations and updates and display current gift card balances on demand.
Review the Updated MerchantWare 4.6 Settings
B-106150, B-106151 – We have set up your MerchantWare 4.6 settings for you as part of your upgrade process. Administrative users can see the new settings in the system parameters. These settings allow you to use Card On File-saved data for Sales, Orders, Direct Shipments, Account Payments, and Payouts.
To review the MerchantWare 4.6 settings to Cayan Credit Card Processing:
1. From the Main Menu, choose Maintenance > Database > Parameters to display the Parameter Settings form.
2. Choose the Software tab to display the Credit Card Processing options.
3. Beside the Interface: Cayan box, choose the Settings button to display the Cayan Settings options.
4. From the Branch list, choose the first branch that will use the MerchantWare 4.6 settings. The branch settings display:
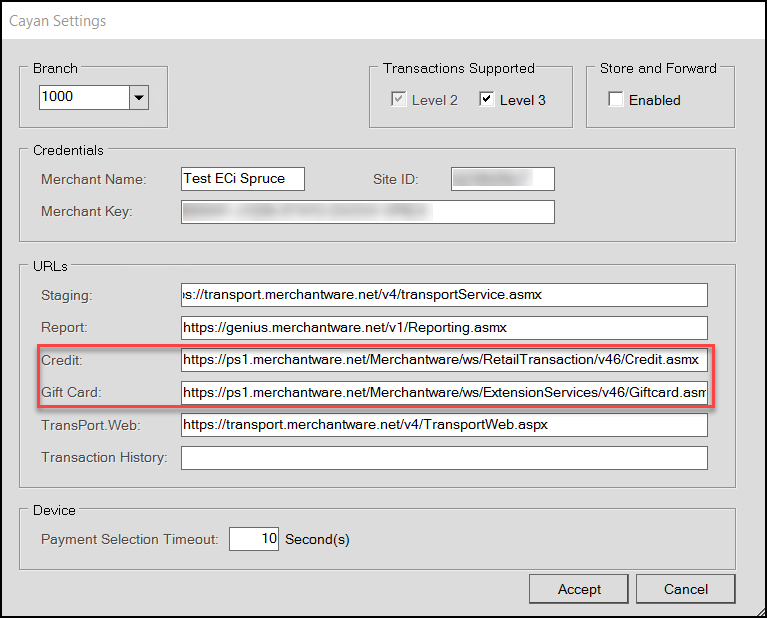
Parameter Settings > Software Tab > Cayan Settings > MerchantWare 4.6-Specific Fields
The Credit and Gift Card fields have new v 46 settings. These settings should display for each branch that uses the Cayan MerchantWare 4.6 update. The application will use these values to process credit card and gift card payments when you use Cayan devices.
5. Choose Accept to close the box.
Messaging Improved when Cayan Merchant Key Errors Occur
B-105518 – As we work with our Cayan partners to improve your payment processing experience, we have added new message that displays when there is a problem with the Cayan Merchant Key setting. If the Merchant Key is not set correctly, Cashiers are notified using a transaction message that includes:
-
Invalid Credentials
This message can display during the following Point of Sale or Payment entry processes using Cayan devices:
-
During the Payment process, the message is: Failed! Staging – Invalid login credentials
-
Refund process, the message is: Failed! Refund: Invalid Credentials
-
Payment using Card On File, the message is: Failed! Staging – Invalid login credentials
-
Refund using Card On File, the message is: Failed! Refund: Invalid Credentials, and
-
Invoice Reversals, the message is: Failed! Void: Invalid Credentials.
Global Contract Update: Group/Section Items and Floating Price Levels
B-108579, B-108583 – We have added two new capabilities to enhance your ability to import Excel file entries into your carefully selected global contracts. The ability to import:
Group/Section Items.
This feature gives you a way to import each item in a specified inventory group or group/section into the selected global contracts.
Note: You can import these items using the Unit Prices options described in the last release and with the floating price levels described in this one.
Floating Price Levels.
You can import floating contract prices for selected account and job items, including:
-
FD (floating discount percentage),
-
FL (last floating markups percentage),
-
FM (market-based floating markup percentage),
-
FW (weighted average-based floating markup percentage),
-
FB (floating margin based on the higher of the market margin or weighted average percentage), or
-
FX (floating markup based on the higher of the market or weighted average percentage).

Sample Import Global Contracts Excel Spreadsheet
Note: For these Floating Type calculations, you enter the percentage you want to apply after the code to allow the application to calculate the appropriate unit price value on the contract.
In the Item column, GS*aaa refers to the Group number and GS*aaa*bbb refers to the section number within the group. When you use this import structure and include *GS*aaa, the application imports every item in that group. When you use this import structure and include *GS*aaa*bbb, the application imports every item in that Group / Section. This import includes the quantities, pricing, start, and end dates you specify in your spreadsheet.
Here are some assumptions pertaining to global contract imports you should be aware of:
-
If an item you are importing is set to Disabled (Item Maintenance form > Branch > Codes > Disabled field = Y) the application does not import it.
-
If you enter a unit of measure value in your spreadsheet, and the item you are importing does not have that unit of measure specified in the Item Maintenance form, the application uses the item’s pricing unit of measure for the import process by default.
-
When you import an item and specify a valid unit of measure in the spreadsheet, the application uses the unit of measure price you supply. If the unit of measure is not valid, the application uses the pricing unit of measure in the Item Maintenance form.
Importing Group/Section Records into Global Contracts
B-108579 – When you select the Global option in Contract Maintenance, you can now import all the items in particular group and/or all items in a particular Group/Section from an Excel spreadsheet. This process assumes you have put these group and section settings (as well as the other required columns) in the spreadsheet correctly before you start the process below. The spreadsheet needs to include the following fields at a minimum (column headings are required):
-
Account
-
Item
-
Quantity
-
Unit Price
-
Unit of Measure
-
Start Date
-
End Date
To import group/section records into a group of contracts:
1. From the Main Menu, choose Point of Sale > Database > Contracts to display the Contract Maintenance form.
2. Choose the Global button.
3. Choose Import (F2) to display the context menu and choose Batch.
Follow the prompts to import the spreadsheet you want to import and choose OK.
The application tries to import the spreadsheet entries and reports on the status when this process is complete.
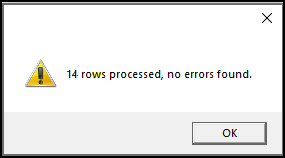
Contract Maintenance Before Imported Entries Display
Note: If not all of the items are imported, the application reports the errors. If items were disabled when you tried to import them, the application reports the number of items that were disabled.
4. Click OK to close the message.
5. Choose Cancel (F9).
6. From the Account list, choose the account you imported from the spreadsheet to display the new entries.
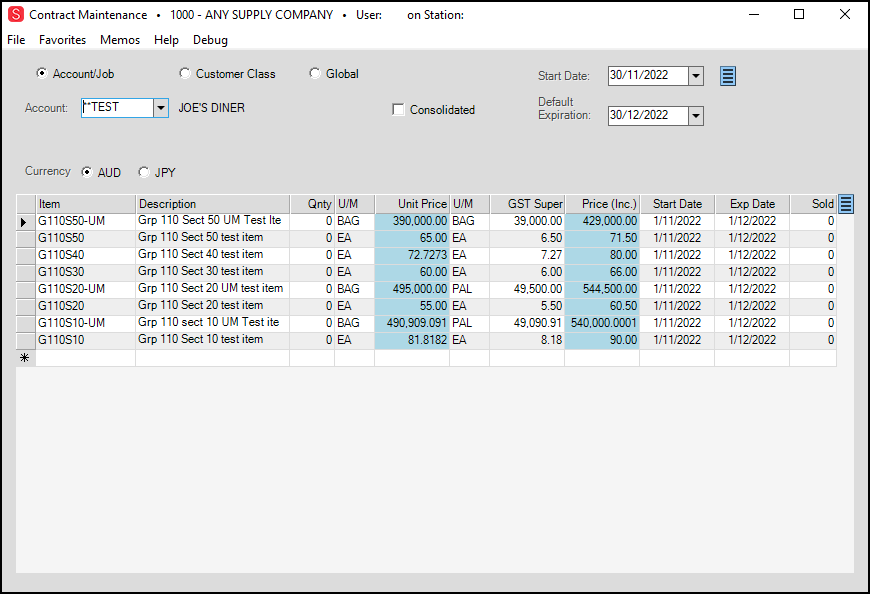
Contract Maintenance with Imported Entries
If you entered floating price entries in the Unit Price column, you can review that calculation by placing your cursor in the Unit Price column and choosing the down arrow.

Contract Maintenance with Unit Price Calculation Method Displaying
Clearing an Accounts Contracts Before Importing New Entries
B-108583 – Before you add new contract items and pricing to an account, you might want to remove the existing contract entries from that account. This allows you to start with a clean slate. You clear the existing contract from an account by adding a new entry to the spreadsheet you are importing for that account.

Spreadsheet with Clear Entry
In the first row of the spreadsheet, type the account ID, the Job number, and in the Item field, type *CLEAR*. Leave the rest of the fields blank. If you enter a StartDate and an EndDate entry, the application will clear the contract for the specified account as of the selected date.
Filtering Statements by “Branch” Made Easy
When your business has more than one location or you run more than one company, you may want to organize statements by different criteria than we have traditionally provided. In this release, we added a way to group statements by the account’s AR Branch and/or Report Branch settings in Account Maintenance form to generate statements. This change gives you a way to organize your statements without creating additional work and ensures that no statements are left out. This feature is for charge accounts only.
After you set a system parameter, the application looks at entries in the Branch Setup form:
-
Receivables Tab > AR Branch, and
-
Codes Tab > Report Branch
You can set these options to group statements by the branch the customer uses or perhaps, the branch you associate with a particular company. After you set the new parameter, a new section displays in the Billing Statements form, so you can choose Branch-specific settings when creating Billing Statements.
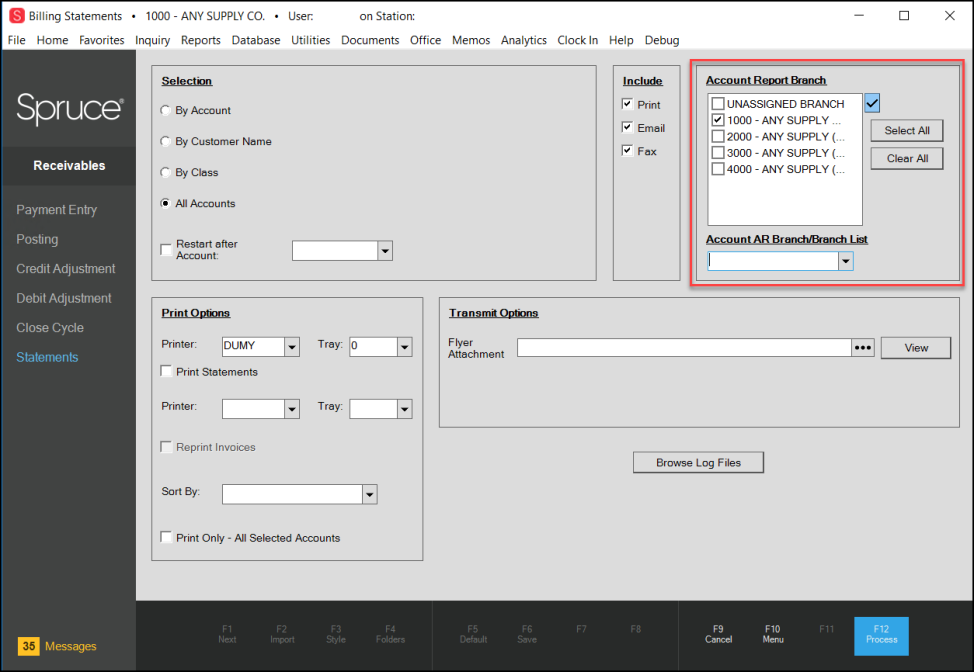
Billing Statements Form with Account Report Branch Settings
Using the branch-specific check boxes, you can generate account statements according to the account settings in the Report Branch list.
OR
Using the Account AR Branch/Branch list option, you can generate the account statements based on the account’s AR Branch setting.
Further, you can use the Billing Statements form find accounts that do not have branch settings so you can update them.
We thought having these two options would be useful for businesses with multiple branches that roll up into different companies or where multiple locations roll up into a single corporation, but you keep the finances separate.
Setting the Branch Statement Filter Parameter
B-109675, B-109681 – After you set this parameter, the AR Branch and/or Report Branch settings will be required in the Account Maintenance form and the new branch setting options display in the Billing Statements form. You must have administrative privileges to select this parameter.
To set the branch filter parameter:
1. From the Main Menu, choose the Maintenance > Database > Parameters options to display the Parameter Settings form.
2. Choose the Receivables tab.
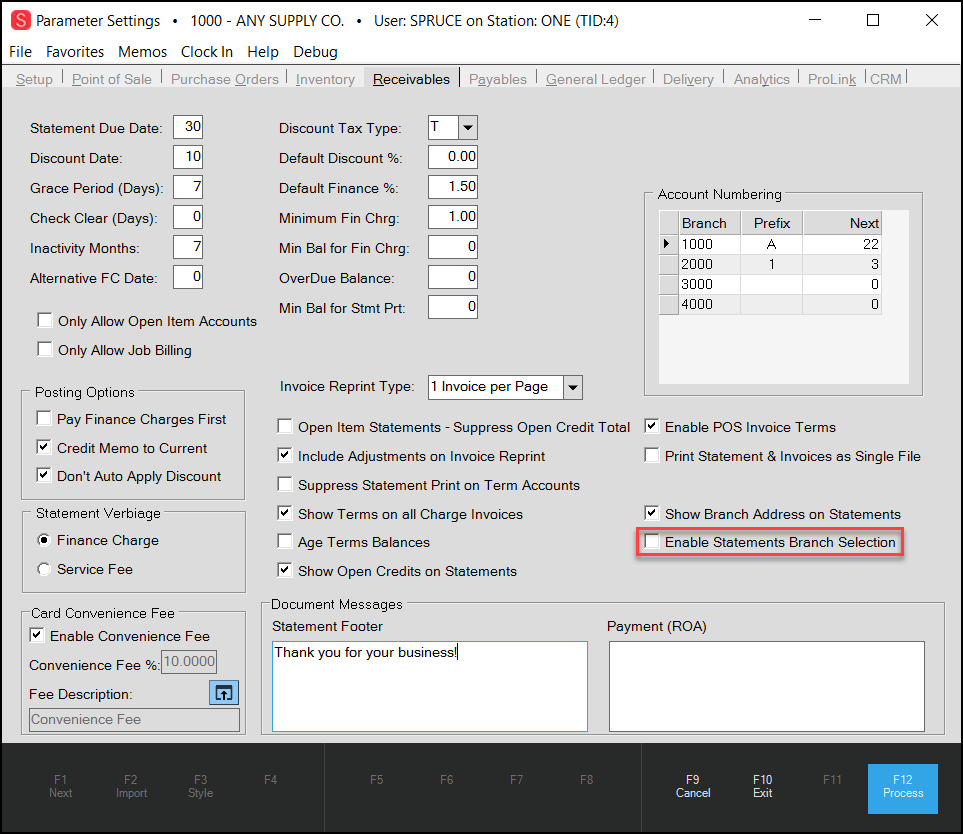
Parameter Settings > Receivables Tab with Enable Statements Branch Selection Highlighted
3. Choose the Enable Statements Branch Selection check box.
4. Choose Process (F12) to save this setting.
Setting up Filtering Statements by Branch
After you set the Enable Statements Branch Selection parameter, you can set the AR Branch and/or Report Branch lists for each charge account record. The charge setting is required, but warning messages display if you do not set the AR Branch and Report Branch settings after the parameter is enabled. The application gives you a way to group charge account statements using these settings.
To set an account’s branch statement settings:
1. From the Main Menu, choose Point of Sale > Database > Account to display the Account Maintenance form.
2. From the Account list, choose the account you want to set the new settings for. The account record displays.
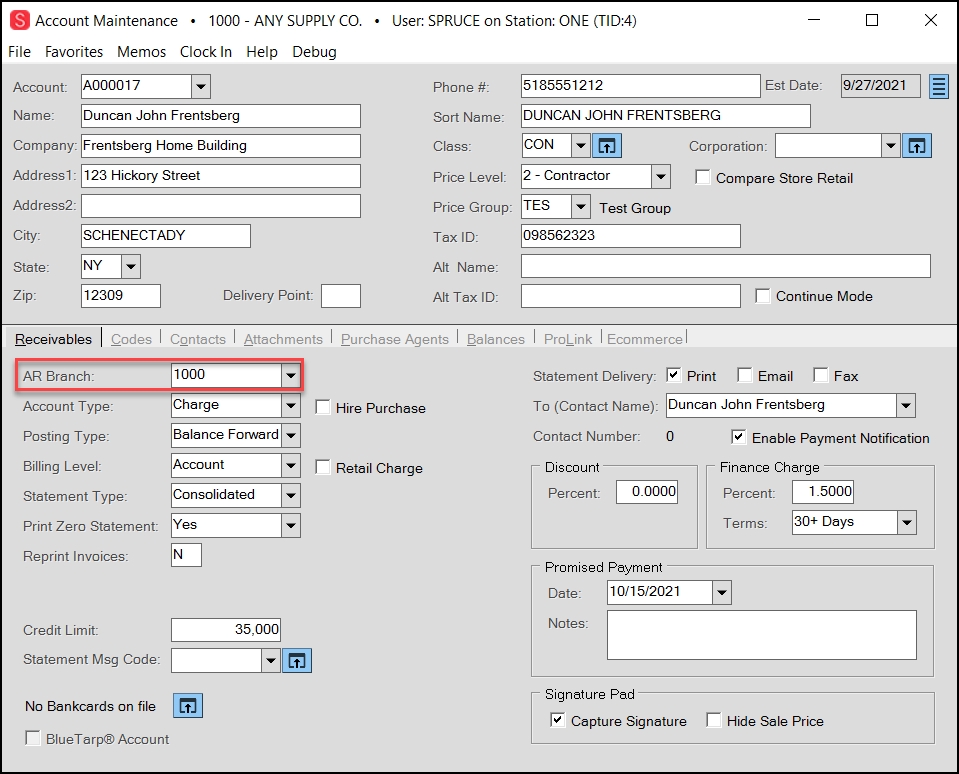
Account Maintenance with AR Branch Setting Highlighted
3. In the Receivables tab, set the AR Branch entry to the branch you want to use to generate the account’s statements.
4. Choose the Codes tab to display new options.
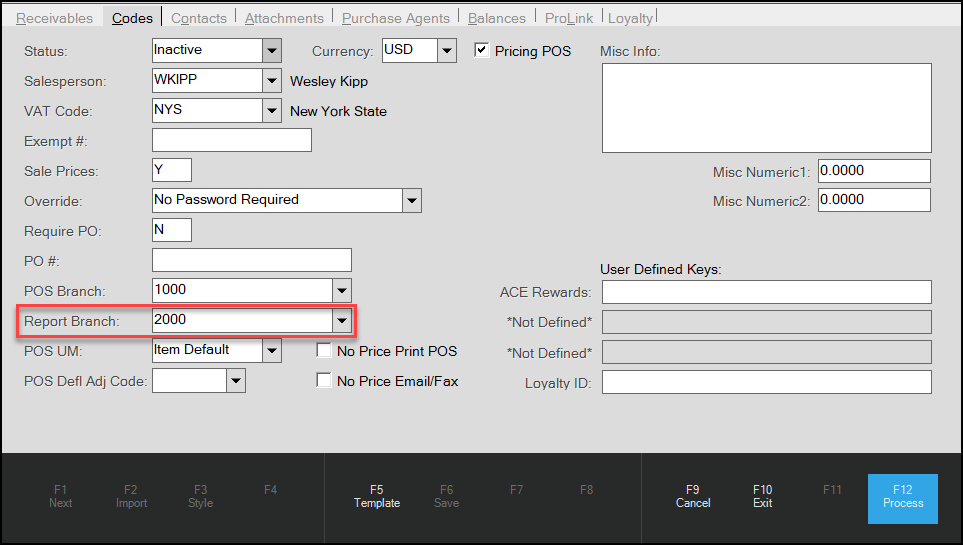
Account Maintenance > Codes Tab > Report Branch Highlighted
5. Choose the Report Branch setting and do one of the following:
-
Select the same branch as the AR Branch to ensure the account statement is generated using the same branch using either statement setting,
OR -
Select a different branch if there are cases you want to generate statements for this account using a different branch setting.
6. When you have completed your selections, choose Process (F12) to update the account record.
Note: If you process the Account Maintenance form without these settings, warning messages display to prompt these entries.
Using the Branch Filters to Produce Statements
B-109682, B-109683 – After you select the AR Branch and/or Report Branch settings in the charge account records, these settings determine which statements print when you generate your billing statements by branch. These statements can be for Open Item or Balance Forward posting types.
To generate the monthly statements by a specific branch:
1. From the Main Menu, choose Receivables > Statements to display the Billing Statements form.
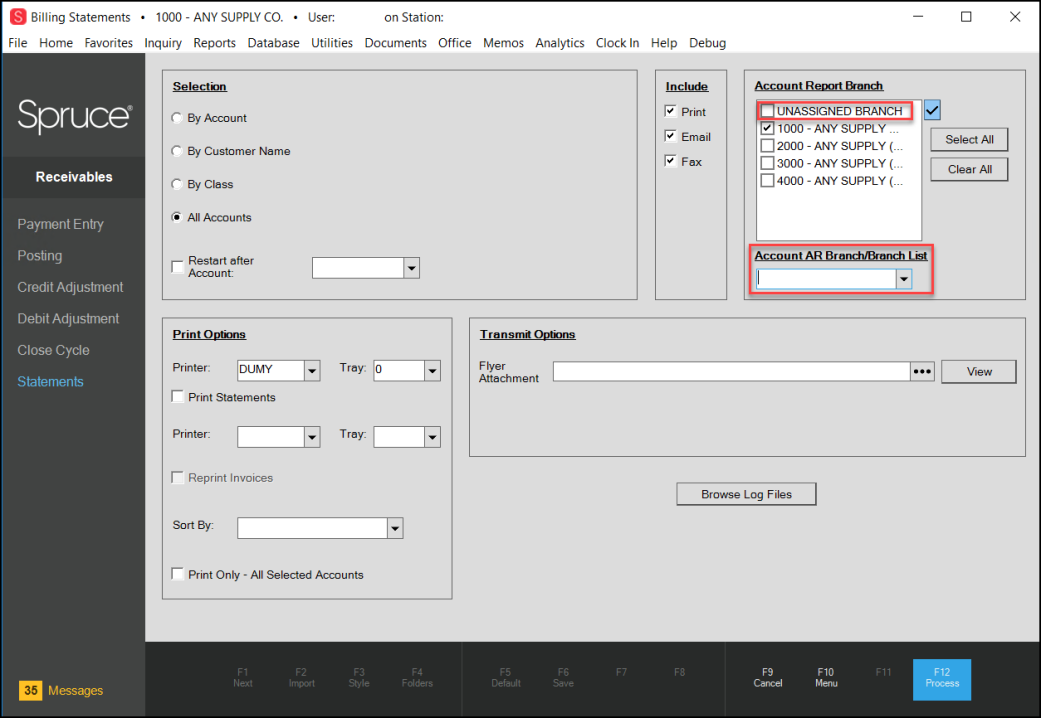
Billing statements Form > Unassigned Branch and Account AR Branch/Branch list
In the previous figure, we highlighted the Unassigned Branch entry because this is a new field type. You select this check box to create statements for accounts that do not have AR Branch or Report Branch settings.
Note: If you do not set the Enable Statements Branch Selection parameter discussed in Setting the Branch Statement Filter Parameter, the Account Report Branch and Account AR Branch/Branch List options do not display.
2. In the Selection list, choose All Accounts.
3. In the Print Options section, choose the statement printing options you want for this task.
4. From the Include list, choose the delivery option(s) for the selected statements.
5. Consider the Account Report Branch and/or the Account AR Branch statement selection options and choose among these options to generate the statements you want:
-
To produce statements for the selected accounts with unassigned branches, choose the Unassigned Branch check box and no other check boxes (in the Account Report Branch).
Note: You can use this setting to find accounts that are missing these settings or to generate statements for accounts that have no AR Branch or Report Branch settings. -
To produce statements for accounts with one or more Report Branch settings, choose the branch check box(es) from the Account Report Branch list.
-
To produce statements for accounts with one AR Branch setting, choose the branch from the Account AR Branch/Branch List.
-
To produce statements for a combination of Report Branches and AR Branches, choose the Account Report Branch check boxes and select a branch in the Account AR Branch/Branch List.
Note: When you use this option, the application ensures that any branches are in both lists are not duplicated. -
To produce statements for all selected accounts and for all branches based on the Report Branch setting, choose the Select All button. This selection includes the Unassigned Branch statements.
-
To produce statements as you did before, do not select any branch settings in the Account Report Branch list or the Account AR Branch/Branch List.
6. In the Transit Options field, click the Ellipsis  button to attach a flier to each of the statements you are preparing for the customer.
This step is not required.
7. When these settings are complete, choose Process (F12) to begin generating the statements. The Generating Statements box shows the progress:
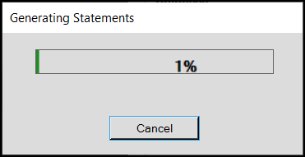
Billing Statements > Generating Statements Message
The application creates a processing log that contains records of every statement it produces. If there is an error, the application adds the error to an error log, which you can review at the end of the process.
8. As the application processes the statements you have requested, messages display to explain the status of the process and give you choices about displaying or hiding the messages. Messages like:
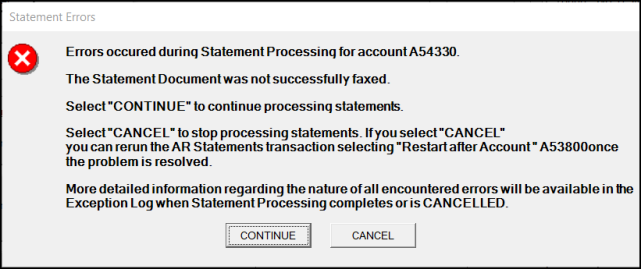
Billing Statements > Error Message
9. If you get an error, choose:
-
Continue to continue the statement processing, or
-
Cancel to stop the statement processing until you have cleared the issue.
Then the application asks you whether to keep displaying error messages or just give you a list at the end.

10. When you get the Inhibit Error Messages prompt, choose:
-
Show to see the error messages and choose as you go to complete the statement process, or
-
Hide to complete the statement creation process and handle the exceptions afterwards. The application saves a list of the issues and logs as indicated in the next message for your review.
11. When the Statement process is complete, the Statement Delivery Results display. The application saves the list of errors and a process log in separate files with the date and time stamp in an accessible folder:

Billing Statements > Statement Delivery Results
12. From here, you can click:
-
View Exceptions, to open the log that contains the errors the process recorded
-
View Full Log, to open the log of the entire statement process
-
Done, and review the results you have printed, sent via email or fax manually
-
Browse Logs, to go to the folder that contains the exceptions and process log and review them manually.
Using Unlimited Adders in Purchase Orders
B-104222 – When you are working with Purchase Orders, it may be useful to have the flexibility to add more than three adjustments to an item. You do not have to use more than three adders in a purchase order transaction, but there will be no limit to the user’s ability to add new adjustments to an ordered item. This feature was moved to make it more accessible.
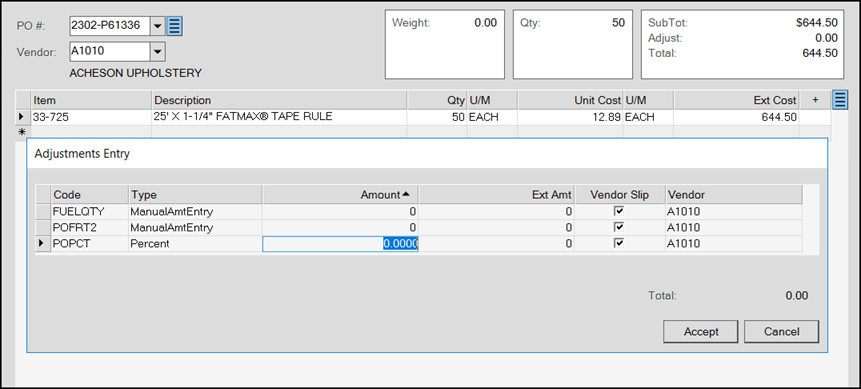
Purchase Order Entry Before Enabling Unlimited Adjustments
We have added a new Purchase Order parameter, Unlimited Adders, that you can set to add as many adders as are required to complete the purchase of your inventory. Here is an important note to keep in mind before you enable this parameter:
-
After you enable this option, you cannot turn it off.
Since this becomes part of your financial tracking structure, you cannot disable it.
Consider this restriction carefully before you turn on this feature. You must have administrative permissions to make this change.
To enable unlimited adders in your system:
1. From the Main Menu, choose Maintenance > Database > Parameters to display the Parameters Settings form.
2. Choose the Purchase Orders tab to display the Purchase Order parameter options.
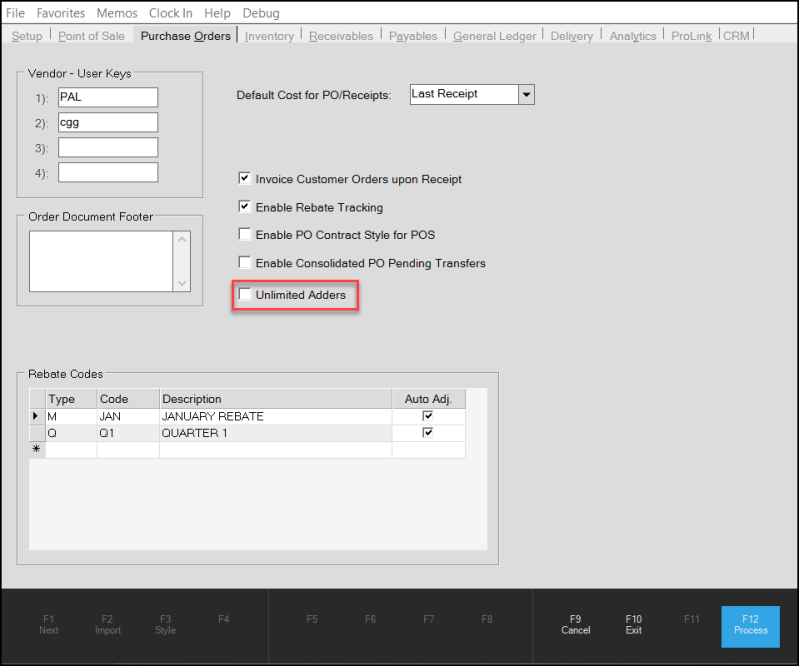
Parameter Settings Form > Purchase Orders Tab > Unlimited Adders Check Box Highlighted
3. Choose the Unlimited Adders check box to enable the feature. This pop-up message displays:
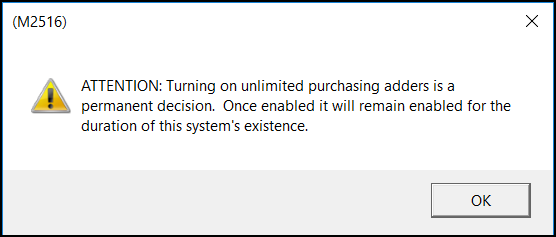
Unlimited Adders Check Box Message
4. Click OK to accept this message.
5. Choose Process (F12) to save this change.
After you enable this option, the application disables this check box so it cannot be modified.
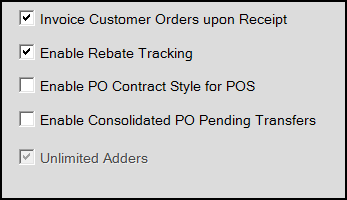
Unlimited Adders is Disabled after Selection
After you set this parameter, you can add additional adjustments in Purchase Order Entry:
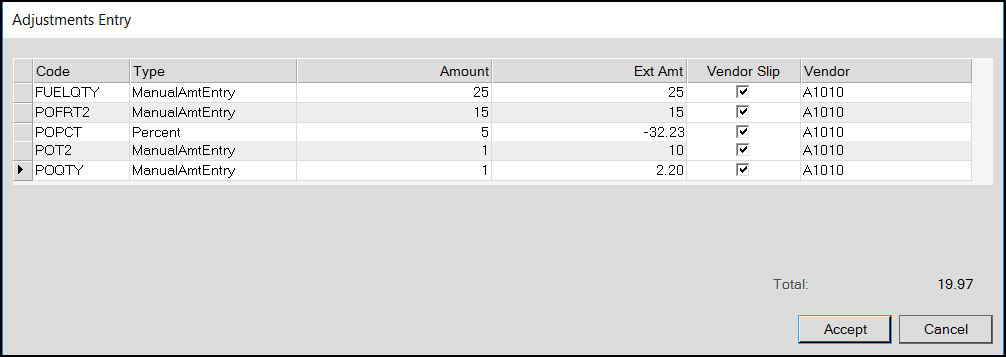
Purchase Order Entry > Adjustments Entry Tab
Using the ePad Vision to Capture Signatures (AU, CA, Caribbean)
If you want to capture the customer’s signature on transactions you are processing, the ePad Vision (VP9808) signature capture device may be a good tool for you.
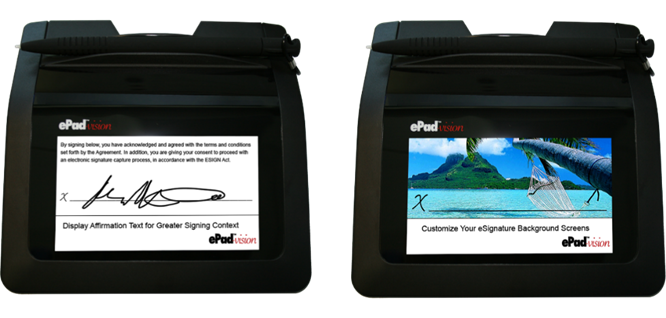
ePad-Vision Devices
When the system is configured for the ePad Vision signature capture device, customers can use the signature pad for Sales, Orders, Open Tickets, Direct Shipments, Charge Returns, and Account Payments in the Point of Sale area. The application encrypts the signatures submitted during the Process Document procedure and adds the signature to the process document (and ticket). You can use this device in conjunction with a Linkly device in the APAC region and with other devices in Canada and the Caribbean.
Discuss this feature with your ECI Support or Implementation team as there is some remote client setup that is required. They will need your Station IDs and your hosting URL.
Adding an ePad Vision Device to a Station
B-100816, B-100822, B-100829, B-107582 – When you are ready to add a signature capture device like the ePad, you may need to work with some ECI Implementation or Support team members to get started. Typically, the remote client services ePad Signature Capture parameter is set by default, but if you experience any issues in during setup, we recommend you contact ECI and ask about this setting.
To add an ePad Vision device to a station:
1. From the Main Menu, choose Maintenance > Database > Parameters > Setup > Software to display the Software parameter options.
2. In the Installed Software list, make sure the Signature Capture check box is selected.
3. Choose Process (F12).
4. Return to the Database menu and choose Devices to display the Device Maintenance form.
5. In the Device Name field, choose the station to add the ePad Vision device to. The settings for the station update.
6. Make sure the IP Address field displays the login name of the user.
7. In the Remote Client section, select the Enabled check box and enter the Station ID (from the Device Name field) in the Alias field.
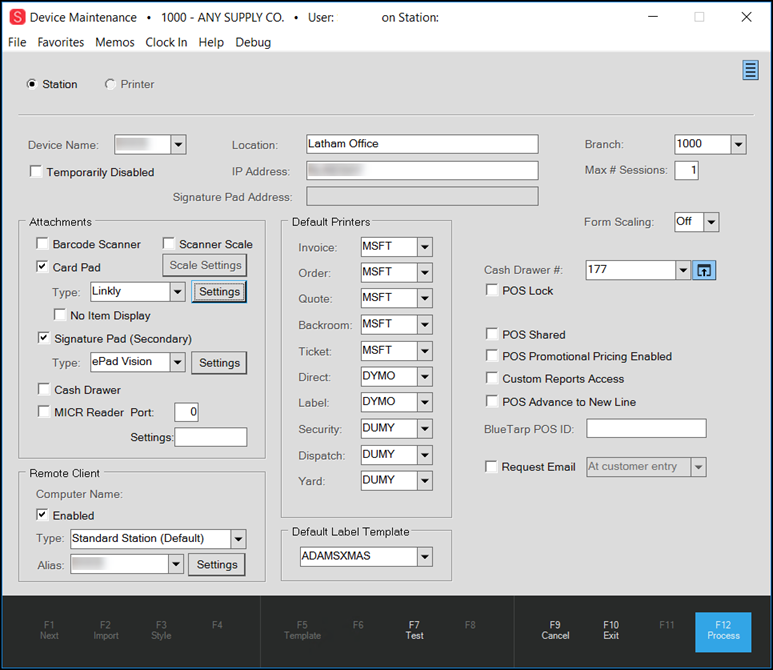
Device Maintenance with ePad Vision Signature Pad Setting
Note: We have certified that this signature pad works with Linkly devices.
8. In the Attachments section, select the Signature Pad (Secondary) check box and in the Type List, choose ePad Vision. The ePad Vision Settings options display. (You may need to click the Settings button if you have modified this entry before.)
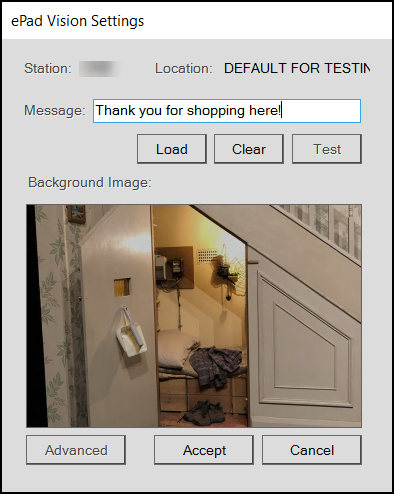
ePad Vision Settings
9. In the Message field, enter the message you want to display on the device when a transaction is not in process.
10. To add pictures and other settings to the device:
a. Click the Load button to add the main picture to the device. The File Explorer opens.
b. Navigate to a picture you want to display on the device and click Open.
c. When you have completed these settings, choose OK to return to the original ePad Vision Settings list.
11. Click Accept to store your settings.
12. Click Process (F12) to save the settings to the device. Accept any warnings.
The Remote Client Service Authorization prompt displays a PIN code:
.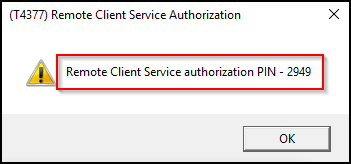
Remote Client Service Authorization
The Enter PIN prompt displays from the Remote Client:
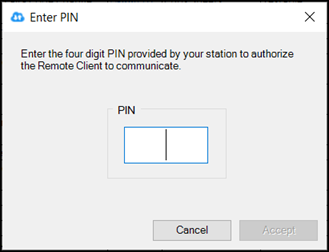
Remote Client PIN Prompt
13. In the Enter PIN box, enter the PIN number listed in the Remote Client Service Authorization box and click OK.
14. Return to the Remote Client Utility Status tab and click the Reconnect button.
Now you are ready to use the ePad Vision device for signature captures.
Adding the ePad Signature Capture Settings to an Account
B-100819 – When you have an ePad Vision device, you can add an account setting that requires a prompt for a signature for account purchases and payments. Customers may want this to be able to check on purchases made on their account. If this setting is not added, the ePad Vision signature prompt does not display during the Process Document procedure. When this option is enabled, it displays when the account processes Sales, Orders, Direct Shipments, Tickets, Account Payments, and Returns.
To add the ePad Vision capture signature settings to an account.
1. From the Main Menu, choose Point of Sale > Database > Account to display the Account Maintenance form.
2. In the Account list, choose the account for which you want to set the signature capture option. The account details display.
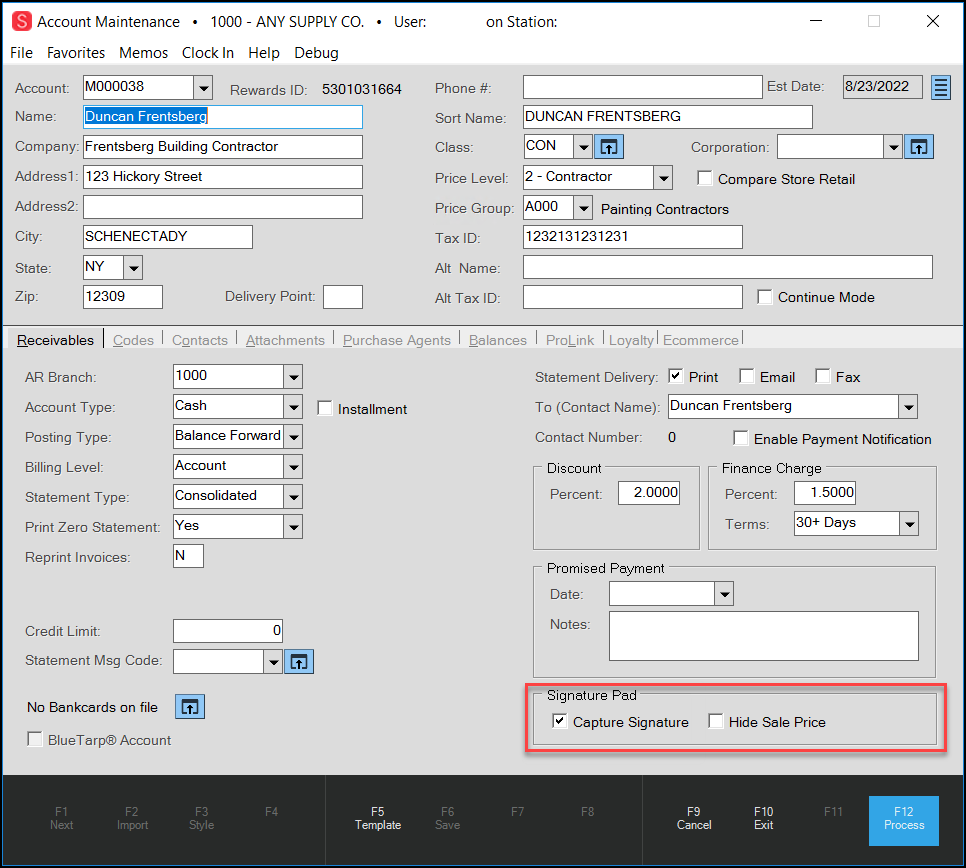
Account Maintenance > Capture Signature Pad Options Highlighted
3. On the Receivables tab, select the Capture Signature check box.
4. Consider whether you would like to hide or display the price on the Signature prompt.
-
If you would like to display the Signature prompt with the sale price, (as in this figure), leave the Hide Sale Price box unchecked.
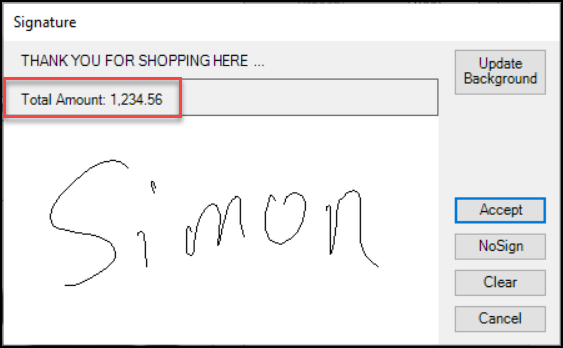
Signature Prompt with Sale Price
-
If you would like to display the Signature prompt without the sale price, check the Hide Sale Price check box.
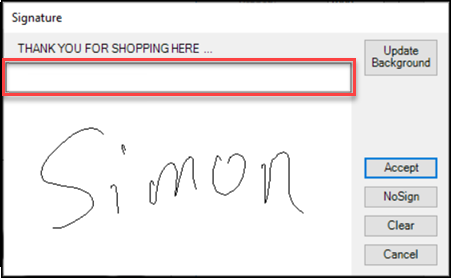
Signature Prompt without Sale Price
5. Choose Process (F12) to save these changes.
Using the ePad Vision in a Pay on Account Transaction
B-100828 - After you have set up the device and the account settings, you are ready to use the ePad Vision to collect signatures during the charge to account process. Typically, the signature prompt only displays when the customer of a prepared account is charging the transaction to their account. You can use this process in the Sale Entry, Order Entry,
To see the ePad Vision device in action:
1. From the Main Menu, choose Point of Sale > Sales to display the Sale Entry form.
2. From the Name field, choose an account that has the Signature Capture settings enabled.
3. Add items to the data grid as you normally would and select Process (F12) to complete the transaction.
4. Handle the tender process as you normally would and select Finish (F12).
If the customer is charging the transaction to the account, the ePad Signature device displays the signature prompt. The customer adds their signature and clicks Accept.
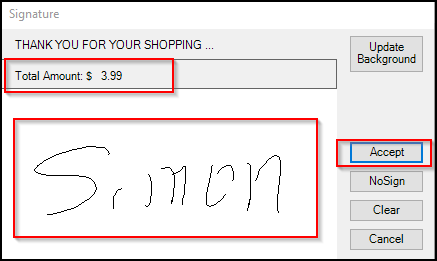
ePad Vision Signature Prompt
The application saves the signature and displays it on the Point of Sale document and on the ticket.
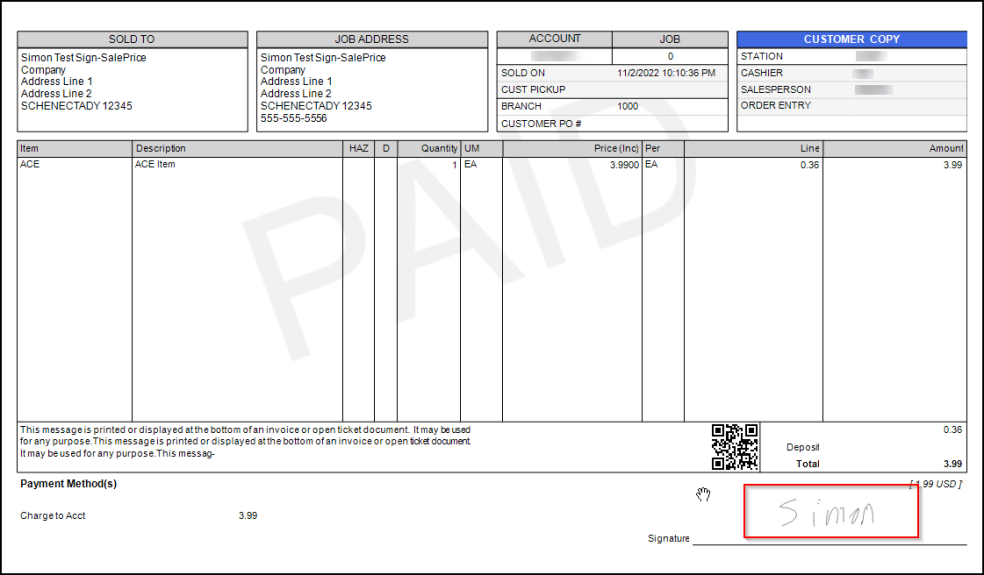
Point of Sale Document with ePad Vision Signature
Note: You can also use the ePad signature pad for cash sales by selecting the Signature button on the Process Document box.
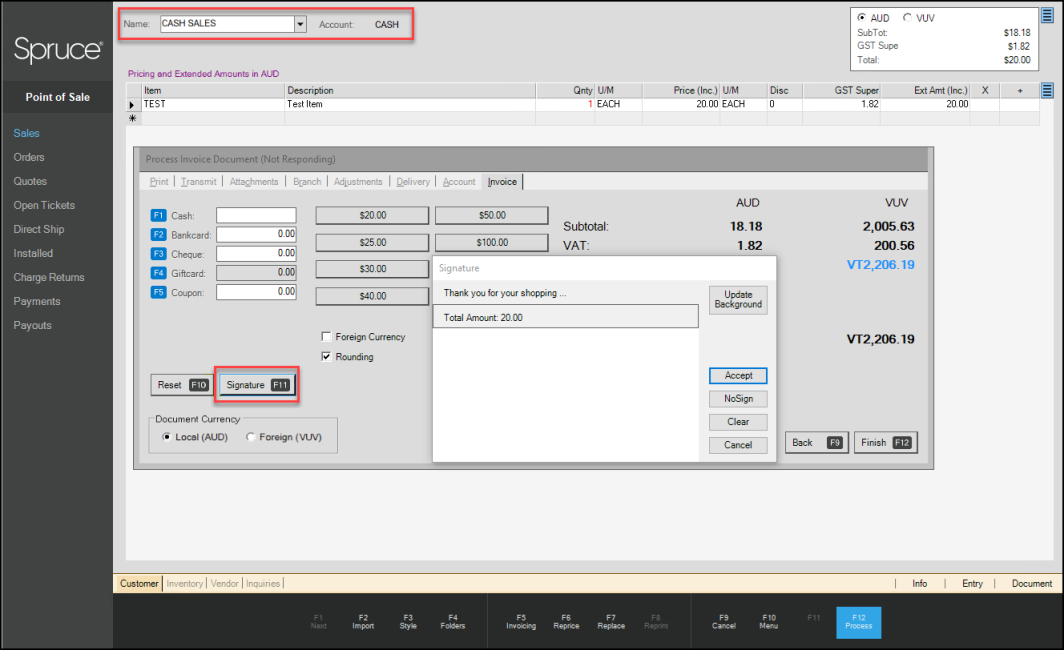
API Updates
Update to Allow $0 Deposits on Ecommerce Orders
B-113530 – Customers have asked us to add the ability to submit orders with no deposit amount for system (internal) and cash accounts (for customers that do not have accounts set up with your business). Since payment in full is typically taken through a third-party company, this makes sense. We have added a new parameter to support this change; the CreateOrderRequest method checks this parameter setting to determine the handling of $0 deposit orders:
-
If the parameter is enabled, the payment bypasses the payment validation processes.
-
If the parameter is not enabled, the method uses the current validation process depending upon account type and Card on File properties set for the account
Using either option, the application can import and process the online order.
To see this change:
1. From the Main Menu, choose Maintenance > Database > Parameters to display the Parameter Settings form.
2. Choose Point of Sale > Ecommerce API tab to display the Ecommerce options.
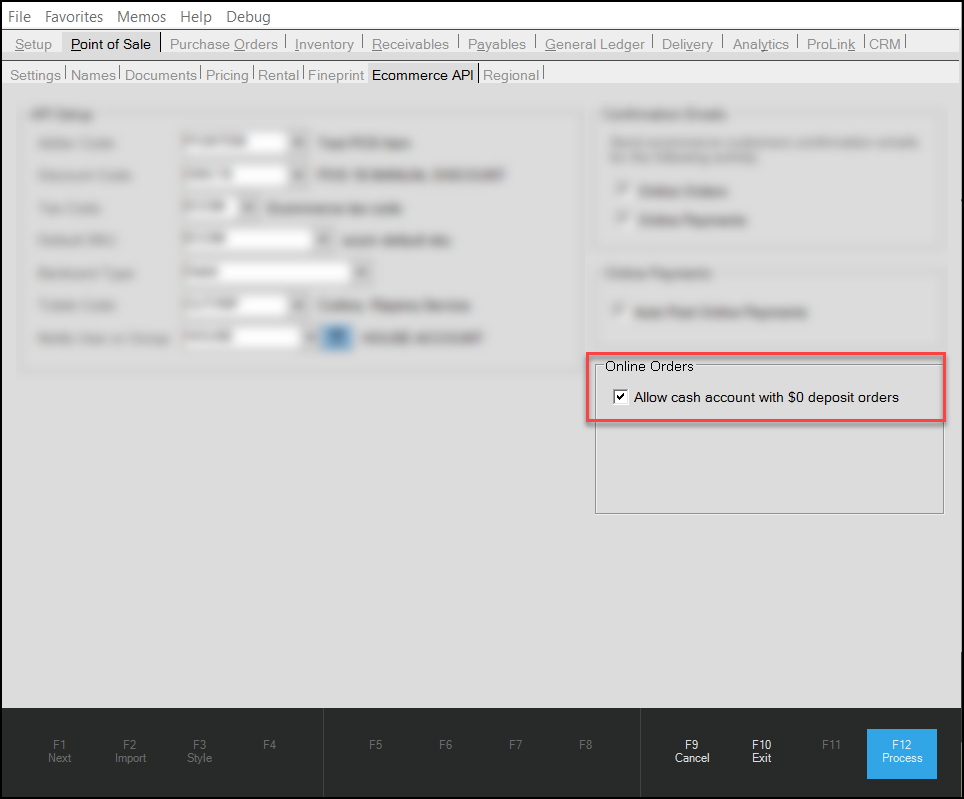
Parameter Settings > POS > Ecommerce API Tab with New Setting Highlighted
3. Select the Allow cash account with $0 deposit orders check box.
4. Choose Process (F12) to save the change.
Allowing Customers to Pay Account Balances Online Automatically
B-106078, B-106082, B-106083, B-108198 – If your business allows online payments, when customers submit their online payments, the application can process those payments automatically as of this release. You can set this option globally and, for particular accounts, you can specify whether the payment is applied as the customer requests or not. This is true for both Balance Forward and Open Item accounts and allows for third-party payments to these accounts.
To take and process orders and payments online, you must have the Ecommerce parameter enabled and your Manage API Keys setting in the Support Utilities must be set to Active. The application accepts payments for e-commerce orders for accounts with card on file settings automatically. You can check with your ECI Support team to verify that these options are set for your business if you are unsure. You may also want to discuss applying Convenience Fees for this process, as allowing customers to pay online using a card on file incurs extra fees for your business.
Setting the Online Account Payments Globally
The Payment Posting Rule allows you to apply the customer’s payment to their account as submitted. You can use these instructions to apply this rule to multiple accounts or use the instructions in the next section to apply the Payment Posting Rule differently to a specific account.
To set the online payment posting rule for many accounts:
1. From the Main Menu, choose Receivables > Utilities > Account Global Modify to display the Account Global Modify form.
2. From the Field Name list, choose Payment Posting Rule.
Note: Since this feature is new, there are no existing values.
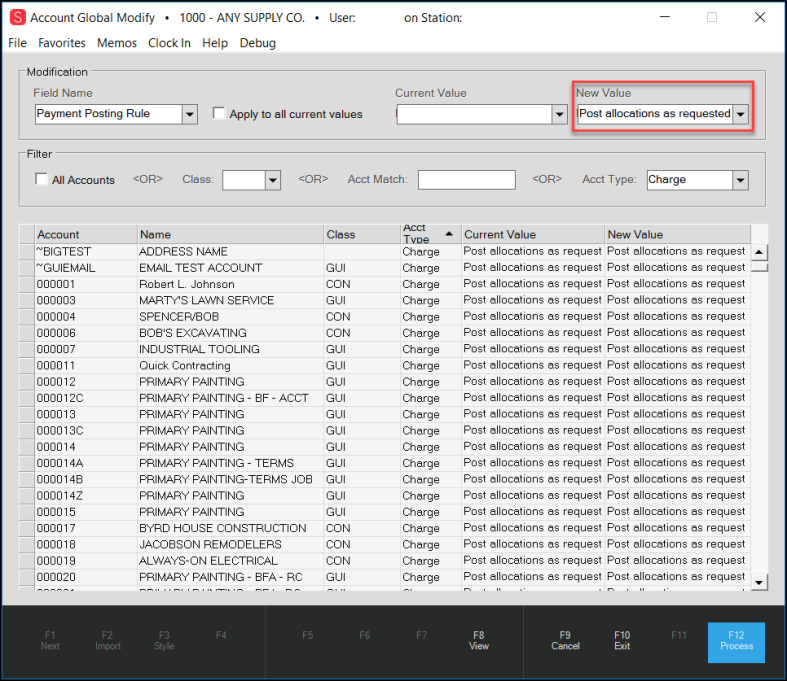
Account Global Modify with New Value Selected
3. In the New Value list, choose the value you want to apply to the selected accounts. Options include:
-
Post allocations as requested
Choose this option to post online payments to account balances automatically. -
Post ignore allocation request
Choose this option to prevent account payments using this posting process.
4. In the Filter box select the criteria for which this value should apply.
5. Choose View (F8) to collect the accounts that match the filter criteria.
6. Review the list to ensure that they include the accounts you want.
7. When the list of account is right, choose Process (F12) to save this setting to each account.
If you have set this option for a group of accounts and decide it should not apply to a specific account, you can reset the Payment Posting Rule for that account using the instructions below.
Setting Auto Posting for Online Payments
B-106092 – You can post online payments automatically using a new parameter setting. You must have administrative rights to set this option.
To enable auto posting of e-commerce payments:
1. From the Main Menu, choose Maintenance > Database > Parameters to display the Parameter Settings form.
2. Choose Point of Sale > Ecommerce API tabs to display the Online Payment options.
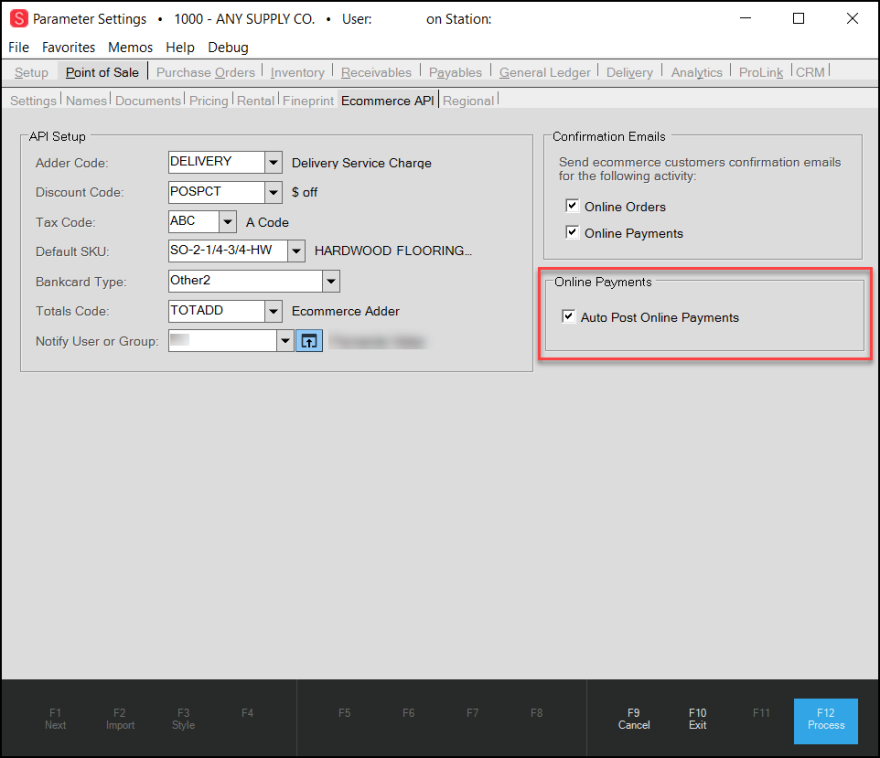
Parameter Settings Form > Point of Sale > Ecommerce API Tab with Online Payments Highlighted
3. In the Online Payments box, select the Auto Post Online Payments check box.
4. Choose Process (F12) to save this change.
5. To ensure that this works for each of your branches that accept e-commerce payments, check your branch settings.
From the Database menu, choose > Branches to display the Branch Setup form.
6. In the Branch ID field, enter a branch you want to process payments for and press Enter.
7. Choose the Ecommerce tab. The e-commerce options for the branch display.
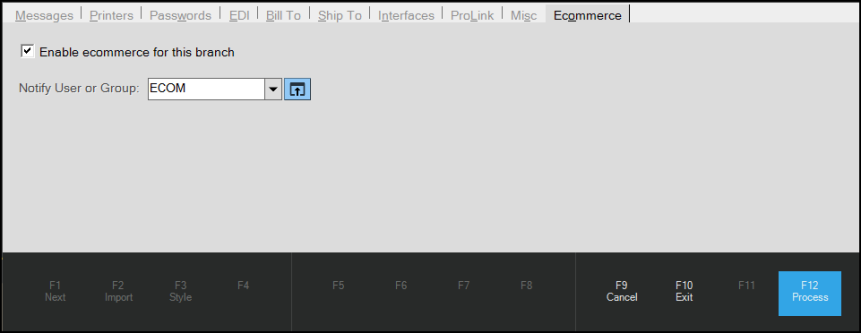
Branch Setup Form > Ecommerce Tab
8. To enable e-commerce order processing for this branch, complete the following:
-
Enable ecommerce for this branch
Select this check box to enable e-commerce processing for this branch. -
Notify User or Group
Choose a user or a user group from this list to notify your staff when an e-commerce order has been submitted. Click the Settings icon to choose individual User IDs for this task and click Apply when you are done.
9. When you have completed these selections, choose Process (F12) to save them to the application.
Note: Check the branch settings by repeating steps 6 - 9 for branches that process e-commerce payments.
Setting the Online Account Posting Rule for a Single Account
You may want to prevent a particular account from posting their payments online automatically. Typically, if there is a card on file problem for an account, this might be the case.
To reset an account’s online payment handling:
1. From the Main Menu, choose Receivables > Database > Account to display the Account Maintenance form.
2. From the Account list, choose the account that you want to set the online payment handling for. The account details display.
3. Click the Ecommerce tab to display the Payment Posting Rule that is currently associated with the account.
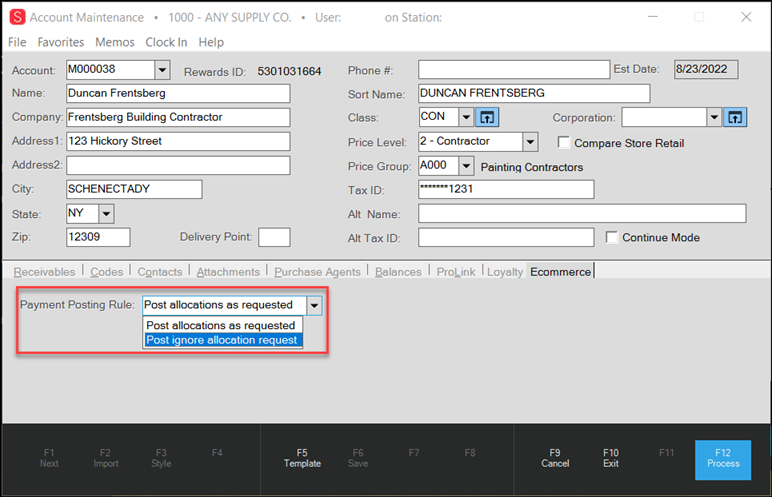
(Receivables) Account Maintenance > Ecommerce Tab > Payment Posting Rule List
4. Select the other e-commerce payment posting rule you want to use for this account.
5. Choose Process (F12) to save this setting.
Security Updates
We have made the following updates to ensure better security and functionality for the new release.
B-89502 – Updated Orgill Warehouse List to Add the NY Rome, NY Location.
We have updated the Orgill Warehouse list to add the Rome, New York location. This will make it easier to place orders using this warehouse.
B-93458 – Income Statement with by Department Option Selected Working Correctly Again.
A customer reported they were receiving errors when attempting to run an Income Statement Report while the Report per Department check box was selected. This turned out to be a label-related issue, which occurred when you selected to run the report using the Report per Department option or when you ran the report with no departments selected. We have corrected both of these errors so the report runs as expected with the department labels displaying correctly.
B-93561 – Error during EJD Price Update Resolved.
When a customer reported that they were experiencing serious errors during an EJD price update process, we researched the cause. We found that this occurred because an item for which the application was importing the price update was not in stock. We have modified the process to ensure that the application skips the import process for items that are not in stock. We also corrected an issue where left over bar code data was affecting the next row entry.
Making Job Payments Using ProLink
D-87883 –When a customer reported this defect, we thought it was the perfect time to add the ability to use ProLink to pay by Job. In the past, when you selected the Job billing option for an the account, ProLink did not display the Make a Payment button as an option.
To get started, enable ProLink on the account record (in the ProLink tab in the Account Maintenance form). To make a job payment on an account:
-
One or more jobs must be associated with the account
-
A Card On File must be set for the job
-
The Job must have an open balance
-
The account must have completed at least one end-of-month cycle
Note: If you have selected a Consolidated Billing Level, and you want to pay by job, the application displays the message, Select a job to make a payment. If you select a job that does not require a payment, the Make a Payment button does not display.
To make a payment by job on ProLink:
1. Log into ProLink and click the My Account link to display the My Account page.
2. In the Account Activity (or Job Activity) list, choose the job you want to make the payment to.
The application updates the job’s activity details to show the current status.
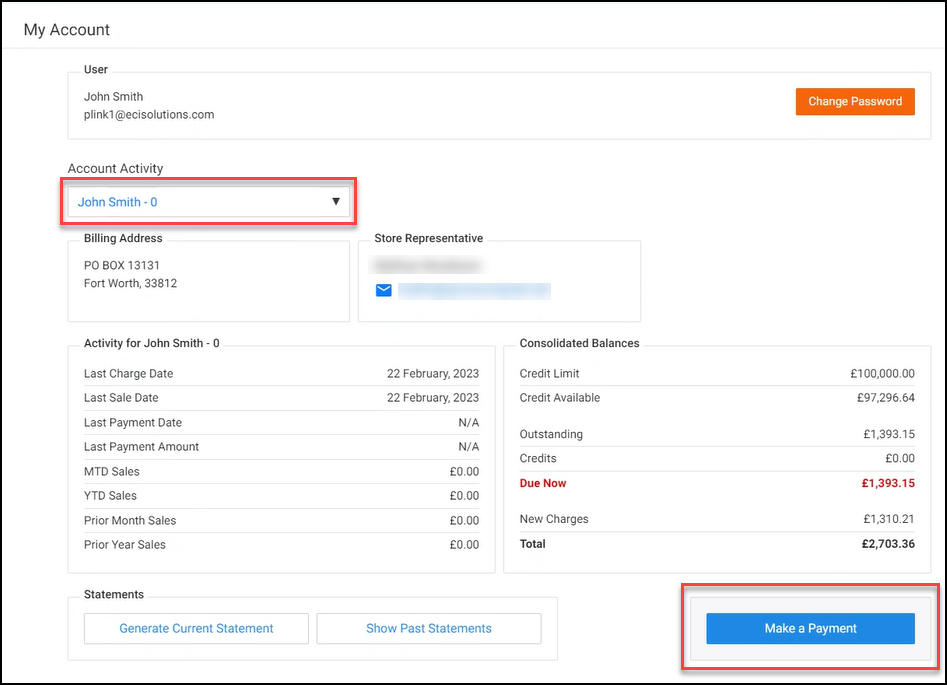
ProLink > My Account > Job Selected > Make a Payment Button Enabled
3. Choose the Make a Payment button to display the Card On File and payment amount options.
4. Enter your payment amount and choose Submit Payment to complete the job payment.
Making your Software and Infrastructure Stronger
As part of this release, we have used the latest tools available to us to ensure we are delivering top-quality code that is robust and secure. Our Development and Quality Assurance teams spent a large part of this release employing code-scanning tools that help us prevent customer-facing issues from reaching your production environment. These improvements translate into a more stable infrastructure for your Spruce and RockSolid MAX applications. We will continue to build on those accomplishments in future releases to come.
B-106235 – Item Inquiry Search Returns Cursor to the Item Field, not the Description Field.
When you search for an item or a group of items in the Item Inquiry form and you press Enter to select a record from the list, you expect the cursor to say in the Item entry field. This action used to place the cursor in the Description field, but customers have asked us to refactor this page to leave the cursor in the Item field. We have updated the system to reflect this behavior.
B-110564 – Added Store ID to Collected Data for FiServ Hosted Payment Page (AU/UK).
When you add a Card On File to an account using the FiServ Hosted Payment Page (for Clover and Linkly Point of Sale Devices), the application now saves the Store ID to the collected record to ensure that the token is saved securely.
Send your Product Suggestions to the Ideas Portal
B-113358 – The ECI Product team wants to hear from you! The Ideas Portal makes it easier for you to tell us what you and your teams need to be successful with our software! Tell us what works and what doesn’t so we can build solutions that help your business grow!
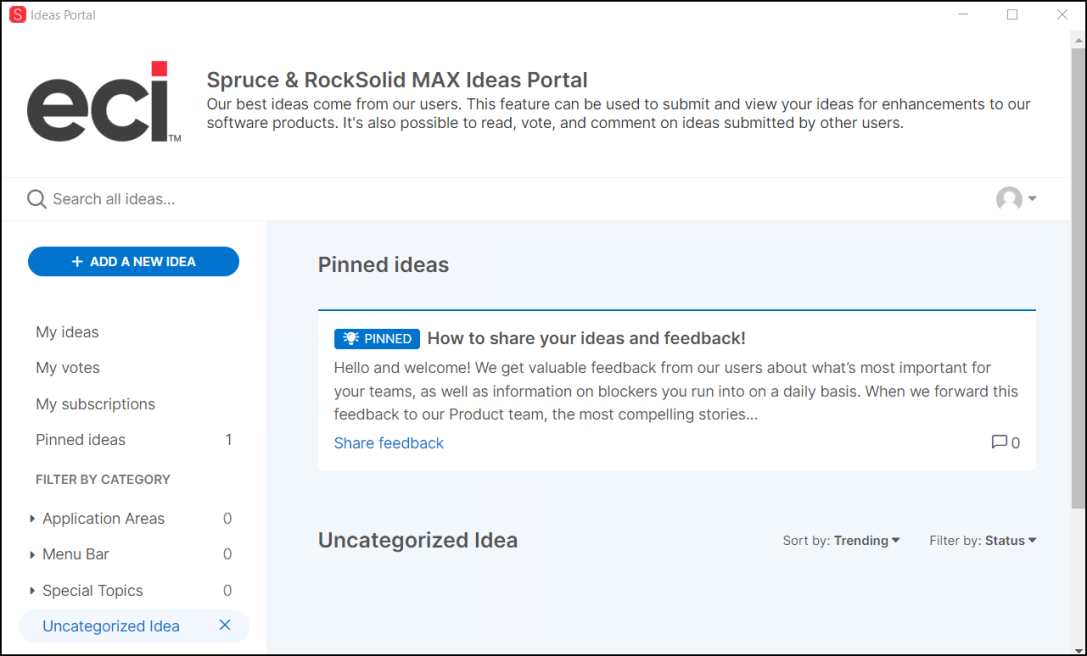
Ideas Portal Landing Form
Send us your suggestions, search for ideas that others have submitted, comment on and vote on those ideas to promote their adoption. This portal gives you a window into the suggestions others have so you can consider their ideas too so you can vote on their importance from your own perspective.
IMPORTANT: This is not a place to share your Support-related issues. If you submit support requests here, you will need to submit them again using the normal process. You can use your support issues as an example if it helps you make your point, though.
Accessing the Ideas Portal and Getting Started
To access the Ideas Portal:
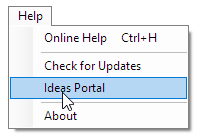
1. From the Toolbar, click Help > Ideas Portal. The Ideas Portal landing form (shown above) displays.
2. Click Subscribe to add your email address and create a password.
3. Click  to write your first idea.
When you contribute your ideas and review the ideas of others, you can consider whether they will work for your company. Add your comments and vote on the suggestions to promote features you think would be beneficial to your teams. Pin ideas you are interested in to stay on top of the ones that matter to you. Categorize your ideas by the area of the application or the special topics that you care about. The Product team will also weigh in with their thoughts and evaluate each feature you present. Even if you are not adding an idea, review and vote on the ideas entered by other businesses. YOUR OPINION COUNTS! Literally!
How do I add a Good Idea to the Portal?
Our Product Team is looking for detailed, specific suggestions of features you want the application to provide. An example of a helpful feature idea might be:
-
"I use the Build feature to pull my order together every week and it slows me down when I need to reference the catalog to find manufacturer's SKU for a product. I would like to view the manufacturer name and the manufacturer SKU in the Inventory folder."
That is a suggestion we can work on; better than:
-
“Display manufacturer info.”
These suggestions do not have to be long, but they need to be detailed enough that we can use them to communicate the solution you are looking for.
Corrections
B-112314 – Beta Upgrade: Orgill Purchase Order Updates using EDI Restored.
A customer showed us that they were getting serious errors when trying to receive Orgill purchase orders using the EDI process when the item field was empty. We now also use the item’s UPC code to identify the item when receiving Orgill purchase orders to prevent this issue.
B-113082 – Analytics Accessible Again after Upgrade.
A customer let us know that they were not able to access the Analytics content after the upgrade to version 24. We have corrected this issue.
B-113307 – EasyAP Email Notifications Expanded.
During testing at a customer site, we found that the email notification settings were not long enough to accommodate the length of some recipient, subject, and body formats. We have expanded these entries to prevent these issues.
D-60234 – Currency Rounding No Longer an Issue with Multiple Payment Methods and Other Point of Sale Scenarios.
Customers have reported minor currency rounding issues that caused the application to close under a variety of conditions. We have corrected these issues to ensure this error has been resolved.
D-62669 – Beginning / Ending Balance Issues Found in Trial Balance Runs Resolved.
When kicking off a Trial Balance Run report, a customer reported that they were seeing different beginning and ending balances based on whether they ran the report with no journals or with journal details. This turned out to be an issue where the application was including journals with zero credits and debits, which affected these balance values. We have corrected this issue to ensure that these journal entries are ignored when performing a Trial Balance Run.
D-63617 – Sending ACE POS Data Gets Better.
After reviewing a customer’s problems when sending ACE POS data, we have improved this EDI process in several ways. We found that the application was not sending ACE POS data when either the ACE Rewards or the in store pickup options were not enabled, even when there were other reasons to send this data. We have modified the EDI process to ensure that ACE POS data is sent, even when these options are not enabled. We have also added new settings to notify users when ACE POS data is not being sent and the reasons that the data is not sent. You can see these changes when you use the ACE EDI process, POS Send Data in the Purchasing > Vendor EDI > ACE Vendor and > ACE Wholesaler options.
D-66924 – Redesign of Tally Item Entry in Physical Counts Form Addresses Reported Issues.
When a customer imported or entered a lineal tally or lot tally item in the Physical Counts (Stock Check) form and tried to assign the count to Quantity on Hand (using the Menu Marker option), the application did not force the user to choose length or location count values. Assigning the count for these tally items using Quantity On Hand did not provide all the information needed to define these items, which resulted in errors. When it came time to sell those products from Point of Sale, error messages also displayed because using the Quantity on Hand values did not supply all of the information needed in the data grid.
Now, when you enter or import a lineal tally item or lot location tally item into the Physical Counts (Stock Check) form, but you do not list any length or location counts, the application displays a message. The application does not enable the Accept button until the user chooses a response to the message:
-
Set all counts to zero? To not set a zero count, choose No, then Cancel or specify count quantities.
When this message displays, users must choose one of these options to proceed:
-
If you select Yes, the application defaults the physical count quantity for the tally item and the lengths to 0
-
If you select No, the application redirects you to the tally dialog so you can specify the appropriate quantities and length values
We structured the change this way so that when you are looking at these tally items in Point of Sale, you will not get quantity on hand error messages when the customer is purchasing these tally items.
D-70872 – AIR MILE Audit Files Refresh Issue.
In working with Air Mile audit files, some customers reported that the application was not displaying the expected file updates. After investigating, we have determined that this issue will take time to resolve, so we are turning off notifications of these file issues but will continue to track them.
D-72845 – Card On File Settings No Longer Affect Customer Lists Report.
In the past when you ran the Customer Lists Report, the report would leave out transactions where the Card On File was not associated with a contract (like Point and Payware Connect). We have changed this process to ensure that the report captures all Card On File capable bank card interface types.
D-75178 – Rewards Plus Calculating Correctly Again.
During testing, we found that when a transaction contained items sold and returned and the returned items had Rewards Plus values (listed in the previous invoice), the application did not recalculate the new Rewards Plus amounts correctly. When prorating the remittance amount, the application was only passing the "positive" total, which prevented the correct Rewards Plus calculation. We have corrected this issue.
D-75441 – Consolidating ACE Instant Savings Line Items in Point of Sale and Documents.
We have refactored the ACE Instant Savings handling in Point of Sale data grids and tickets and documents based on customer feedback. When a customer is eligible for one or more ACE Instant Reward, the reward entry displays in one row only but if multiple rewards apply, the quantity reflects the number of applicable rewards. We have made this change for Sales, Orders, Quotes, Open Tickets, and Charge Returns.
In the case below, the Instant Savings applies to a maximum of 10 Hammers.

Sales Entry Data Grid with Instant Savings Accounted For
Note: When Cashiers use the scanner to add items to the data grid, the scanner process will consolidate the entries by default.
D-83979 – Resolved: Calculation Issues When Tax Type is Different for Account / Branch (AU/UK).
If you are in an Ex Tax branch and have assigned a specific VAT code to an account, knowing if the application has calculated the appropriate taxes for order / quote transactions can be challenging. We have perfected this process to ensure the application has calculated the tax appropriately. The application uses the lower GST tax percentage by default when you have specified two valid tax values.
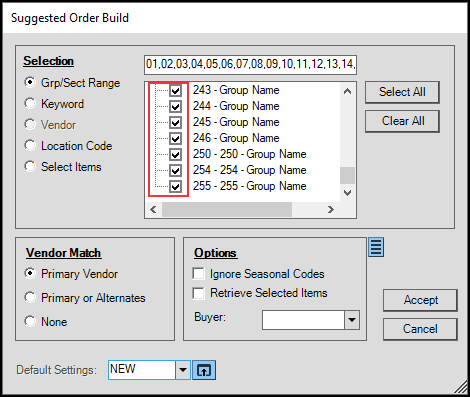
D-84505 – When Building Purchase Orders, Now Including All Group/Sections Selected.
A customer reported that when they were working in Purchase Order Entry and used the Select All option in the Group/Section Range, there was a limit to the number of groups and sections that the application could add. We have corrected this problem by expanding the selection option to truly include all selected Group/Section entries in the grid.
D-84898 – Out of Memory Issues in Item Maintenance Resolved.
A customer with two locations reported that they were getting a serious error when they accessed the Item Maintenance form and attempted to change branches. This resulted in memory leaks which caused the out of memory issues. We have changed this process to ensure that users change their branch settings from the Main Menu only to prevent this problem.
D-85027 – Transaction Document Printing Logic Change (When Print Copies are Set to 0).
In the Device Maintenance form (Printer) when you select 0 in the Number of Copies field, you expect the application to prevent printing by default for the Point of Sale transaction document types you specify. Some customers reported that documents were still printing even though this field was set correctly. What we found was that if Selection 2 or Selection 3 Copies field for these document types had entries, the application was printing these documents anyway. We have resolved this issue by focusing on the account’s job print settings.
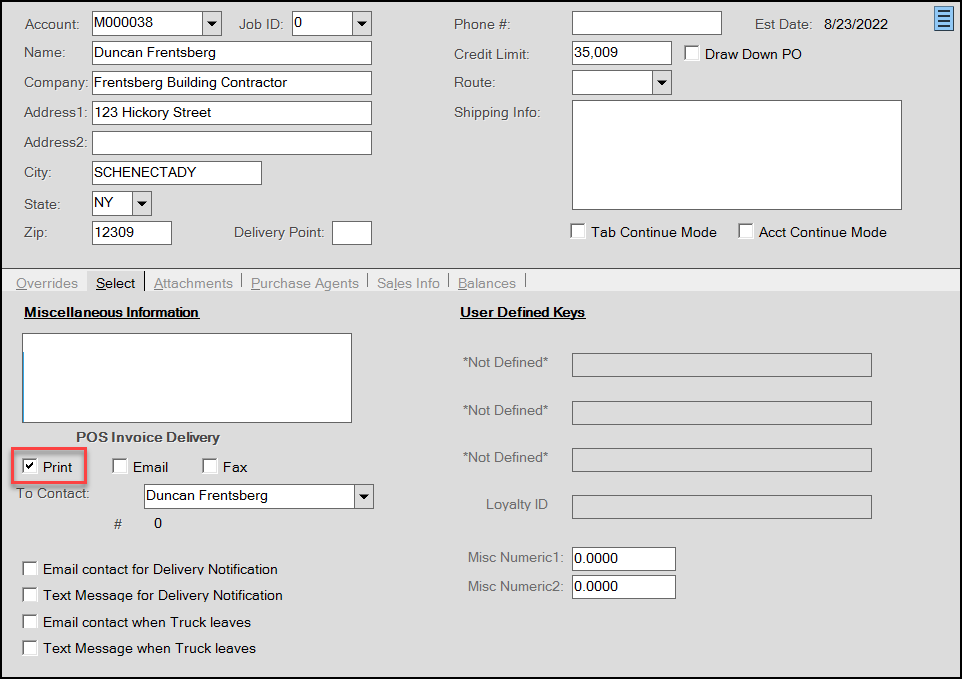
Job Maintenance > Print Setting for Point of Sale Customer
If the account’s job settings on the Select tab are set to Print and the Device Maintenance entries are set to 0, the application prints the transaction ticket/document. If there is no setting in the Select tab, the application uses the Device Maintenance setting to set the print option by default. This logic applies to Sales, Orders, Quotes, Tickets, and Charge Returns. If the account’s job settings on the Select tab are set to Print and the Device Maintenance entries are set to 0, the application prints the transaction ticket/document. If there is no setting in the Select tab, the application uses the Device Maintenance Print setting to set the print option by default. This logic applies to Sales, Orders, Quotes, Tickets, and Charge Returns.
D-85294 – VAT Return Calculations include Sales Credits (As of August 2022). (UK Only)
For business in the UK that use the “Cash” accounting method, we now include credit memos (invoice type 2) in the VAT Return calculation and reporting process. A customer reported this issue and we fixed it quickly to ensure their tax submission was accurate.
D-85448 – PO Reference Numbers No Longer Look Like Amounts.
A customer requested that we update the PO reference numbers on customer statements because they were formatted as amounts. We found that in some cases PO Reference Numbers did have unnecessary formatting applied, which we corrected.
D-85785 – Items Sold History by Customer Form Displays Group/Section Box Correctly Again.
A customer reported that the Group/Section box in the Items Sold History by Customer form (Point of Sale > Inquiry > Inventory > Items Sold) was displaying incorrectly at different scaling settings. We have corrected this issue.
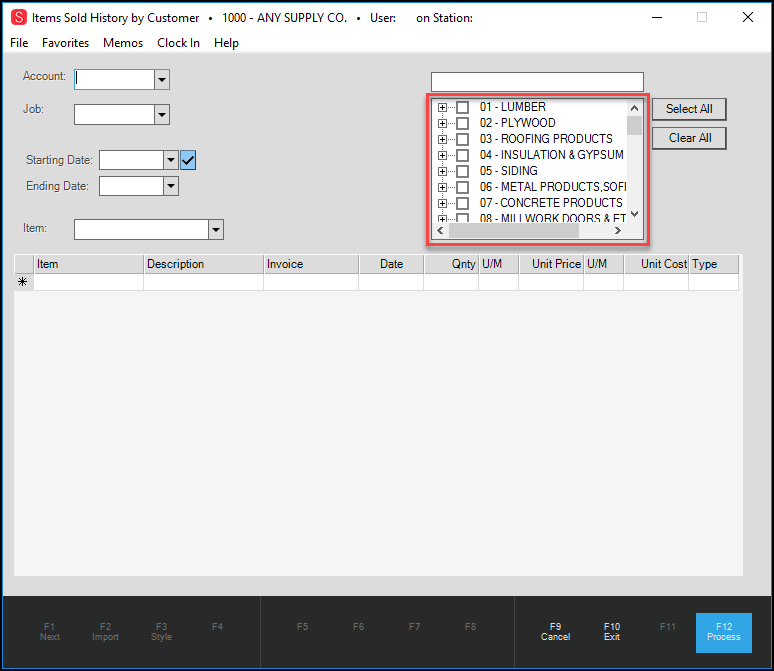
Items Sold History by Customer (at 110% Setting)
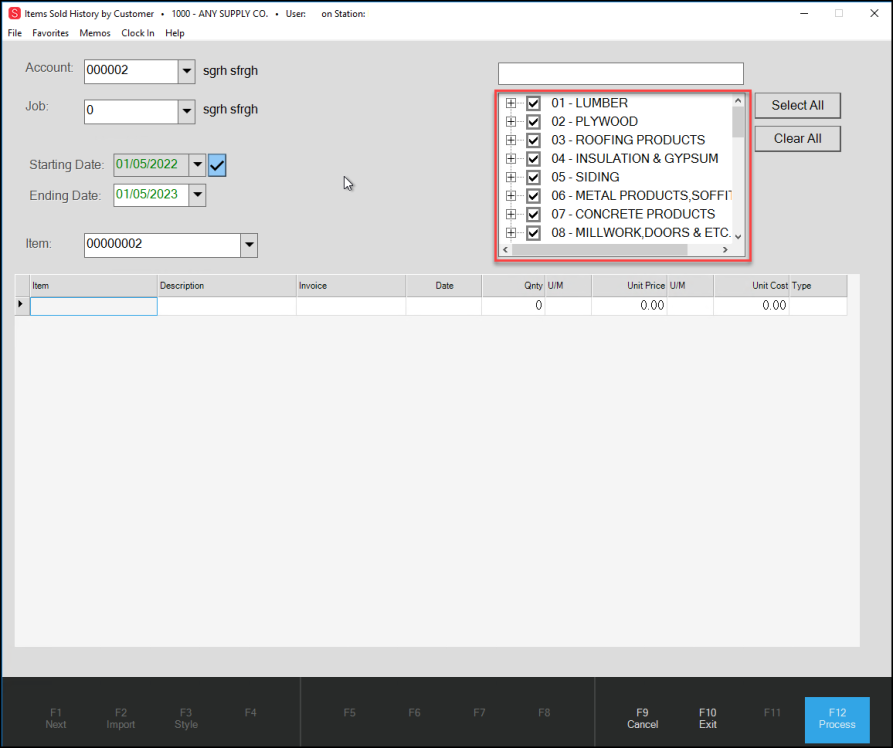
Items Sold History by Customer (at 150% Setting)
D-85806 – Calculating Prices for Non-Taxable Variable Price Material List Items Improves. (AU Only)
When you are in an Inc Tax branch and the customer purchases a variable price material list item that is non-taxable, calculating the price gets complicated. We have improved the calculation process to ensure that all material list items, including variable price and fixed price item types, that are taxable and non-taxable, are calculated correctly as of this version. This has been corrected as items that display in the data grid and in the resulting Point of Sale documents. We have tested this fix with foreign currency and local currencies and when accounts are changed from a local currency to a foreign one (and foreign to local).
D-87602 – Cash Drawer Tally Shows in Cash Drawer Handler Form.
As a Cashier, if you want to see a tally of your Cash Drawer bankcard and check (cheque) amounts, you can use the Cash Drawer Utility to do it.
To display cash drawer tally information:
1. From the Main Menu, choose Point of Sale > Utilities > Cash Drawer to display the Cash Drawer Handler form.
2. From the Drawer # list, choose your cash drawer (as assigned in the User ID Maintenance form).
3. From the Session Activated list, choose the session you want to review the tally for.
Note: The current (open) session is at the top.
4. Choose the Menu Marker  to the right of the data grid. Three options display.
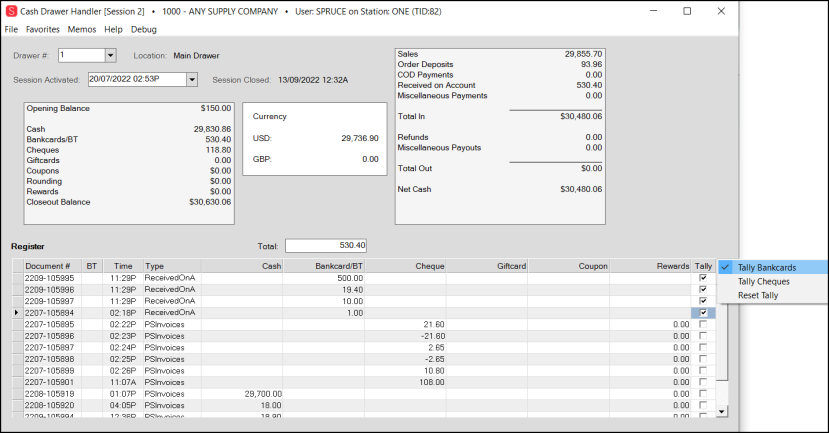
Cash Drawer Handler Form with Tally Menu Options
5. From the list, choose the tally option you want to calculate. The Total box displays.
-
Tally Bankcards allows you to total the bankcard transaction amounts (positive and negative) in the current session
-
Tally Checks (Cheques) allows you to total the check/cheque amounts (positive and negative) in the current session.
6. In the Tally column, choose the check boxes beside the rows you want to total based on the tally type you selected. The Total field updates as you select the amounts for that tally type. You can uncheck a Tally box to recalculate the amount without the selected row value in it.
Note: If you select a row for a different tally type, that amount does not update the Total field.
D-87627 – Kiosks Showing Prices with VAT when Appropriate. (Caribbean)
A customer reported that the prices that displayed on their kiosks did not reflect the tax information correctly. After some research we found that the process for updating the prices in kiosks used the wrong record type, which did not reference the tax status (Tax Included/Tax Excluded) of the branch. We have corrected this issue to ensure that pricing in kiosks reflect the tax amounts correctly.
D-87628 – Order Pick Tickets for Sold Random Tally Items Printing Correctly Again.
In the past when you sold random tally items and created a pick ticket document that included them, the quantity and size details did not display in the Description column on the pick ticket. This changed in release 20 and customers asked us to change it back. We have removed this information from pick ticket documents when the items have been sold.
D-87630 – Item Comments Saved and Display Correctly on Processed Purchase Orders.
We found that when you saved comments to a Purchase Order and then added new comments to the processed PO, the application did not save the original comments. We have corrected this issue so the Purchase Order contains all comments saved to it over time.
D-87894 – Disabled Tax Codes Removed from Tax Loc field in Delivery Tab.
A customer reported that they were seeing disable tax code entries in the Tax Loc field for orders and sales in the Delivery tab. We corrected this issue to exclude disabled tax IDs from this list.
D-88474 – Unit of Measure Price Levels Apply to Sales Entry Columns Correctly. (UK Only)
We have resolved a VAT-related issue that caused unit of measure-based price levels to display incorrect pricing for some UK transactions.
D-88786 – Returns for Exempt Items No Longer Contain VAT Amounts. (UK Only)
When customer’s return exempt items, we ensure that we no longer calculate VAT amounts as part of the return process.
D-89077 – Statements with Reprinted Invoices Attached Print Properly Again.
We found that some statements with reprinted invoices attached were not able print reprinted invoices if the statement was adjusted. The error message, Could not open reprint XXXX because it is either not a supposed file type or because the file has been damaged has been resolved. We corrected the issue that prevented this invoice from printing.
D-89436 – VAT Adjustments (Credits) included in VAT Return Calculations. (UK Only)
When calculating a new VAT Return, the application now includes VAT adjustments for the previous VAT Return amount into the calculation. We have corrected this issue.
D-89440 – Modified Reprint Functionality to Prevent Resending Email for the Transaction.
In the past, when you chose the Reprint (F8) option to reprint the previously printed invoice (or ticket), the application would also resend the document via email. We have modified this functionality to prevent the application from resending the invoice/ticket for reprints.
D-89755 – Purchase Order Formatting Corrected to Display Missing Information.
We have updated the formatting for Purchase Order documents to ensure that the Cost and Extended Cost column content and headings display correctly and that these documents require more pages to print. We have corrected these issues by changing the font size and improving formatting.
D-90000 – Primary Vendor Prompt No Longer Displaying when Using Item Import Wizard.
A customer reported that while using the Item Import Wizard (in the Update and Continue mode), the application would prompt them to update the branch’s primary vendor each time the vendor deviated from the primary vendor. We now skip this validation process.
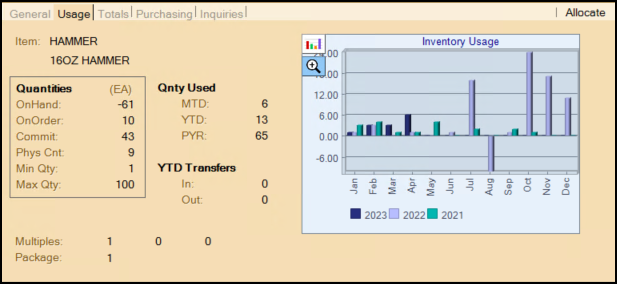
D-90631 – Corrected: Show Bar Chart Issue in Purchasing > Usage Folder.
When you selected Purchasing > Order Entry and accessed the Usage folder, a customer reported that they were not able to access the Show Bar Chart option. We have corrected this issue to enable the inventory usage display as both a data grid and as a bar chart.
D-91336 – Resolved: No Sign on ePad Resulted in Process Form Disappearance. (AU Only)
When a customer using an ePad, chose No Sign, the Process form redisplayed behind the application form, so it was not visible. We have corrected this issue so that under these circumstances, the application displays the Process form on top, as expected.
D-91352 – Purchase Order Entry Issue with Order Multiples Corrected in Usage Tab.
When an Order Multiple setting is entered in Item Maintenance and then that item is added to Purchase Order Entry, the application multiplies the Purchase Order entry value by the entered multiplier. In the Usage tab, this was not working correctly. When you chose Folders (F4) and reviewed the entries in the General Tab and then in the Usage tab, the Order Multiples entries on the Usage tab were wrong. We have corrected the error that caused this discrepancy in the Usage tab.
D-91393 – Splitting a Child Hardwood Unit in Point of Sale Working Properly Now.
When entering a child unit of a Hardwood item in Point of Sale, the application was displaying an error when the user tried to split the child Hardwood item. This issue has been resolved so that any child item can be split as needed.
D-91614 – Resolved: Incorrect VAT Calculated for POS Invoices. (Caribbean Only).
When investigating a customer-reported VAT calculation issue, we found that the tax calculated was incorrect in some cases by .03 to .08 pence. This occurred when the application was recalculating row totals. We have resolved this issue.
D-91692 – Scheduled Reports were “Failing” even when they ran Successfully.
A customer told us that all of their scheduled reports were failing. When we reviewed the data the customer was seeing, we found there was a problem with the reporting mechanism that listed all of the reports as failing, even when the reports completed successfully. We corrected this mechanism so that it accurately shows the results of their scheduled reports.
D-91843 – Tags & Labels Designer No Longer Changing Printer Type During Label Edit Process.
A customer told us that when they used the Label Designer to edit a label (either a Dymo or Zebra) the application would change the printer type to a Laser label type and they could not change it back. We corrected this issue by ensuring that during the edit process, the label type defaults to the selected template’s label type.
D-91991 – Beta Issue Resolved: Error on ePad Signature Capture After Canceling a Transaction.
When a user tried to click the Finish button after canceling a transaction on an ePad Vision Signature Capture device, the application closed suddenly. To resolve this problem we have added a timeout limit to the ePad form.
D-92019 – Accommodating the EJD Price Updates and File Maintenance Requirements.
We found that EJD price update automation settings were conflicting with the EDI parameter settings. We have resolved these conflicts to ensure the application can process the nightly price update changes and file maintenance processes. This change has been applied to the system that reported the issues and will work properly for any new customer that has the same conflict.
D-92168 – Inventory Receipts Report No Longer Causing Error.
When choosing View (F8), after choosing parameters for the Inventory Receipts report, the application sometimes closed suddenly. We have resolved the issue that caused this problem.
D-92984 – Scanning a Doc ID Barcode Works in Open Tickets Again.
A customer reported that they were not able to scan a document ID barcode for Open Ticket transactions. We resolved the problem that caused this issue.
D-93121 – Skipping Laser-Type Labels in Tags & Labels Feature Working Correctly Again.
A Tags & Labels customer reported that when used a laser printer and tried to use the skip label process so that the application would start printing the labels correctly, did not skip the specified labels. This turned out to be an issue that was specific to non-vendor labels. We expanded this capability to include all label types.
D-93329 – Incorrect Extended Costs on Work Order Forms Issue Resolved.
A customer found that their work order forms were displaying the incorrect extended costs for materials in work order items in the Manufacturing area. After some investigation, we found that when the unit of measure specified in the data grid was not the same as the base unit of measure, the application was converting the cost based on the new unit of measure and then converting it back to the base unit of measure. We have corrected this error so the application successfully converts the extended cost amounts based on the unit of measure entered rather than the base unit of measure.
D-93406 – Retrieving Existing Non-Stock Item and Material List Order Errors Resolved.
When a customer tried to retrieve existing customer orders that included some non-stocked items and material lists, they received the error, Unable to retrieve the specified Order. We have corrected the issues that caused this error so these orders should be accessible again.
D-93428 – Performing Item Searches in Data Grids (like Orders) Works Correctly Again.
A customer told us that when they were performing a keyword search in an Order Entry data grid, a serious error occurred and the application closed. After researching we found that the error was caused by an ineffective data request. We have corrected this issue so you can reliably search for items using keyword searches in all data grids.
D-93634 – AR Payment Posting Session Report Displays All Accounts in Session Again.
When a business made a single change to a Cashier’s report, the change did not display correctly in the AR Payment Posting Session report as it did in the previous release. We found that the application was creating multiple sessions for each payment, which caused the confusion. We have corrected this issue to ensure that the AR Payment Posting Session Report displays all payments correctly.
D-93869 – Update to Clover Pairing Processes Improve Re-Pairing Experience (UK Only).
A customer in the UK had trouble when trying to re-pair a Clover device when the device processed several transactions in a short time. We have improved the Clover pairing and re-pairing process to make it work faster and more efficiently. There are no additional steps for this process.
D-93918 – PO Summary Report Displays Correctly for Businesses with PO List Manifests.
When a customer with a PO List Manifest tried to access the PO Summary report, it caused a serious error. We have corrected the issue that caused this error.
D-93925 – Stock Status Report Export No Longer Causing Error.
When exporting a Stock Status report to Excel format, a customer found that a serious error resulted. We have corrected the issue that caused this error so you can export the Stock Status report successfully now.
D-93959 – Errors Resolved in PO Entry Form When Catalog Items are Not in Current Branch.
A customer told us that they were getting serious errors when they were in the PO Entry form and tried to scan in items that were in the catalog but discontinued or disabled in the current branch. We have resolved this issue to ensure that the application does not close suddenly when this circumstance occurs.
D-93974 – Random Length Tally Item Issue Resolved.
Due to lineal tally change, a customer found that when they added a random length tally item to a Point of Sale transaction and then deleted a row from the item’s tally box, the application updated the quantity in the data grid to 0. We have corrected the previous change to ensure that it only applies to lineal tallies, which resolved the issue.
D-94174 – Beta Upgrade: M304 Error During ROA Payment Process Resolved.
A customer who was using the new payment notification features noticed that when they went to process the Receive on Account amount for a customer and tried to process the payment the error M304 occurred (Unable to display the Process form). We have resolved this issue so you can process these payments and complete the notification processes too.
D-94268 – Transactions Resulting in a Cash Tender Ending in .96 or .97 No Longer Causing Errors.
In regions that use cash rounding, when the sale total had .96 or .97 in the tender amount, and the cashier entered the next currency bill over that, the application experienced a serious error: This sale has encountered an error with the total remittance and will not be saved. When we investigated this issue, we found the cash rounding routine did not work as intended. We have corrected this issue so that cash rounding works correctly.
D-94279 – Beta Issue Resolved: Inventory Stock Status Report Displaying QOH Values Correctly.
A beta customer reported that in the inventory Stock Status Report the Quantity on Hand values were displaying with four-digit decimal values. This has been corrected.
D-94293 – Material Lists No Longer Repricing When Orders are Copied In.
We investigated an issue a customer reported that materials lists were repricing when they were copied into Point of Sale. Turns out the application was converting the unit of measure of these material lists during the process, which caused the repricing problem. We have corrected this issue to ensure that the pricing of orders remains stable when they are copied into Point of Sale.
D-94301 – Beta Upgrade: Sales Tax Report is Reporting Non-Taxable Amounts Correctly Again.
A customer told us that the Point of Sale Sales Tax Report was not reporting non-taxable sales when the user chose the selected month option. This was caused by a correction we made to the PS Sales Tax Report when the non-taxable amounts were doubled. We have now corrected both issues and tested them to ensure that the results are accurate.
D-94323 – Clover Devices Displaying Correct Totals for Refunds (UK Only).
We have modified the Clover refund process to ensure that the currency symbol and number format is working more consistently and readably.
D-94325 – Clearing Clover Devices of Line Items For Cancelled Transactions. (UK Only).
A customer reported that when they cancelled a transaction, there were times that the line items of the old transaction showed up on the next Clover screen. We have corrected this issue.
D-94326 – Improved Clover Terminal Initialization Time (UK Only).
We have improved the terminal initialization time for Clover devices, particularly when you are re-stablishing a connection. The terminal was trying to re-connect at login, even though the connection was already established. Now, the only time the terminal attempts to perform this step is when there is an unfinished transaction from a previous session.
D-94330 – Resolved: Reselected Quote Line Discounts and Pricing Preserved. (AU, UK Only)
When you create a quote in an Inc tax branch, and then you opened the quote later or imported the quote into Order Entry (or Sale Entry or Open Tickets), the application sometimes repriced the line entries incorrectly. We have fixed the code to ensure that the application retains the original discount specified in the quote. We have tested this fix in Quotes, Sales, Orders, and Open Tickets to ensure this correction works as expected.
Note: We are still working on a separate defect that addresses quotes price changes associated with material list line discounts. This fix does not address this issue.
D-94431 – Item Merging No Longer Causing Issues on Unexpired Contracts.
When you merge items in the application, it makes sense to consider how that merger affects those items in existing contracts. A customer reported that after merging items that were on existing contracts, they were not able to change contracts that included those modified items. We have added a warning when you are merging items to warn you that it may affect existing contracts, but we are now ensuring that those contracts are still editable after an item merge that affects the contract has occurred.
D-94473 – Overload Resolution Issue Corrected.
That long message that was attached to this error meant that the application could not find the Cubes and Weight values it was looking for when creating the Manifest document. We resolved this issue by displaying 0.00 rather than the error.
D-94476 – Unexpected Data Base Error Resolved.
This issue was caused by a change to the delivery subitem’s content, which had a specific reference to a field position. When we corrected the reference to the internal document ID, we corrected the error.
D-94483 – Email Queued Message No Longer Appears as a Pop Up During Sale Processing.
A customer told us that suddenly, a new pop up message displayed during the Sale Entry process that prompted the Cashier to click OK to confirm that an email had been queued. This message now displays as a footer and does not require confirmation.
D-94650 – Beta Upgrade: Branch List Selections on Statements Working Correctly Again.
When using the updated Branch selection feature for generating statements, a customer found that the application was pulling in the prior branch rather than the newly selected branch statements. We have corrected this issue so the statements associated with the branches you select are the statements you should get.
D-94742 – Now Applying Deposits Proportionally When an Order is Partially Invoiced.
We have modified our approach to applying a deposit amount to a partially invoiced order. When your customer pays a deposit on an order, and requests a partial invoice, the system should default the Deposit to Apply amount proportionately, based on the percentage of the order that is invoiced. For example, if 40% of the order is being invoiced, the application will apply 40% of the deposit to the invoiced amount.
D-94743 – Images in Point of Sale Folders Display Correctly the First Time.
When you open the Folders (F4) option for any Point of Sale item, and you click the Inventory > Images tabs, you expect to see a saved image of the selected item in Inventory. Due to the addition of the Foreign Pricing tab in Folders, the Foreign Pricing tab displayed first. We have corrected this issue so that the Image tab displays when you select it.
D-94753 – Open Tickets Pulling in the Selected Quantity Only Again.
A Canadian customer reported that when importing selected items into an Open Ticket from an Order, if you only pulled in some of the item quantity from the order (as you would when some items are back ordered), the application would pull in all the full quantity any way. We have corrected this issue and tested partial invoicing, ticketing from both customer orders and customer quotes on sales, order, direct ships, and open tickets. Each of these scenarios work correctly now.
D-94754 – Consolidated Contract Maintenance Processing Correctly Now.
While working in the Contract Maintenance form, a customer reported that when they chose the Consolidated check box, the application would not enable the Process (F12) function. We have corrected this issue so this function is available for consolidated and job-based contracts as well.
D-94816 – VAT Added Correctly to Quotes and Orders when using ProLink. (UK Only)
A UK customer told us that when they processed incoming quotes and orders using ProLink, the application would not also import the VAT amount. The VAT displayed correctly in the Subtotal list but not in the data grid. We have updated this process to ensure that when processing orders and quotes using the ProLink app, the VAT amount displays correctly in the data grid and is processed successfully.
D-94915 – Better Layout for Purchase Order Documents.
A customer shared with us the need to change the Description and Cost column entries in Purchase Order documents to fit the description and cost entries better. The expanded entry for the Description field ensures better readability and the Cost field entry can now display four-digit decimals appropriately.
D-95067 – Maintaining Tax Inc Pricing in Saved Quotes and Orders. (AU Only)
When you created a quote or order in an Inc Tax branch and then went in to modify that transaction, the application did not display Tax Inc prices in the data grid in all cases. We have corrected this to ensure that the data grid displays only Tax Inc pricing in Tax Inc branches under all circumstances.
D-95194 – Improved: Clearing Clover Transaction that is Not Approved. (UK Only)
When encountering an unfinished Clover transaction on start-up, the application was not clearing that process after the cancellation was confirmed, so it prompted the Cashier to check the same transaction again. We have corrected this process to ensure that once a transaction is cancelled, it is cleared from the Clover device.
D-95195 – Clover Pairing Improved to Prevent Re-Pairing During First Transaction. (UK Only)
During the pairing process between the Clover device and the station, the application was not saving the authorization token in all instances. This caused the device to try to repair with the station during the first transaction of the day. We have improved saving process to include the authorization token and the station name, which results in a more reliable and stable pairing process and prevent this repairing issue.
D-95309 – VAT Issues Resolved for Material List Items when Importing Quotes. (UK Only)
When a Cashier entered a material list item to the data grid and then imported a quote in the Sale Entry data grid, sometimes the application would double the VAT for the material list item. We have corrected the issue that caused this behavior so that the import process does not affect the material list tax information.
D-95361 – Successful Clover Transactions No Longer Require Reinitialization. (UK Only)
When a Cashier completes a successful transaction, you do not expect the device to require reinitialization. We have corrected the issue that used to trigger this reinitialization.
D-95438 – Processing Returns on Clover Devices Improves. (UK Only)
When processing a return (whether enhanced or not), the Clover device was still displaying the line items and did not advance to payment mode. We have resolved this issue to ensure that item display works correctly and so does return payment processing.
D-95532 – External Links Open in a new Type of Window Now.
In the past, when you opened a Google Map, accessed the ECI website, or clicked an email link, the application would open an IE window in which those pages could display. To improve security and make access quicker, we open a new type of page.
Google Maps Page Sample
The new page does not have an address bar, so it is more secure while providing the tagging tools necessary to save a particular page, if you need it.
D-95644 – Cancelled Transactions on Clover Devices Clearing Better. (UK Only)
In the past when you cancelled a transaction on a Clover device, if the application did not clear it entirely, it affected other stations’ ability to access the application successfully. Other stations would try to clear the “in-process” transaction and if the transaction no longer existed, the second station’s application would close. We have corrected this issue to successfully clear cancelled transactions, which prevents the problem for other stations.
D-95727 – Clover Pairing Issues Resolved. (UK Only)
When you begin processing a transaction using a Clover device, but the device is not paired with the station, the application was beginning the pairing process during the transaction process, which caused errors. We have improved the pairing process to ensure that pairing is complete prior to transaction processing.
D-95732 – Clover Pad Configuration Reporting Improved (UK Only)
A customer reported delays and errors during the Point of Sale process when the station device was reset to None, but the parameter settings were set for Clover. Now, when you change the station device settings to None, the application does not expect the station to be using the Clover device to process payments, so there are no delays or errors when adding items to the data grid or process payments.
D-95857, D-95858 – Processing Payments for Accounts Set to Foreign Currency Improves.
A customer reported that when processing transactions for an account that uses foreign currency, the application closed suddenly. We researched this issue and resolved it for all accounts.
D-95937 – Updates to Clover Time Out Process Improve User Experience. (UK Only)
A customer in the UK reported that when a Clover device timed out, messages would display every minute to state that the process had expired. We have improved the handling of this behavior to ensure that when the Cashier hits the Cancel button, no further messages display.
D-96129 – Transaction in Progress Flags Clearing Correctly (Clover). (UK Only)
On Clover, after completing an order with payments on it, the application was not clearing the transaction in progress flags, so when the next person logged in, the unfinished transaction check happened but it should not have. We have corrected this issue.
D-96455 – Hosted Payment Page Payment Working as Expected Again. (UK, AU only)
When you use the Hosted Payment Page to process transactions there were times when the application would close unexpectedly during the transaction. We found that the transaction was losing focus, which caused the error. We have corrected this issue.
D-96503 – Back Ordered Quantities on Partially Sold Orders Issue Resolved.
When your customer placed an order and there were back ordered items on it, if you further modified the order, the original ordered quantities would be reset. We have corrected this issue to ensure that the application maintains the original order information correctly.