Permissions List
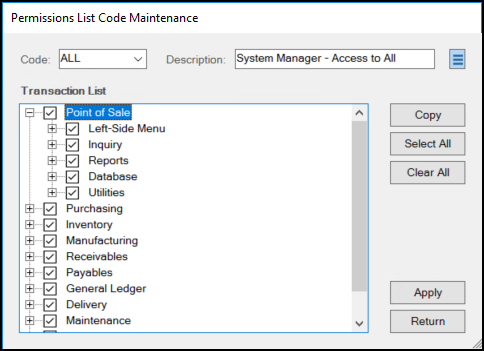
The Permissions List (accessible in the Security Options tab of the User ID Maintenance form) gives system and application administrative users the ability to manage navigational access to specific areas of the application for each user or user group.
To access the individual permissions for a group, click the Settings ![]() icon beside the Permissions List drop-down list.
icon beside the Permissions List drop-down list.

These settings display in a tree view which is organized by the software's menu structure to make the access easy to understand. Authorized users can set up group permissions for financial, point of sale, and receiving, or inventory, for example.
-
Click the + (plus) to expand the tree and display sub-level choices.
-
Click the - (minus) to collapse the tree to the primary selection.

When you select any sub-level choices (checked) for an application set, a check appears in the box ![]() next to that application feature.
next to that application feature.
-
If you choose only some sub-level choices (not all), the application area check appears grey
 .
. -
If you do not select any sub-level items, no check appears in the top box.
Some system-wide security options are always enabled, such as Logoff (under File), Home, and Help need to be available to all users.
After you complete your selections, choose Apply (ALT-A) to save your changes or additions and Return (ALT-R) to close the Permissions List box and redisplay the User ID Maintenance form.
Note: A prompt appears if you do not select Apply after you make changes.
There is a special process form for adding, modifying, and deleting Permission list codes.
Button choices such as Copy (ALT-C), Select All (ALT-S), and Clear All (ALT-C) are standard.
You can delete permissions codes using the Menu Marker ![]() icon.
icon.
Tree Selection Tip: You can make tree selections using the keyboard. Press the TAB key until the tree form is active then use arrow keys for movement and the Space bar for either selection or clearing. The right and left arrow keys display or collapse the sub-level selections.