Setting Up a Moneris Device on a Station
After the Moneris parameters have been enabled and the settings configured for the branch location and you've received your devices (Moneris configured Ingenico IPP320 or the Verifone P400), you can begin associating those devices with stations in the application. The Verifone P400 devices are 3DES-compliant, which is the reason for the change. As Moneris prepares to replace the Ingenico IPP320 device with the Verifone P400, we have worked to ensure that these processes stay in sync so you can use both devices until the replacement process is complete.
This is done from the Device Maintenance form available from the Main Menu by choosing Maintenance > Database > Devices.
|
Important! With all card interfaces, a one-to-one relationship is required between the payment entry device (PED) and the station configured in the software. In addition, we strongly suggest that stations configured with card devices only permit one user session. Attempts by multiple software sessions or other stations to access the same pad device can cause unwanted behavior and results. |
Device Settings - Assigning a Static Network Address
A unique static IP address must be assigned to each Moneris device. The term "static" refers to an IP address that won't change if the device or network is reset. "Dynamic" (DHCP) addresses can change any time the device or network connections are refreshed. You will need to know the IP address to continue to the next steps.
What IP Address Should I Use?
IP addresses must be different for each network device you connect. Connecting devices with the same address can cause network slowness and other problems, so it's important to make sure the address you assign is:
-
(1) in the "static" range for your network and
-
(2) not being used by another device on the same network
For our hosted customers, network devices often require a hardware VPN (Virtual Private Network) device to connect to the cloud hosted servers. In these cases, the addresses used by your company's network may or may not be available, so we may need to assign special addresses for their use or we may use NAT (Network Address Translation) to convert your local address to one that's available in the hosted network environment. To learn more about setting up the IPP320 to use
A network generally will have a defined range of addresses assigned for static use and another reserved for dynamic (DHCP) connections for devices that don't require a specific address. The only way to tell your static address range, if you don't already know it, is to log into your router (using a browser) and check the settings. This usually (should) requires a user name and password. You'll need to know the IP address of your router (the gateway).
Once you have determined the range of static addresses, check to make sure the address is not already in use. While all network devices are on and connected, you can use the "ping" command from the command prompt in Windows to test connectivity for various addresses. When you find an address in the "static" range that does not respond to the ping, it is likely available. It's a good idea to keep a written record or chart of your company's network for reference to make this process easier.

In the example above, the "Destination host unreachable" message indicates that the address is likely available (or, it is not connected currently).
Other information you'll need
In addition to identifying an IP address, you'll need your network subnet mask (255.255.255.0, for example), gateway address, and two DNS (Dynamic Name Server) addresses. These are typically the same for all devices on your network. The easiest way to find this information is to run the ipconfig /all command from the command prompt on a connected network computer.
For our cloud-hosted customers, some of this information will be provided to you.
Adding the Verifone P400 to a Station
Moneris is replacing the Ingenico IPP320 with the Verifone P400, beginning in April of 2025. You can extend your use of the IPP320 by resetting it to use the Remote Client process rather than the VPN and this process is covered here. If you are converting the station from an IPP320 to a P400, you make those changes in the Moneris Device Settings box to support the new device.
Note: To learn more about configuring the network settings for the P400, check out the ECI Customer Portal article, Moneris P400 Configuration.
These instructions assume you have Remote Client set up for the station in your Device Maintenance form. Follow the instructions in this topic if you need to set up a new remote connection.
Note: If you revert an IPP320 to VPN after setting up the Remote Client process to connect to the device, make sure the Remote Client settings in the lower left corner are disabled if you do not use them for printing.
To add a P400 device to a station using the Remote Client process:
1. From the Main Menu, choose Maintenance > Database > Devices. The Device Maintenance form displays.
2. From the Device Name list, choose the station to add the P400 device to. The form updates to show the current device settings for the station.
3. Choose the Card Pad check box and Moneris from the Type box (if these settings are not already selected).
4. Continue based on whether you are adding a new device or replacing an existing IPP320:
-
If you are replacing an existing device, the Moneris Device Settings box displays automatically.
-
If you are adding a new device, click the Settings button to display the Moneris Device Settings box.

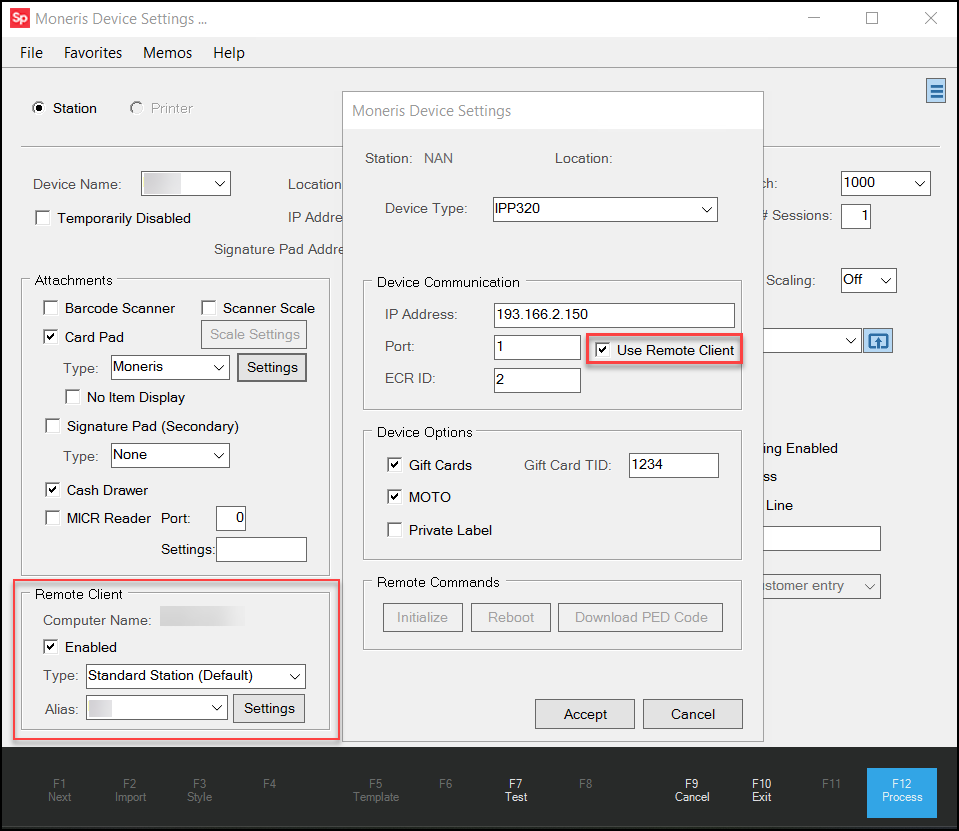
Moneris Device Settings Box with Verifone P400 Option Highlighted
5. From the Device Type list, choose Verifone P400.
6. Whether you are adding a new device or replacing an existing one, you can reset the Device Communication settings as needed:
-
IP Address
Enter the IP Address for the Verifone P400 device, as supplied by your network team. -
Port
Enter the Port setting for the Verifone P400 device, as defined by your network team, 9599. -
ECR ID
Enter the Cash Register ID of the device in this field.
When you complete these entries, the Initialize Device box displays.

P400 Settings > Initialize Device Prompt
7. Choose Yes to begin the initialization process. An initialization message displays on the P400 device.
When initiation is successful, the message, Terminal Initialization Succeeded.
If not, review your settings to see if there are any changes required.
8. Click OK to close the initialization message.
9. Review the following options and select the check boxes of the features you need to support with this device:
-
Gift Cards
Select this option to support gift card and loyalty transactions on this device. This includes enabling gift cards, activating and deactivating them, inquiries about points and usage totals, purchases with gift cards, and returns that involve gift cards as part of the original transaction.
Note: Enter the unique transaction identifier ID in the Gift Card TID field. The gift card TID number is specific to the ECR ID number and is unique to the Moneris Pad. This is required for processing Moneris gift cards. -
MOTO
Select this option to support Mail Order/Telephone Order transactions on this device. When you enable this check box, Point of Sale can use the MOTO option in the Process Document section during the Point of Sale checkout process on P400 devices.
10. On the Moneris Device Settings box, click Accept to close the box.
11. In the Remote Client section, select the Enabled check box and leave the default Type list entry, Standard Station (Default), in place.
12. Choose Process (F12) to save these settings to the application.
The application uses the Terminal Initiation for both the Remote Client and VPN processes, these processes are just different.
Using Terminal Commands to Review the P400 Responses
The BankCard Maintenance Terminal Commands allow you to review the Remote Client and VPN responses to Moneris device changes for a particular station. Using these commands, you can review the results of many standard process changes you made to the station, including initialization, gift initialization, log on/off, PED (PIN Entry Device) details, including code download, totals reset and reboot; terminal reset, last transaction details, close batch and close batch inquiry, gift totals by card code, gift close batch and batch inquiry, and to set the English/French language settings. Moneris must be your Card Processing Interface to see these BankCard Maintenance settings.
To review the responses to terminal command options for the current station running Moneris:
1. From the Main Menu, choose Maintenance > Utilities > Bankcard Maintenance. The BankCard Maintenance form displays.
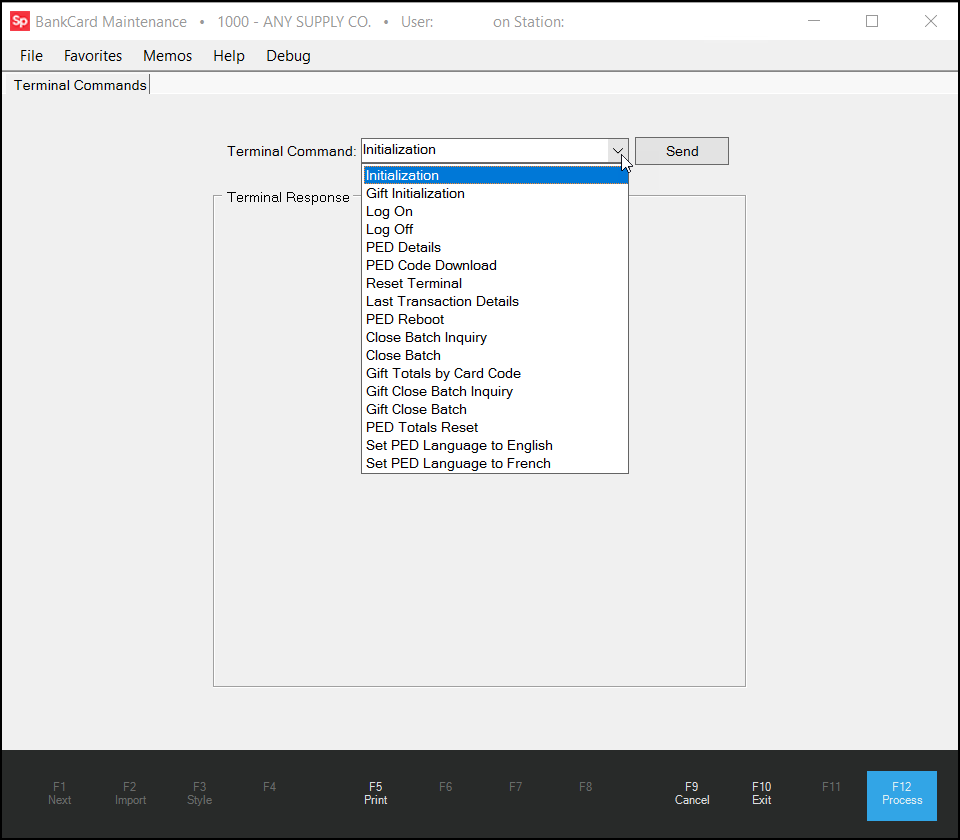
BankCard Maintenance > Terminal Command List
2. From the Terminal Command list, choose the command you implemented, to see the terminal response results. This tool works for both Remote Client or VPN responses.
3. Choose Send. The application searches for the terminal response results and displays them in a new box.
Understanding the Moneris Receipts for the P400
When you begin to use the P400, you may notice that the receipts’ layout is different from those you see when you are using the IPP320. These receipts have been designed by Moneris and comply with their layout requirements.
Setting up a Remote Client Connection for an IPP320 Device
Typically, Ingenico IPP320 devices use a VPN connection by default to access the application. If your stations already use a Remote Client connection for printing, you can extend your use of the IPP320 by setting the device up to use the Remote Client process as well. In the Device Maintenance settings for the station, specify the Use Remote Client option while setting up your IPP320 device. Make sure each station’s Remote Client settings are complete as part of this process.
Important Note: Moneris is replacing the IPP320 with the Verifone P400 in April of 2025.
To update the IPP320 device to use Remote Client settings:
1. From the Main Menu, choose Maintenance > Database > Devices. The Device Maintenance form displays.
2. From the Device Name list, choose the station the device is connected to. The form displays the current settings for the station.
3. Choose the Card Pad check box and Moneris from the Type box (if these settings are not already selected).
4. From the Device Type list, make sure IPP320 is selected and click Settings. The Moneris Device Settings box displays.
Device Maintenance > Station > Moneris Settings > Use Remote Client Check Box Enabled
5. To update your IPP320 device to use the Remote Client connection options:
-
Update the IP Address to reflect the local network connection.
-
Check the Port and ECR ID settings to ensure they are current.
-
Enable (Select) the Use Remote Client check box.
Note: If you uncheck this box later, the device reverts to the VPN connection.
6. Choose Accept to close the Moneris Device Settings box.
7. Enable the Remote Client settings for this device using the instructions in this topic or update the current entries, if needed.
8. Choose the Process (F12) key to save these settings to the database.
See Also:
Setting up Moneris Gift Cards