Blish-Mize - Setup
After your Blish-Mize EDI (Electronic Data Interchange) settings have been enabled by ECI Support or Implementation personnel, you are ready to configure the applications settings for communicating with the vendor. These settings are typically completed by Support personnel; however, someone at your company may have to supply some of the information required. Setup is done from the Branch Setup form, EDI tab (which you access by choosing Maintenance > Database > Branches from the Main Menu). You can enable additional settings including Mapping Overrides and Automation (schedule) options using the Menu Marker icon's ( ) context menu.
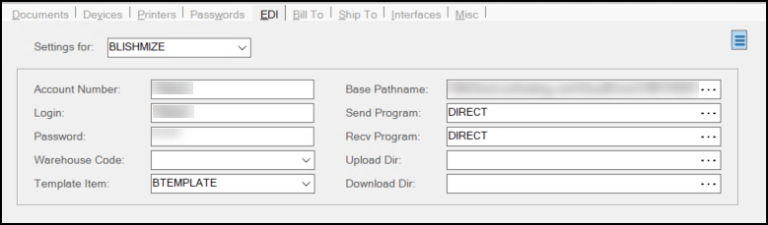
To support the EDI transmissions to/from Blish-Mize, complete these settings for each branch:
Account Number
Enter the store's (branch) account number.
Login
Enter the user name for online access. This is provided by Blish-Mize.
Password
Enter your member's password for online access to the vendors EDI web service/system. This is provided by Blish-Mize.
Warehouse Code
Not applicable.
Template Item
Select your Blish-Mize-specific item template from this list.
The application uses the item template when updating a purchase order with receiving data and an item in the data the vendor sends you is new to your inventory database. The template's item settings are used for any settings or information that is not provided in the data so that the application can add the item to the database. The application also uses this item to add new catalog items when they send you a Catalog update. You can name this item whatever you prefer. It's best to assign the item to its own group and section so that newly added items are easy to locate and make changes to. Generally, the template item is assigned to a primary vendor matching the EDI vendor code.
|
Please Note: Some EDI operations will fail unless a template item exists. |
Base Pathname
Click the Browse  button and select either the physical path on the local computer or a mapped drive to serve as the Base Pathname. If you select a directory that does not exist, the application will prompt the user to add it; however, this only applies to processing that is user initiated and not those that are automated.
For locally installed (not hosted) applications, the path name is a directory on the user's local computer or a mapped drive to a network share directory (on the server or another computer). This would usually only be done if EDI was being processed from different locations (computers) and you wanted to have all of the data files kept in the same location. Directory names can vary from our examples.
An additional directory, indicating the branch location, should be used any time the company has more than one location using the same EDI option; otherwise, there is a possibility that operations will conflict with each other causing another user's data to be overwritten.
C:\WSTieIn\{EDIName}\1000
For our cloud hosted systems, the path should be a UNC path name to a shared directory (folder) on the hosted servers. In some cases, it is instead a mapped drive that is automatically added when the user connects to the hosted environment. The UNC path will vary for each customer and point to their specific share directory (see below for an example).
\\server-name\SHARE\SharedFolders\ANYSupplyCo\EDI\{EDIName}\1000
When using a physical drive path, the letter of the drive may vary, but is usually either "R" or "S." It's best if letters for user's mapped drives do not conflict with any physical drive found on the server. For example, for servers where a physical drive of "R" exists, it's best to map the "local" drive to another letter. Both the drive letter, and path name, will be set for cloud hosted customers (this only applies to companies hosted by ECi Software Solutions, Inc.). An example is provided below:
R:\EDI\{EDIName}\1000
Some EDI operations run automatically and are initiated by services running on the server. In these cases, a physical path cannot be used (and the "mapped" drive won't exist). For this reason, there is a "services base path name" override found in the Automation dialog box available from the context menu. The services base path name resolves to the same location but is the UNC path name to that location.
Send Program
Enter DIRECT in this field.
The Send program refers to a script, application, or method used for transmitting data from your company to the vendor. In the case of Blish-Mize, we use a DIRECT code-based method, not a script.
Receive Program
Enter DIRECT in this field.
The Receive "recv" program refers to a script, application, or method used for retrieving data from the vendor. In the case of Blish-Mize, we use a DIRECT code-based method, not a script.
Upload Directory (Dir)
Not Used.
Download Directory (Dir)
Not used.
When these settings are complete, choose Process (F12) to save them to the database. Repeat these steps for any other branch that uses the Blish-Mize EDI process to send or receive data.