Scriptel ST1501 Signature Capture Devices
ECI Software Solutions, Inc. no longer sells Scriptel devices. For customers in Canada, the Caribbean, and the UK, you can purchase the device directly from Scriptel. We recommend that you review the General System Requirements (GSR) document for your region before you choose new products for your store location. This GSR document contains hardware options that have been thoroughly tested for use with ECI software. You can get this document and access many other helpful tools on the Customer Portal.
Understanding the Scriptel Signature Capture ProcessThe communication from Scriptel devices is in one direction only, from the device to the application. The device transmits the signature data as keyboard input to avoid many of the issues you might normally encounter with remote connections. Scriptel devices operate as a Human Interface Device (HID), like a keyboard or a mouse, and converts the signature to an encrypted string and uploads it to the application. The application converts the input back into a signature for display in Point of Sale documents and screens. Because the string is very large, the internet speed can be a factor in processing this data. Therefore:
Since there is no communication from the software to these pads, a customer submits their signature during the transaction process at the direction of the Sales Clerk. This device does not display the items being purchased and does not include any card processing capability. |
| The Scriptel ST-1501-STN and Compact St1551-STN devices are now considered deprecated by Scriptel. The Scriptel ST1571 device is compatible with the software. |

This signature device should work in most hosted and Remote Desktop (Terminal) Services situations. We do suggest that your company purchase one device initially to test it to ensure that it works in your specific environment.
No software is required to use the device; however, you will need to download and install the ScripTouch™ Toolbox software for initial configuration. Communication between the device and the software is one way only, from the device to the application. Devices don't display items and the customer must sign and submit their signature at a specific point during processing as directed by the sales clerk (while the signature form is displayed after the sales clerk presses the signature button). The Scriptel pad device must be assigned to a station.
Where can I buy Scriptel devices?
ECI does not sell or directly support these devices. Devices may be purchased from Scriptel Corporation distribution partner Computime® or other sources. For manufacturer’s information about the device, please visit their product page: http://www.scriptel.com/products/desktop-1x5-lcd-signature-pad.
What if I need assistance?
We do not provide any support for hardware devices including Scriptel signature devices beyond this documentation. If you have a problem using a Scriptel device, please refer to this topic, most issues can be resolved by adjusting settings and following the instructions listed here. Since we are unable to guarantee that Scriptel devices will work in all environments and situations, you should purchase a single unit for testing at your location before investing in more devices.
Installing the Device
When a Scriptel device is connected, you may be prompted to install drivers, but it is not usually necessary to install drivers for these devices since they usually work using your computer's existing HID (Human Interface Device) drivers.
Before connecting your device, it's best to wait until after you've installed and run the ScripTouch Toolbox and follow the steps outlined below. Newer Scriptel devices may come with updated firmware. Our software currently targets the EasyScript 1.0 API. Until we make changes to integrate with the newer EasyScript 2.0 API, we suggest using firmware versions 3.x only. These instructions are provided primarily for cloud-hosted connections or any remote type connection where speed may be an issue.
Step 1:
Download and install the ScripTouch™ Toolbox software from the Scriptel web site: http://services.scriptel.com/releases/scriptouch-toolbox/scriptouch-toolbox-windows
Step 2:
Open (run) the software.
Step 3
Make sure the stylus is plugged into the device then connect the device to an available USB port on your computer. The USB cable provides both power and connectivity.
Step 4
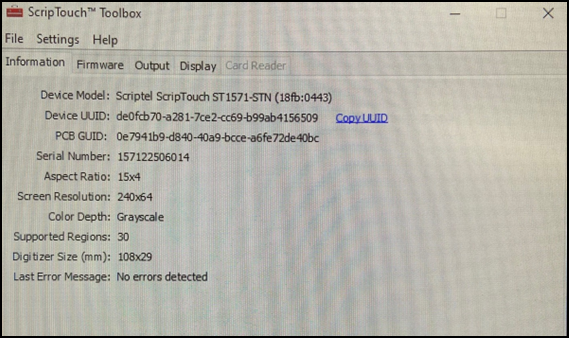
Choose the Information tab to let it populate with information once your device is located.
If the ScripTouch software doesn't reflect your device, unplug the USB cable and plug it back in. Try a different port if it repeatedly fails.
Step 5
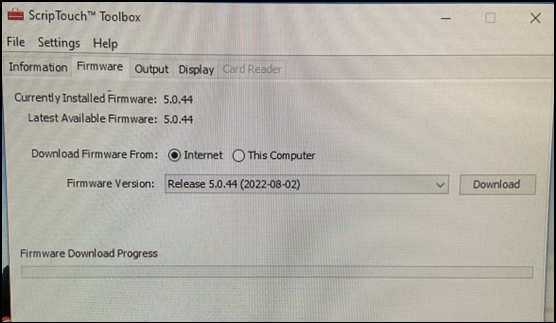
Choose the Firmware tab. Set the firmware version to version 5.0.44 and click the Download button. Version 4.x may work in certain cases, but needs to have advanced options such as compression and stream output disabled). The device should display a message to wait until the device completes the update. Do not unplug the device until the process completes. You will be asked to calibrate your device once the update has completed. This involves tapping the stylus on the + symbol displayed in various areas of the form.
Step 6
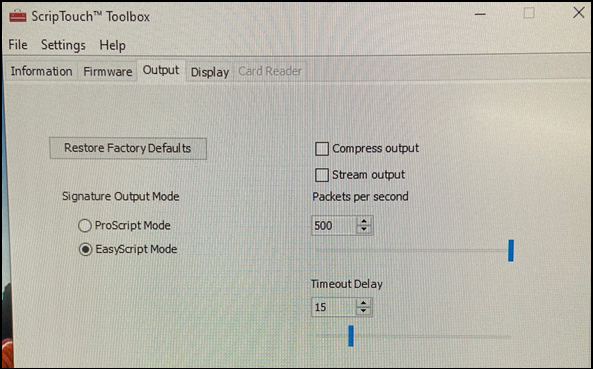
Choose the Output tab.
Set the Signature Output Mode to EasyScript Mode.
Set the Packets per Second to 200.
Set the Timeout Delay field to 15 and leave the other check boxes unchecked.
Scriptel devices treat the signature data as keyboard input. This data is encrypted and can be quite large. The larger the signature, the more data is sent as keyboard input. For slower connections, this can cause issues, so it's important to choose a Packets per second speed appropriate to your connection. The slower your connection, the lower the Packets per second setting should be. Ranges are from 1 to 500. For slower connections, we suggest a setting anywhere between 15 and 200. We do not suggest you use the maximum setting of 500, as in most cases, larger signatures will fail over remote connections.
Begin testing with the slowest setting (15) and work your way upwards or just set the speed to 50 which should work in most cases (you might see some delays before the signature is shown; however, this is better than not receiving the signature). You'll need to complete the "Software Setup" (outlined below) before you can test signatures to find the best speed for your connection.
Step 7
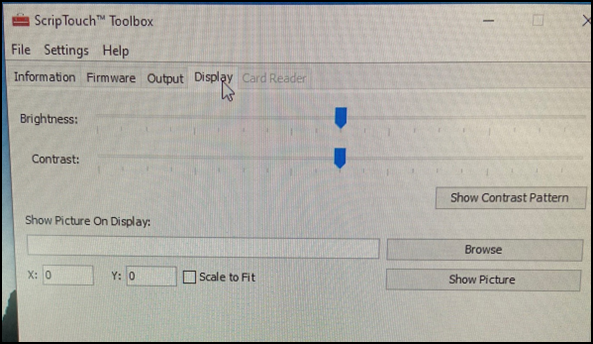
Choose the Display tab and start with the default settings.
Remote Desktop Settings
When using a Scriptel device over a remote connection, you may need to adjust Remote Desktop settings for the connection before the pad will function. Choose View options to see the Remote Desktop settings for your connection. Under the “local resources” tab for the remote desktop connection, you may need to adjust the “keyboard settings.” Try changing the “Apply Windows key combinations” setting to “on the remote computer.” You may also need to adjust your connection speed default under the “Experience” tab. Companies using the software should be using high-speed broadband connections; however, the quality of these can vary based on your location and selected plan.
Adding the Scriptel Device to a Station
Follow these instructions to set up your Scriptel device on a station. Complete these steps to pair each device with the station that will use it.
Note: Signature capture is not required for card processing, but some companies may want to collect signatures for other reasons while also doing card processing at a station. Signatures captured during point of sale transactions can display on transaction documents and tickets.
To add your Scriptel device to a station:
1. Connect the device to an available USB port on the station. The driver installation is optional.
2. Log into the application as a user with administrative permissions (specifically, who can access the Device Maintenance settings).
3. From the Main Menu, choose Maintenance > Database > Devices to display the Device Maintenance form.
4. Leave the Station option selected.
5. In the Attachments section, select the Signature Pad check box.
6. From the Type list, choose either Scriptel ST1501 or GlobalPay w/Scriptel.
This selection depends upon your location.
-
In the US, choose Scriptel ST1501.
-
If you are in Canada or the United Kingdom, and you use Global Payments for integrated card processing, choose the GlobalPay option).
7. To save your changes, choose Process (F12).
8. Close the application and restart the software.
Repeat these steps for each Scriptel device that is connected to the application through a station.
Using the Scriptel Device at Point of Sale
After you have paired a Scriptel device with a Station (see instructions above), you can use it to process any Point of Sale transactions that would normally allow for signature collection. You may need to close and re-open the application on the station after adding the device settings. There are signature capture settings associated with the account that may trigger the display of the Signature prompt, or the application may rely on the Cashier's verbal prompt described below.
To capture a signature, the signature dialog must be displayed at the time the customer submits their signature. Nothing on the pad indicates when a signature is allowed, so the sales clerk must direct the customer when to sign.
To prompt the customer for their signature during the transaction, choose the Signature button on the Process form.
Credit card payment methods will not trigger a signature.
Bankcard Processing with a Scriptel Device
Scriptel devices are considered a Signature Pad device, but unlike many other options, they don't function as card devices. These devices were primarily intended for situations where card processing is not involved. For companies using VeriFone PAYware Connect and doing card entry via the Process (F12) form, enabling a "Scriptel" or other non-card device will prevent any card processing at that station unless the following command arguments are used: PAYWAREALLOWANYPINPAD and PAYWAREALLOWANYPINPAD2. These can be added as system-wide settings for your entire company or individually as arguments in the desktop shortcuts for the application.
|
The ability to manually input customer's card information from the Process (F12) form is not supported by newer card interfaces including Verifone Point and TSYS Cayan. To remain PCI-DSS compliant, we have been forced to remove this functionality. We are currently looking into similar but safer replacements for situations where a customer's card is not present (MOTO - Mail Order, Phone Order type transactions). |
Using with International Keyboard Layouts
The EasyScript 1.0 API that we integrate with for Scriptel communication assumes a keyboard input default of English - United States. Depending upon your location and Windows operating system settings, your default keyboard layout may differ.
There are differences between the English - United Kingdom and English - Canada keyboards, for example. These keyboard layouts map keys differently and use different character sets, which can cause issues with the text characters returned by the pad to the client. To accommodate these differences, we added code to temporarily swap your computer's default keyboard language while the Scriptel signature form displays. After the signature is completed (or the form is otherwise closed/canceled), we reset your keyboard back to your original language.
For this to work, your computer (as well as the computer you connect to remotely, if using a Remote Desktop Server), must have both your local and the English - United States keyboard languages installed. Each station user has to complete this task; we cannot add languages to Windows for you.
Note: During the time that the signature form is displayed, your default keyboard language will temporarily be English - United States, so you will notice differences if you use your keyboard for other applications at the same time.
Adding the English - United States Language Keyboard in Windows
You only need to add this setting if you do not use the English US language keyboard settings already. These instructions were created using Windows 11, but in general, the instructions are pretty much the same.
To add the English - United States Language Keyboard to a station:
1. Choose the Windows Start ![]() or
or  button.
2. In the Search field, type Language, and select the Add a language to this device option.
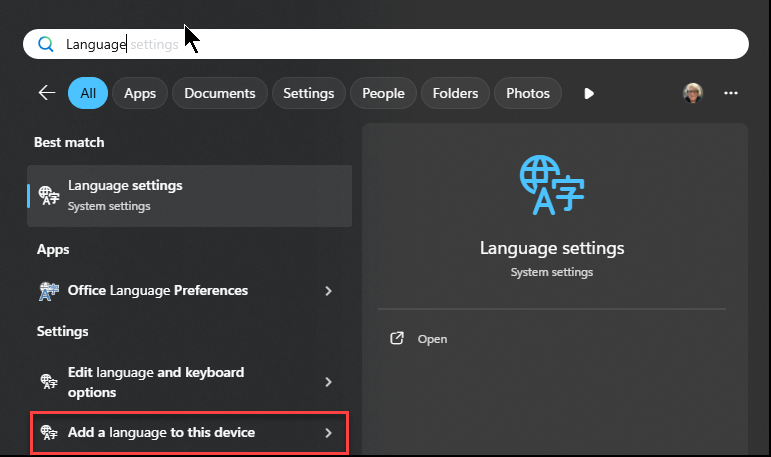
The Language and region settings display.

3. Choose the Add a language button. The Choose a language to install list displays.
4. Enter English in the field and choose English - United States from the list.
5. Choose Next to display the Install language features list.
6. Uncheck all of the entries in the list except Handwriting and click Install.
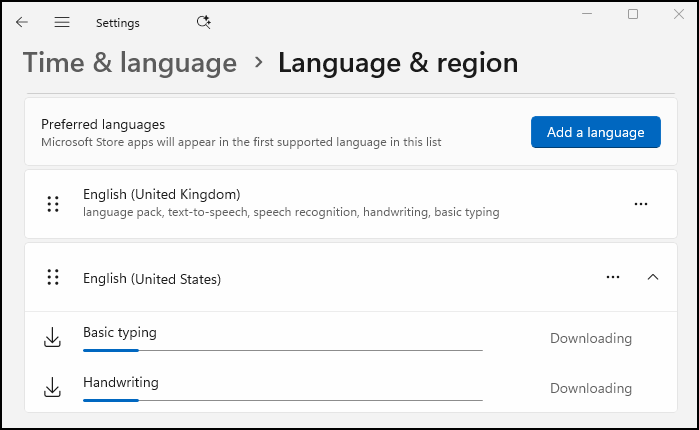
The application downloads the settings you specified.
When the installation is complete, you will notice that there is a language setting in the Taskbar.
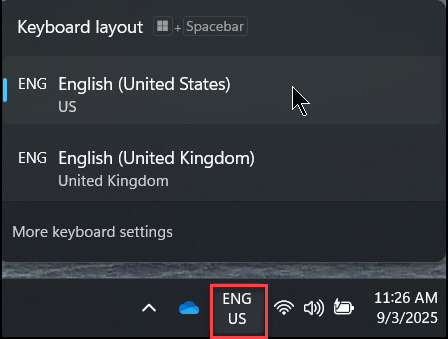
Click the current language setting to select the setting you need and to switch between the language settings for using the Scriptel device.
Scriptel and the Scriptel logo are trademarks of Scriptel Corporation.