Using the Changes in this Release
This section explains how to use the changes in the version 31.0.
-
To review the major release changes in this release, see the Major Features.
-
To review defect resolutions for this release, see the Resolution Log.
Using the Orgill FanBuilder Coupon Changes
Orgill FanBuilder is a popular rewards program where your customers and consumers earn loyalty ID points on purchases and redeem them as coupons. Businesses and consumers can enroll in the FanBuilder program online or directly from the application, which tracks the points they earn and applies related coupons when the points reach specific thresholds. Your business can name this program anything you like, creating your own brand identity. You must be an Orgill-supplied store to participate in this program.
In the past, Orgill required the use of the prefix: CPN% in the FanBuilder coupon template. They are updating the FanBuilder coupon rules to use two codes for the FanBuilder program now:
-
Coupon Item Prefix code
You use this code as the prefix for creating the coupon template, -
Coupon Barcode Prefix code
Management selects this code in the Store System Manager portal to uniquely identify your business’s coupon-specific transactions to Orgill so they can track loyalty points.
After this change, you can choose your own coupon item prefix based on your business preferences.
THIS MAY NOT HAVE GONE TO PRODUCTION ON ORGILL’S SIDE YET, so we are providing this content to help you be ready when they implement this change. After they complete testing, we will enable this feature for all businesses currently using the Orgill FanBuilder program and notify you of the update. Then, you will see the changes we discuss below. Only System Administrators will be able to see these changes.
To set up the Orgill FanBuilder coupon prefix in the system parameters:
1. From the Main Menu, choose Maintenance > Database > Parameters. The Parameter Settings form displays.
2. Under the Setup tab, choose the EDI tab and the Orgill FanBuilder (or the name you have chosen for your rewards program) tab.
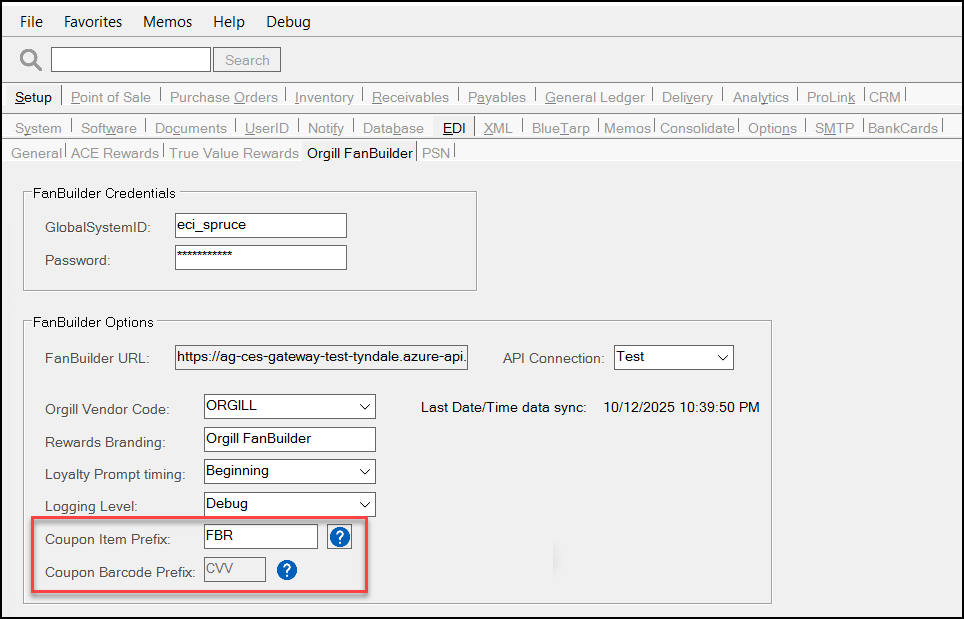
NOTE: If you access this form and the Coupon Item Prefix and Coupon Barcode Prefix fields do not display, the feature has not been released yet. If you are currently using the Orgill FanBuilder feature, you will be notified when we make this change.
-
The FanBuilder Coupon Prefix field has been renamed the Coupon Item Prefix, and contains a new prefix that the application will use to manage coupons you create on the Orgill website. Click the Blue Question Mark
 icon to learn more about this field.
 -
The Coupon Barcode Prefix field reflects your business’s coupon prefix as set in the Orgill Store System Manager portal. A Blue Question Mark
icon displays to explain the use of this field.
3. When these settings are complete, choose Process (F12) to save them to the database.
4. Then log out and log back in to ensure that these changes are in place.
All of the coupon validation, transmission, and customer sign-up features for the FanBuilder program remain the same.
Customers will Filter Invoices by Payment Status (SPEC)
We have added a new field to the eCommerce API InvoiceFilter (used in the GetInvoices endpoint) that, when implemented in Spruce eCommerce, will allow online customers to filter their invoices by their Paid, Unpaid, or Both status. Third-party ecommerce providers can also use this setting, which is listed in the latest API guide. This change should be visible in Spruce eCommerce by the end of the year.
Note: Since this filter is for Invoices, it does not apply to Balance Forward accounts, which consolidate all invoices into a single payment amount. The online payment status for all Balance Forward accounts will always return as Unpaid when using the GetInvoices endpoint.
Importing Postal (ZIP) Codes
You can now add postal (ZIP) codes to the application to better standardize address formatting and ensure the use of accurate delivery and shipping data in the system. The import process is similar to existing import methods used elsewhere. You begin by creating a spreadsheet with the data you want to import. Each row should minimally include the following:
-
Postal/ZIP code (maximum length 10 characters)
-
Town/city name (maximum length 30 characters)
-
State/Province/Territory code (maximum length three characters)
You can also add other related data import data including:
-
Selling Branch (up to four characters)
-
Material Branch (up to four characters)
-
Tax Code ID (up to six characters)
-
An Ecommerce (Boolean)
Note: Use the indicator 1 if ecommerce orders are processed from this code or 0 if not.
Note: If you need to update a postal code entry that is already in the Zip Code Maintenance list, delete the existing entry before importing the new data. This action requires administrative settings in your User ID record to perform this work.
After you create the spreadsheet, save it to the Shared system drive so the application can access it.
To import the postal/ZIP code spreadsheet into the application:
1. From the Main Menu, choose Maintenance > Database > Zip Codes (or Post Codes in some regions). The Zip Code (Post Code) Maintenance form displays. The Import (F2) key is enabled.
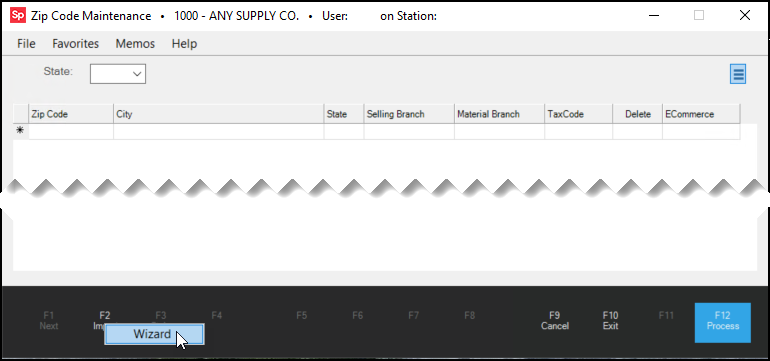
2. Choose Import (F2) and from the context menu, choose Wizard. The Import Wizard form displays.
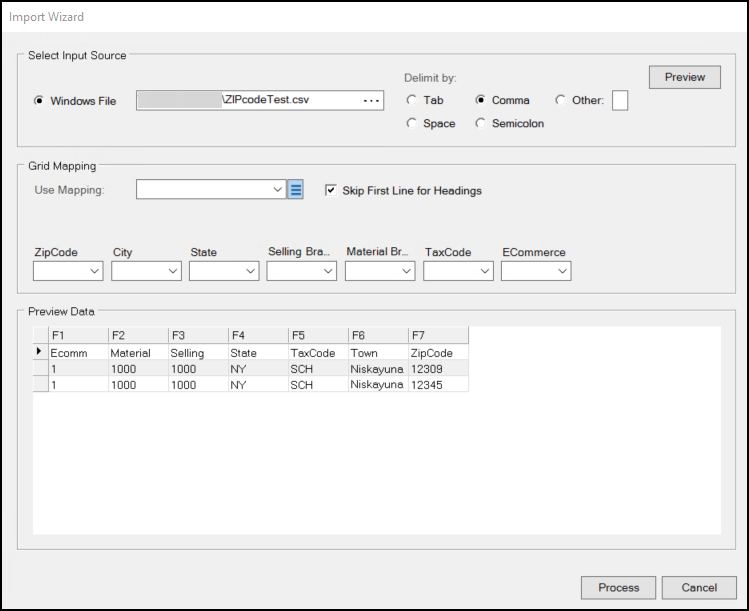
3. In the Windows File field, click the Ellipsis  icon and navigate to the folder with the file you want to import. If the first row of the import file contains the headings for the data, select the Skip First Line for Headings check box.
4. Click the file you want to import in the list and choose Open.
Note: If you have the file open externally, close the file before you try to import it.
Depending upon the format of the file you created, you may need to change the default delimiter settings.
When the file opens, the Preview Data list shows the file entries.
The drop-down lists in other regions may have different titles, but the process is the same.
5. Do one of the following:
-
If you already have a pre-saved grid mapping file for ZIP/Postal Code mapping, select it from the Use Mapping list. The Grid Mapping column fields prefill with the expected order of the list. Continue to step 6.
-
If you do not already have a pre-defined grid mapping file for ZIP/Postal Code mapping, do the following:
-
Load the fields in the Grid Mapping box with the correct column data in the Preview Data list.
For example: In the previous figure, the ZipCode column would be mapped to F7, the City column would be mapped to F6, etc. -
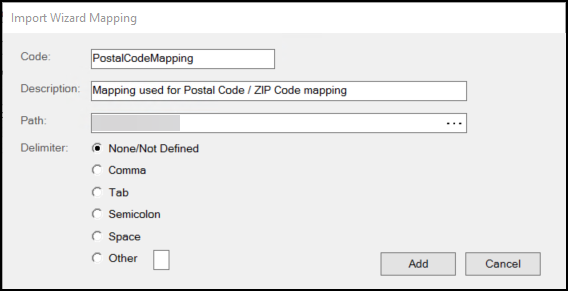
When you have completed the entries in the Grid Mapping box lists, you can save this mapping for future reference. Choose the Menu Marker
 beside the Use Mapping field and choose the Maintain setting. The Import Wizard Mapping box displays.
 -
In the Code field, enter a name for this grid mapping, which will display in the list whenever you enter this form.
-
In the Description field, enter a description for this mapping.
-
In the Path field, this is the “source folder” where you would expect the mapping file to be stored. Typically, this populates for you when you enter the form.
-
If the data you are importing is in a standard file type or a delimited file type, you can specify that type in the Delimiter list. The default position is None/Not Defined.
-
When you have completed these entries and selections, choose Add. The Mapping definition added message displays.
-
If you follow these steps to populate the Use Mapping field, continue to step 9.
6. Review the entries in each Grid Mapping lists: ZipCode, City, State, etc. and compare them to the Preview Data entries.
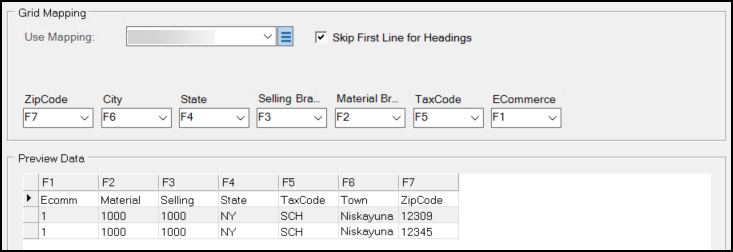
7. Update the Grid Mapping list fields (ZipCode, City, State, Selling Branch, Material Branch, TaxCode, and ECommerce) to reflect the column that contains the same data in the Preview Data list.
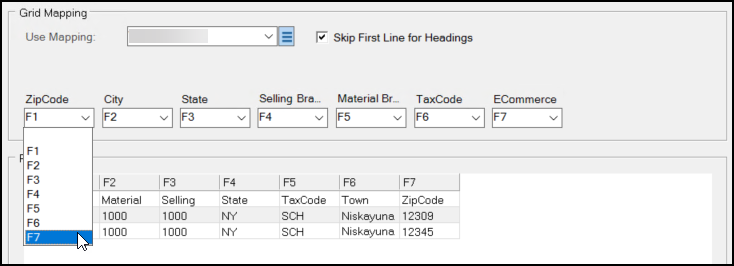
Since the spreadsheet has the Zip Code information in column F7, you choose F7 from the ZipCode list.
8. Repeat step 7 for each drop-down list until the Grid Mapping entries reflect the column information in the Preview Data list.
9. When you are ready to add the postal code information as you have organized it, choose Process. The entries display in the Zip Code Maintenance form.

10. To save these entries to the database, choose Process (F12).
To see the new entries in the Zip (Post) Code Maintenance form, select the State/Province/Territory from the list, and scroll through the entries until you find the new ones.
New Endpoint for Determining Version Information
We have added a new endpoint, GetVersion, that returns the version information for the application your business is running and the web service you are using to deliver the website. This information is useful to both EvolutionX and the third-party website providers that run the ecommerce website.
Delivery Date Added to Online Order Requests
We added the DeliveryDate field to the OrderRequest model to the Ecommerce API to support a customer’s selection of a delivery or pickup date and time for online orders. Spruce eCommerce uses this change to provide online customers with options for choosing a delivery/pickup date and time for their online order, based on the merchant’s existing schedules and the store’s hours. This feature was developed for Spruce eCommerce businesses, but this data is also available to all third-party developers.
Reviewing the Delivery Changes in Spruce eCommerce
The Spruce eCommerce platform uses the DeliveryDate setting to allow customers to choose pickup and delivery dates for online orders. There is a new setting in the EvolutionX platform which, when enabled, allows customers to choose the pickup and delivery day and time (based on your business’s delivery schedules) for their order. Implementation and Support can enable this setting for you after you upgrade the application to version 31.
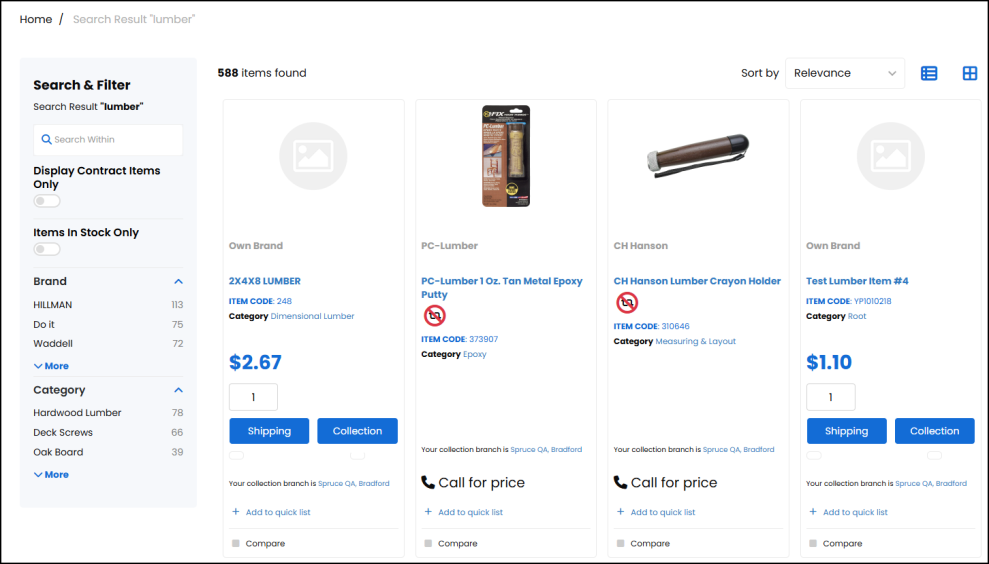
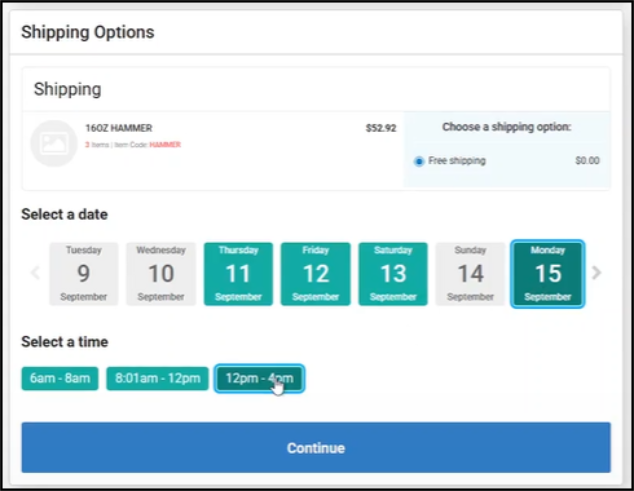
When customers complete their order entry on the website, they can click the Shipping button to have the order delivered or the Collection or Pickup button to schedule a pick up of the order in the store.
When a customer completes their order entry and clicks the Shipping button, the Shipping Options page displays. Here, the customer selects their shipping date and time (based on your business’s delivery schedules) and clicks Continue to complete the transaction.
Similarly, to select a day and time for the order pickup, the customer selects the Collection or Pickup button to display the Collection Options page.
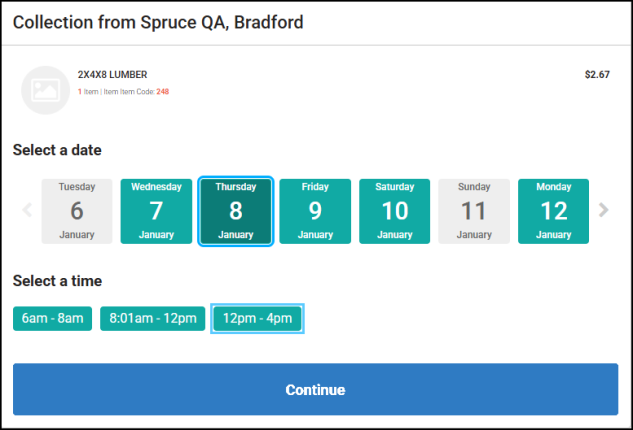
Here, the customer selects their order pickup date and time and clicks Continue to complete the transaction.
In both cases, Spruce eCommerce adds this information to the order it submits to Spruce. When someone opens the online order document in the Document Viewer, the pickup or delivery date displays in the Delivery On field.
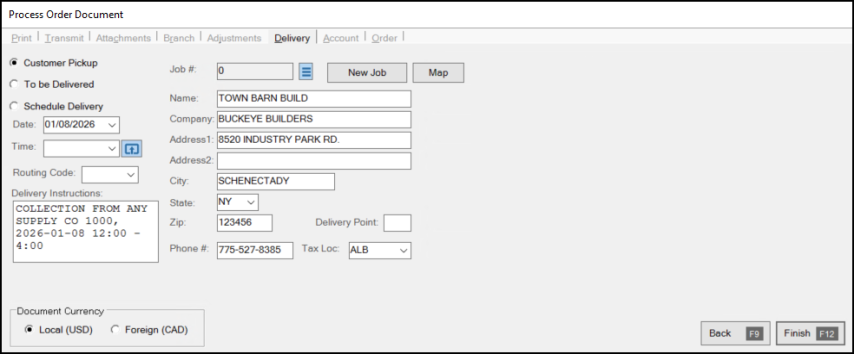
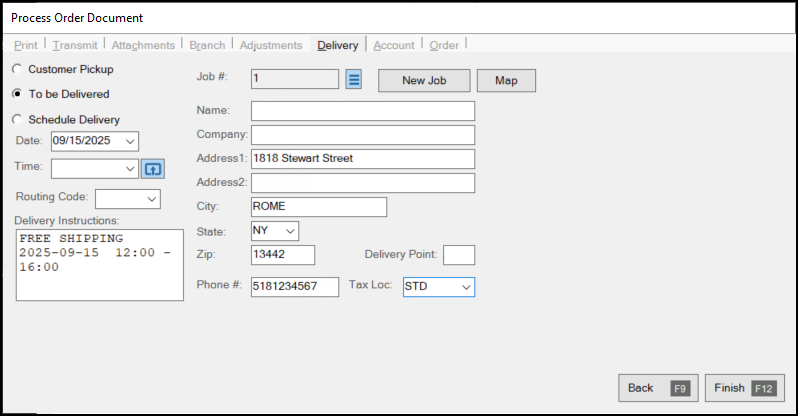
When you open the online order with a delivery in the Order Entry form and process it manually, the delivery details appear in the Delivery tab of the order. The To be Delivered button is enabled and the delivery time the customer requested displays in the Delivery Instructions field.
When you open an online order with a pickup request in the Order Entry form and process it manually, the pickup details appear in the Delivery tab of the order. The Customer Pickup button is enabled and the customer's requested pickup time appears in the Delivery Instructions field.