Automated Clearing House (ACH) payments provide a fast, cost-effective, and secure solution to handling customer payments, particularly when payments are submitted online. Currently, the application handles incoming ACH payments from Spruce eCommerce as credit card transactions.
ACH transactions are processed outside the application, so this system only applies these payments to account and job records and to the General Ledger infrastructure to keep the payment records in sync. Currently, ACH payments are not available in the Spruce or RockSolid MAX Point of Sale areas.
How ACH Works for Online Payments
ACH is comparable to digital bulk mail in that each transaction contains a message. The Originating Depository Financial Institution (ODFI) bundles your customers’ ACH payments and submits them as batch requests to the network. From there, the network transfers these messages onto the Receiving Depository Financial Institution (RDFI) at one of five daily intervals. This everyday use case describes the sequence:
1. The customer makes an online purchase or account payment and pays using their ACH account settings.
2. The OFDI debits the customer’s account and sends ACH files to the ACH network.
3. The ACH network transmits files to the RDFI, which processes the payment.
4. EvolutionX uploads the customer’s transaction to the application during this process. These payments show up in the Daily Cashier’s Report.
5. The application applies the payment to the account using the ecommerce auto-process settings.
Note: The ACH payment process can take three to five days to clear/validate the payment from start to finish. NET1 has a program that processes these transactions overnight, for an additional fee.
6. Depending upon the NSF status of the transaction, use the following process:
-
If the ACH funds clear, the Merchant receives the payment amount from the customer’s account. There is no change to the account information.
-
If the ACH funds do not clear, that is, there are insufficient funds to pay for the transaction, the Merchant takes the following steps:
a. The Merchant contacts the customer to discuss a new payment method.
b. The Merchant removes the payment from the account.
Overview of the ACH Payment Setup Process
This section explains the steps required to set up ACH payments for use in the ECI applications.
1. Currently, ACH payment features only apply to ecommerce projects, so the first step is to ensure you complete the ecommerce settings for the systems you are using as described here. When ACH payments can be completed in the Point of Sale area, you can skip this step.
2. Ensure that the ACH/EFT setting in the BankCards tab of the system parameters is enabled, so your customers can use their ACH account settings to make AR payments as described here. This step will be required for Point of Sale transactions as well.
3. Set up your ACH connection by following the instructions in Working with NET1 to Add ACH Payments to your System. Make sure you complete your PCI Compliance testing to ensure the best results.
4. Complete the General Ledger setup as described in Setting up the General Ledger Infrastructure for ACH Payments. When ACH payments are available in the Point of Sale area, you will still need this infrastructure to track these transactions.
When you complete the ACH payment process setup, review the Daily Tasks for Managing ACH Payments to handle the ACH payments that come in.
Working with NET1 to Add ACH Payments to your System
NET1 Integrated Payments is a part of the ECI family and has provided payment processing solutions since 1989. They specialize in credit card and ACH processing, which we integrate into Spruce eCommerce for businesses that have or want to provide online payment options for their customers.
To get started in accepting ACH payments online through these platforms, contact NET1 at (817) 662-3601 or send an email net1sales@ecisolutions.com. As part of this process, you provide the NET1 team with the information they use to set up the ACH process with their transaction processing partner, Nuvei, including a signed application form, a voided check or bank letter, three months of bank statements, and the beneficial owner information.
With this information, NET1 can work with the EvolutionX and Spruce Implementation teams to deliver secure ACH account payment services to companies in the United States through Spruce eCommerce. When the NET1 team has completed its setup in the appropriate internal systems, they contact the EvolutionX Implementation team to provide the credentials needed to set up ACH payment processes in the website. NET1 will also contact you to schedule an onboarding meeting.
After your website has gone live with ACH payments, the NET1 Implementation team will continue to answer any questions about the process for 60 days. NET1 will support you as you complete the PCI Compliance testing described in this section within that first 60 day period. After that, you can contact Support at NET1 for any ACH payment help you need.
In the application, you should set up the GL infrastructure to track ACH transaction information, as outlined in the instructions below so you can keep track of the incoming payments and for instances where the transaction is not fully paid (due to NSF results). Most of the application setup required for ACH payments is covered below. When the setup is complete, and your customers make ACH payments through the Spruce eCommerce platform, the application will process them as they would any credit card transaction and apply them to the appropriate account records.
Ensuring PCI Compliance after ACH Setup is Complete
After the NET1 ACH process setup is complete, you must perform the PCI compliance testing with Aperia within 60 days of your approval date. This is mandated by the Credit Card companies and court precedence and is important to ensure the security of the ACH process.
-
If you do not complete this PCI Compliance certification within the 60-day limit, the system adds a $29.99 monthly non-compliance fee and 17 (.17%) basis points times the processing volume to your account.
NET1 sends you a reminder email 30 days before the PCI certification expires with instructions for completing this training. You can contact NET1 Support directly by calling 1 682-348-9949.
Setting up the General Ledger Infrastructure for ACH Payments
To track ACH/EFT accounts-receivable payments in the application, you need to:
-
Add a new GL account number to track undeposited ACH Clearing funds
-
Update the Accounts Receivable System Journal to populate the ACH/EFT Payments with the GL account number for undeposited ACH Clearing funds
-
Adding journal entries for each ACH Receivable credit amount and each ACH Payment debit amount
When the GL settings are complete, the application will post the ACH payments to these accounts for the customers that submitted them using the auto-payment process enabled in the Ecommerce parameters tab.
Creating the ACH Clearing GL Account
We recommend you add a GL account that tracks the incoming account payments paid using the ACH process. Keep in mid that ACH payments may take three to five days to clear, so you may want to wait until the funds are transferred to add them to the account. NET1 has an expedited process option that clears the payments within one day. There is an extra fee associated with this service.
To add an undeposited ACH Clearing GL account:
1. From the Main Menu, choose General Ledger > Database > Chart of Accounts. The Account Maintenance form displays. We recommend that you add the new account after the Cash on Hand account entries and before the Checking entries.
2. From the Account # list, choose the last Cash on Hand account entry.
3. Type over the account number so that the account number is higher than the last Cash on Hand account but less than the next account number in the list. Keep it within the Current Assets ownership list.
4. In the Description box, add a new description, something like ACH Clearing Account or whatever works for you regarding a naming convention.
5. Choose Process (F12) to save this account to the General Ledger.
Now you are ready to add this account number to the system journal.
Adding the ACH Clearing Account to the System Journal
To add an ACH/EFT category to the Accounts Receivable system journal:
1. From the Main Menu, choose General Ledger > Database > System Journals. The System Journals form displays.
2. From the Journal Type list, choose Accounts Receivable. The AR journal categories display.
3. In the ACH/EFT Payments row, in the Account Mapping list, choose the new account you created in Creating the ACH Clearing GL Account.

4. Choose Process (F12) to save this mapping setting.
Adding Journal Entries for Incoming ACH Payments
After completing the GL infrastructure in the two sections above, you are ready to post journal entries for incoming ACH payments. As we do in the General Ledger, we add ACH deposit information to the journal accounts to which it applies. Here is a sample below. You can learn about the ACH deposits from either the Merchant Center system provided by NET1 or by using the Cashier’s Report discussed in Reviewing ACH Payment Information in the Cashier's Report.
To add system journals for incoming ACH payments:
1. From the Main Menu, choose General Ledger > Journal Entry from the Left Menu. The Journal Entry form displays.
2. From the Journal ID list, choose New.
3. In the data grid Account # column, choose the general ledger checking account.
4. Change the Description field to match the type of deposit and the date.
-
In this case, for example, enter: ACH deposit <deposit date>.
5. In the Debit field, enter the amount of the deposit.
6. In the next row, select the ACH General Ledger Clearing Account.
7. In the Credit column, enter the amount of the deposit.
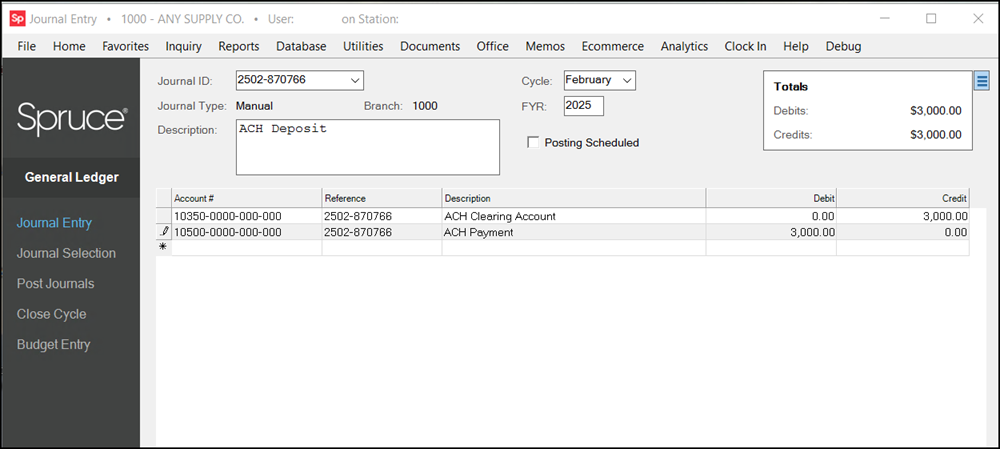
You can add these journal entries daily, weekly, or whatever works for your business.
8. When you have completed these entries, choose Process (F12) to save them.
This completes the General Ledger setup, enabling the application to process ACH payments correctly within the system. The auto-process payments feature ensures that individual payments are applied to the accounts.
After you complete the ACH setup process in EvolutionX, you verify the GL accounts in Spruce, and the Merchant Center account is set up, the NET1/Check Commerce team provides training so you can review automatic notifications and confirmations for ACH payments and batch settlements. You are ready to share this information with your customers and go-live.
Daily Tasks for Managing ACH Payments
After you go live with ACH payment processing, you can follow these daily tasks to stay on top of these transactions:
1. Log into the Merchant Center (NET1/Nuvei system) and check on the ACH payment status and any overnight batch settlements. Tools for completing this process are in Accessing the Merchant Center to Confirm the ACH Payment Statuses.
2. Compare the payment information from the Merchant Center with the payment data in the daily Cashier’s Report to confirm that the application has received notice of the payments listed there.
3. If there are settlements that have an NSF (Non-Sufficient Funds) status, reach out to those customers to discuss their payment status and set up a new payment method.
4. If you need to back out NSF payments that were posted but not completed, follow the instructions in Removing ACH Payments with NSF Status from an Account.
The EvolutionX platform provides additional reports for tracking the status of ACH payments:
-
Card Type Remittance Report
This report provides a list of invoice payments by payment type (including ACH). -
Card Type Sales Report
This report shows storefront orders by payment type. -
Credit Card Invoice Payment Reconciliation Report
This report confirms the reconciliation of ACH payments for accounts receivable invoices paid by your customers. -
Credit Card Order Payment Reconciliation Report
This report confirms the reconciliation of ACH payments for order invoices paid by your customers.
Accessing the Merchant Center to Confirm ACH Payment Statuses
When your NET1 setup is complete and you have your GL accounts in place, you are ready to handle ACH payments submitted by your customers. Reach out to your customers and provide the website link to invite them to sign up for the ACH payment process. From there, they can sign up for this access and add their ACH payment information.
NET1’s Check Commerce Merchant Center system is where you access information about the ACH payments you receive from your customers. To provide access, Check Commerce emails you a unique user ID, so you can add a password and create an account. Then, you can log into this system to review your customers’ ACH payment activities and confirm whether those payments have cleared. It is important to note that the clearing process can take three to five days to clear, after the customer submits their payment. NET1 has a program that can expedite this clearing process to ensure these transactions clear in one day, for an additional fee.
The Merchant Center User Manual (PDF file below) can provide some helpful information for navigating this process.
CheckCommerce_Merchant_Center_User_Manual_2023_v2_ECI.pdf
If you are outside the U.S. and support multiple currencies, you can customize your dashboard to view the currency of submitted payments.
Reviewing ACH Payment Information in the Cashier’s Report
When a customer makes an ACH payment in Spruce eCommerce, the payment information is transmitted and imported as credit card payments are and the invoices are marked as Paid. The Paid status does not mean the funds have reached your account; it only indicates that the transaction was processed successfully. You must still confirm receipt of the funds by reconciling your ACH in the Merchant Center, as directed by the NET1 team.
Note: ACH payments may initially succeed but may later be reported as NSF (Non-Sufficient Funds). When this occurs, manually remove the payment from the account in Spruce and contact the customer to inform them that the payment was unsuccessful.
You can use the Cashier’s EOD report to review ACH payments applied each day in the application. You must have specific Point of Sale credentials to run the Cashiers EOD Report to generate this report.
To review the ACH payments for a particular day:
1. From the Main Menu, choose Point of Sale > Reports > Cashier’s Report. The Cashier’s Report form displays.
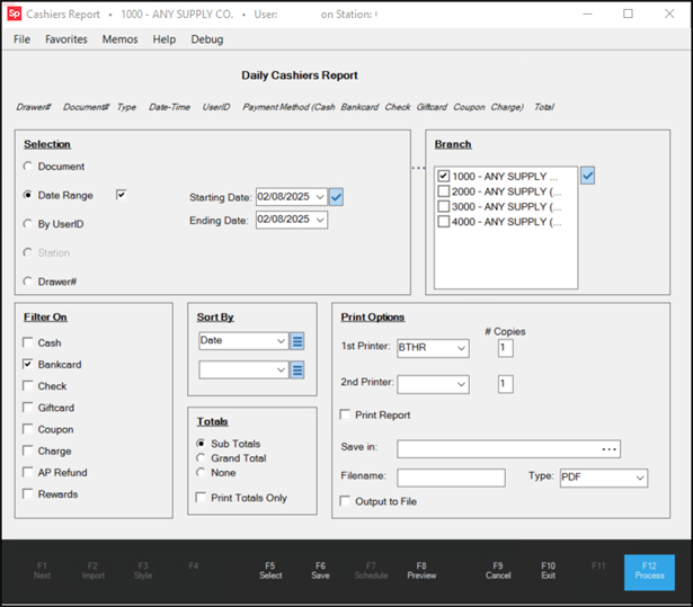
2. In the Selection lists, choose the settings that are specific to the ACH payment method.
-
Date Range
Select the date or date range for the ACH payments you want to review. The application will collect the relevant payment records for these dates, including ACH payments. -
Filter On
In this list, choose the Bankcard option since the ACH payments are treated as bankcard transactions in the system. -
Sort by Date
If you choose multiple dates in the Date Range, it may be useful to sort by date. -
Totals
Choose the Subtotals option so you can see the results by each transaction type.
3. When these selections are complete, choose Preview (F8) to see the results.
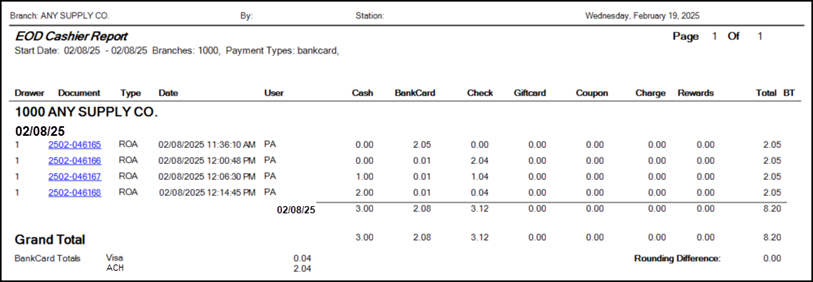
4. Click the links in the second column to review the account and information for the corresponding payment amount.
Removing ACH Payments that Have NSF Status from an Account
If an ACH transaction fails, that is, the customer’s account has insufficient funds to credit the ACH payment to your account successfully, you should process a payment reversal using Open Credits Utility in the Receivables area. You must have Receivables admin permissions to do this work. There is no undo process for removing this payment.
To back out an ACH payment from a customer’s account:
1. From the Main Menu, choose Receivables > Utilities > Open Credits. The Open Credits utility form displays.
2. In the Account list, find the account that submitted the payment you need to back out.
The list of transactions submitted by the account displays.
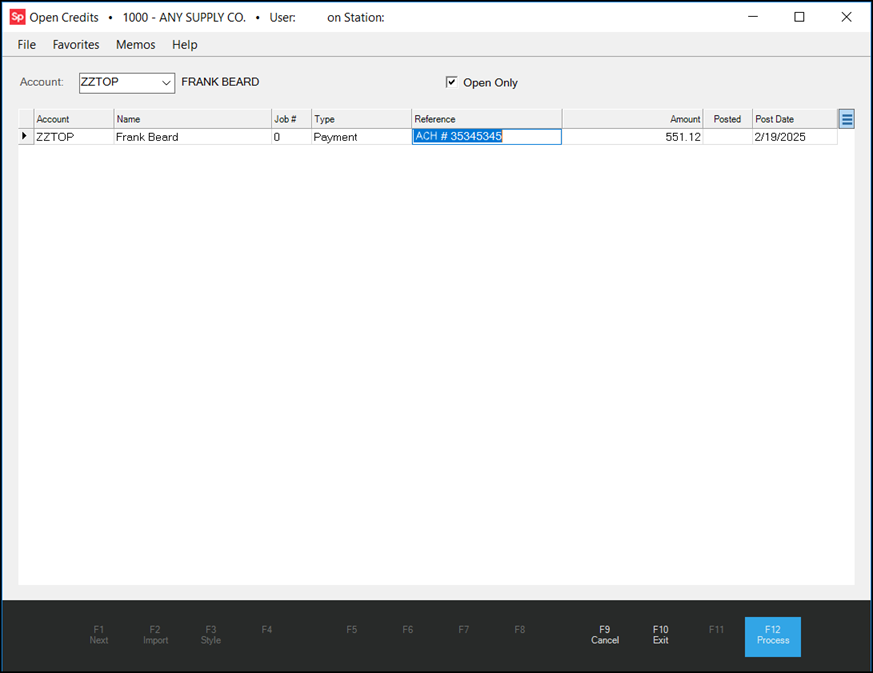
3. Select the row that contains the payment you want to remove.
4. Click the Menu Marker  beside the data grid to display the context list and choose the Remove Payment option. A box displays to confirm the deletion of this payment.
5. Choose OK.
From here, you should reach out to the customer to let them know the payment was not completed and work with them to ensure a new payment method is made.