Setting up Remote Client on a Station
As we move into the future, RockSolid MAX will rely more on the Remote Client Utility to provide secure, reliable access to your system and application data. The Remote Client Utility is the software that connects your application to the cloud servers that contain your data. Each station that accesses the application will need to use Remote Client to improve processing speed and reliability. Updates we are making to Remote Client will mean fewer check out delays and less time spent fighting with printers or card readers.
There are three steps for enabling Remote Client for each station:
1. Download the right Remote Client MSI installer file on each station as described here.
The MSI download site reviews the system and retrieves the right Remote Client file for your version of RockSolid MAX.
2. Install the Remote Client MSI file by following the instructions here.
3. Pair the station to the application in the cloud as described here.
The application uses the Remote Client connection to send data to printers and connect to third-party devices for Point of Sale, Inventory, and other application areas. You can also use this connection to set up an Alias to provide access to a SmartKiosk, AnyWare, or POS Assured.
Before you get started, make sure you know the device name of each station you are enabling Remote Client for and ensure that the Branch setting for this station is entered. Follow the steps below for each station that requires access to the application.
Downloading the Remote Client Installer (MSI) File
To download the Remote Client Installer (MSI) file:
1. Log into the station you want to add the Remote Client Installer to.
2. Click this link to access the Remote Client Portal. The Remote Client Download site displays.
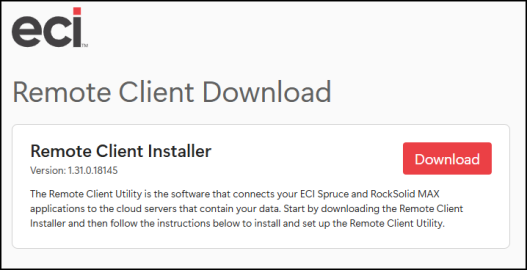
3. Click Download to retrieve the right installer for this station.
The message: Your download has started. Check your browser's downloads folder for the Remote Client Installer displays.
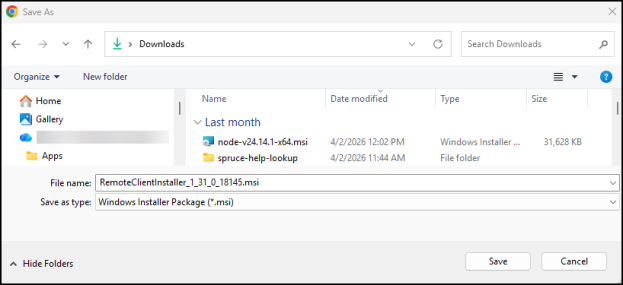
4. In the Save As form, choose the folder you want to download the file to and click Save.
5. Go to the folder that contains the MSI file and double-click it to install it.
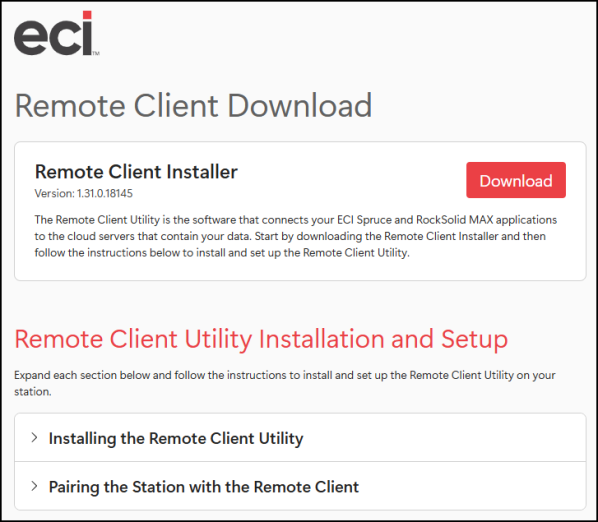
Note: The instructions for the Remote Client Install and Pairing display on the Remote Client Download Portal, below the Installer.
Setting up Remote Client on a Station
To set up or update the Remote Client Utility for a station:
1. On the station, click the up arrow to open the System Tray.
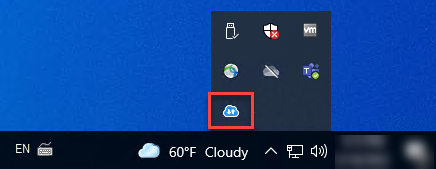
System Tray with Remote Client Utility Highlighted
2. Double-click the Remote Client Utility ![]() icon. The Remote Client Utility form displays.
icon. The Remote Client Utility form displays.
3. Click the Settings tab.
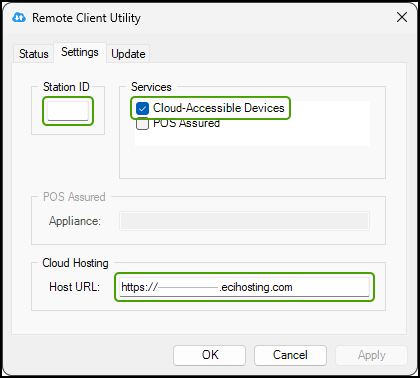
4. In the Station ID field, enter the station's up to four-character ID.
5. Click the Cloud-Accessible Devices check box.
6. Enter your businesses' Cloud Hosting URL, which is located in the Parameter Settings form, Setup > Software tab (Site ID field) and click OK.
Now you are ready to pair your station with the Remote Client Utility.
Pairing the Station with the Remote Client Utility
There are two processes that can pair the station with the Remote Client Utility. This process should be completed by a System Administrator.
Automatic Pairing
After you install the Remote Client Utility, close it and exit the application, if it is running.
Re-open the application.
-
If the Pairing Prompt PIN below displays, you can begin the pairing process automatically.
-
If the Pairing Prompt PIN does not display automatically, follow the instructions below to display the pairing prompt manually.
Manual Pairing
Use the Manual Pairing instructions below to complete the pairing of the Station to the Remote Client Utility.
1. In the Station Tray, double-click the Remote Client Utility ![]() icon.
icon.
2. Log into the application on the station you are pairing to the Remote Client Utility.
6. From the Main Menu, go to Maintenance > Database > Devices to display the Devices Maintenance form.
7. In the Device Name field, choose the station you are adding the Remote Client settings to and press Enter. Make sure the Branch field entry is specified.
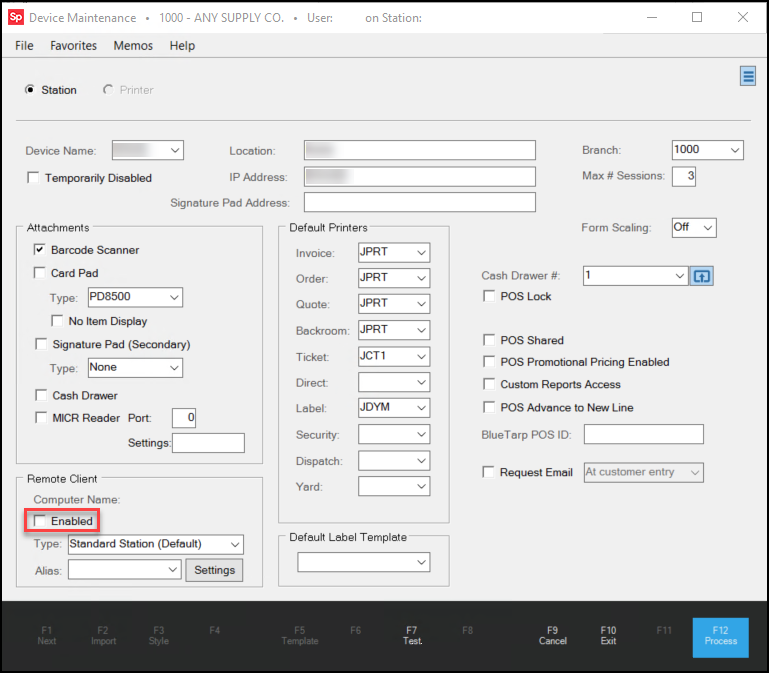
Device Maintenance form with Remote Client Enabled Check Box Highlighted
8. In the Remote Client section, select the Enabled check box and click Process (F12).
The Remote Client Service Authorization (Pairing PIN) displays.
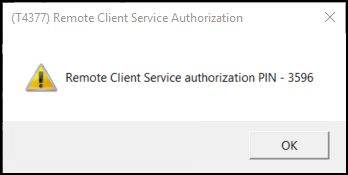
Remote Client Service Authorization PIN ID
9. Make a note of the PIN ID and click OK.
10. Return to the Remote Client Utility Settings tab.
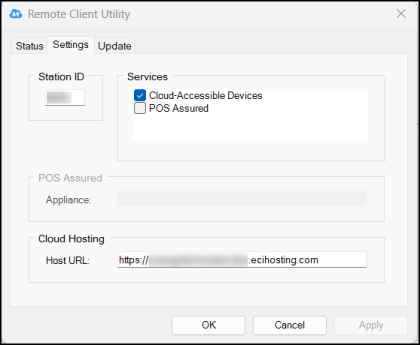
Remote Client Utility > Settings Tab
11. In the Station ID field, enter the station’s Device Name field ID.
12. In the Hosting URL field, enter the URL that the business uses to connect to the remote client service in the cloud.
13. Click Apply. The utility prompts you for the PIN:
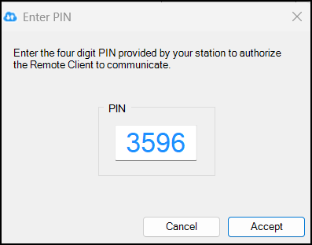
Enter PIN with Entry
14. Enter the PIN from the Device Maintenance form in the PIN field and click Accept.
Note: After you accept this entry, the utility may restart and reconnect on it's own, so you may not have to do this manually.
15. Click the Status tab and click Restart. Wait for the restart to complete.
16. In the Cloud Host box, click Reconnect. The application updates the connection.
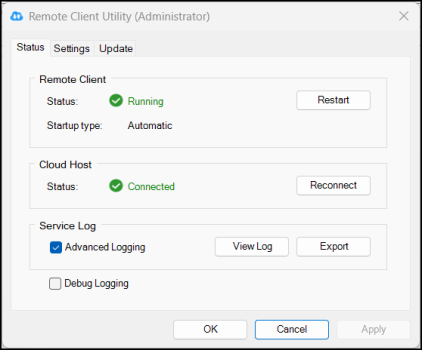
Remote Client Utility with Set Up Complete
Common Remote Client Pairing Issues/Resolutions
The following issues may occur when pairing a station with the Remote Client Utility.
No PIN Code Prompt Displays
This message sometimes displays when the station ID or the URL you are using are incorrect. We recommend that you test the URL (from the Host URL field in the Remote Client Utility > Settings tab) in a browser to confirm that the network access is working. If the issue persists, contact ECI Support for help.
Remote Client Check Box Grayed Out or Not in Device Maintenance
If you access the Device Maintenance form and the Remote Client Enabled check box is grayed out, contact Support to verify your system parameters.
When IP Address Issues Prevent Pairing
If you are using a FortiGate Firewall or have recently changed your gateway IP address, update the static IP addresses for all stations that were previously connected. FortiGate setups typically assign IPs like:
-
192.168.222.### with a gateway of 192.168.222.254.
If the station uses a VPN to connect to local printers, the IP address may reflect the host server’s IP range rather than the local network. You must correct this setting to allow communication between the computer and connected devices.
Finding the IP address for store devices
Identifying the device's IP address can be tricky. Begin by finding your location's subnet, which is the first three octets from the gateway IP address (for example, 192.168.0.###). If your devices are not communicating, they may have incorrect IP settings.
To find the correct subnet for any device in your store (location):
1. On a local computer, click the Windows Start ![]() icon. The Settings options display.
icon. The Settings options display.
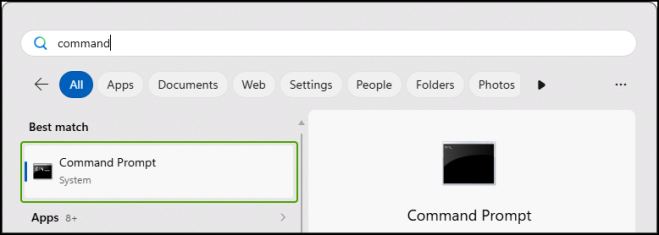
2. In the entry field, type command.
3. Choose the Command Prompt option. A new command line displays.
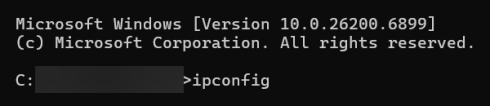
4. At the end of the command line, type ipconfig and press Enter.
5. Scroll down to the Wireless LAN adapter Wi-Fi settings and look at the first three sets of numbers in the Default Gateway field.
![]()
6. Copy or write down these first three octets so you can use them to resolve IP Address issues described above.