Spruce eCommerce > Inventory Item Sync
Part of supporting your ecommerce website is ensuring that it accurately reflects the inventory and pricing changes you make in the application. When you receive new stock in the store, the website should reflect the new data and show any price updates you have assigned to this change.
Using a third-party product to manage this data update process has proven expensive and some customers have reported that the updates are unreliable. To improve performance and increase security for Spruce eCommerce, we have added a new process called Inventory Item Synchronization (Inventory Item Sync), which updates a data store with changes to your Spruce eCommerce-enabled data. New processes monitor the changes you make to your inventory and pricing and transmit updates automatically to the remote data store every few minutes. This keeps your application and your website in sync. We are using the EvolutionX ecommerce platform to support this change.
Important: Currently, this feature is managed using a feature flag, which the Implementation or Support team must enable before you get started. These team members can find these instructions in the Internal Release Notes.
We have included the setup instructions for this new feature below. The Inventory Item Sync feature is part of the EvolutionX solution for Spruce eCommerce and is not available to Ecommerce API-only websites. You can enable the inventory sync process for all ecommerce items or for only some of them. For instructions, see
When you sync inventory information using this new process, the application adds any new items to the website that you have enabled for ecommerce since the last update, removes any items that you disabled since the last update, and sends the following changes to the Spruce eCommerce inventory data store:
-
Item ID/SKU
-
Title and Descriptions
-
Group/Section settings
-
Weights and Unit of Measure setting updates
Note: These values must be in decimal form to ensure accurate updates. -
Taxable status changes (whether the item is taxable or not)
-
Returnable settings
-
Keywords
-
Disabled status of the item
Note: Disabled items still display in the data store, but do not display on the website. -
Lead time required to PO an item to ensure on-time delivery
-
Enabled for Ecommerce status
Note: When the Ecommerce Enabled check box is unchecked after the item is synced, the Spruce eCommerce platform does not display the item on the website. -
List prices and cost prices
The last sync update information is stored in only one table to ensure there is only one source of truth on the date of the last synchronization between the application and the website.
We will update the information we send using these processes as time goes on to ensure that additional data, like quantity on hand, stock images, and category mapping are part of the inventory sync process.
A Note about the Default Branch in Parameters
Spruce eCommerce does not support individual branch records for inventory items currently. Due to this limitation, we use the default branch setting to define the store-level values of the products, such as pricing and cost, returnable status, disabled status, etc. when syncing inventory data to the Spruce eCommerce platform. If a product does not exist in the default branch, but it does in another branch, the other branch’s settings will be sent to Spruce eCommerce. The application uses the first available branch the product exists in to gather branch-level values for that item.
A Note about the Default Category ID in Parameters
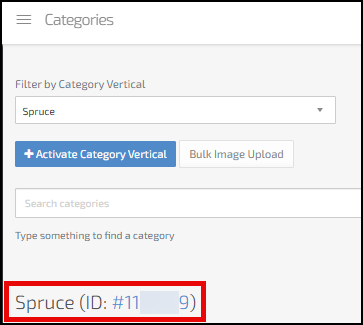
In the remote data store, the system uses the inventory item’s group and section records to map to particular categories for display on the website. That way, items in the same category display in the same section (lumber, tools, appliances, etc.) on the website. There will be times when you add items to the site that may not fit into one of these categories, particularly when you add a new group or section to your inventory. Since these new entries will not have category mapping assigned, there is a Default Category ID to group those items in EvolutionX. You add this Default Category ID to the Inventory Items Sync parameters to reference these ecommerce-enabled items that have no categories mapped for them. The Implementation team and the business manager should discuss this issue to determine whether to use their most popular category as the Default Category ID or the Spruce Root category ID as shown in the Categories section of EvolutionX:
Setting up the Inventory Item Sync Process (Merchant Instructions)
To complete the Inventory Item Sync setup process, the Implementation Specialist needs the list of current products and the Category IDs and Category mapping data from EvolutionX.
To create the Product ID CSV file:
1. In EvolutionX, go to Products > Products and click the Export button.
2. Choose the Own Products option to create the export file.
3. Click the Ellipsis  button at the end of the row and choose Download as CSV.
4. Save this file to your Downloads folder locally and give the file to the Implementation Specialist performing the Inventory Sync set up.
To create the Category CSV file:
1. In EvolutionX, go to Categories and click the Export button.
2. Choose Managed Categories from the list to create the export file.
3. Click the Ellipsis  button at the end of the row and choose Download as CSV.
4. Save this file to your Downloads folder locally and give the file to the Implementation Specialist performing the Inventory Sync set up.
Setting up the Inventory Item Sync Process (Internal Teams)
To set up this Inventory Item Sync process, you need the active EvolutionX API key, which you can get from the Support team. You must have system administrator rights to set up these parameters. Complete the Category ID Category Mapping, and Product ID import processes
Note: This EvolutionX API key has been generated by EvolutionX and not in the
To set up the Inventory Item Sync in your application:
IMPORTANT: Please review the Internal Release Notes for instructions on importing the Product ID and Category record CSV files referenced above in the Merchant instructions. Complete these steps before you begin this process.
1. From the Main Menu, choose Maintenance > Database > Parameters. The Parameter Settings form displays.
2. Choose Point of Sale and the Ecommerce subtab to display the ecommerce parameters.
3. At the bottom of the form are the Inventory Item Syncing fields.

Parameter Settings > POS > Ecommerce Tab > Inventory Item Synching Box
4. Select the Inventory Item Sync check box to enable the other fields and check boxes.
The Inventory Item Sync process reviews this check box each time the update occurs.
5. Complete the following check boxes as meets your business needs:
-
Auto-sync items
Select this check box to sync items you have enabled for ecommerce to the items stored in the Inventory Item Sync data store. Typically, this check box is enabled by default. If this box is not enabled, inventory product changes will not be pushed to EvolutionX automatically. Users will have to use a manual process to sync each individual inventory item with the EvolutionX platform. -
Auto-publish synched items online
Select this check box to ensure that changes to the synced items are published when their pricing or inventory quantity information updates. In general, we recommend that auto-publish is enabled, but if you want to work with the data on EvolutionX first, leave this box unchecked.
6. In the API Key field, enter the API Key that links the application to your ecommerce website. This key is available from the EvolutionX Support team. We recommend the customer store this information offline, securely, in case it is needed in the future.
Note: This is not the API Key that was originally generated in the Support Utilities.
7. From the API URL list, choose one of the following, depending on your website’s location:
Note: This is the regional endpoint for the inventory item synch API.
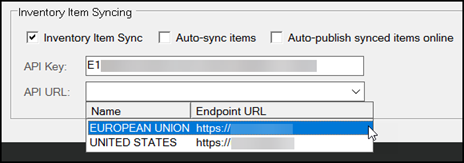
Parameter Settings > POS > Ecommerce Tab > API URL Regional Settings
8. From the Default Branch list, choose the default branch for the synch process.
The application uses the Default Branch setting to confirm pricing, to identify whether an item is enabled/disabled, and to check the product’s inventory quantity status. See A Note about the Default Branch in Parameters for more information.
9. In the Supplier ID field, enter the primary vendor’s ID.
This identifies the store’s default vendor catalog as set up in EvolutionX. The Implementation Team will use the Own Supplier ID in EvolutionX for this entry.
Note: This is not the ID you have set up in the application for your supplier.
10. In the Default Category ID field, enter the ID of the category you use as the default.
This allows you to add items with no matching group/section IDs to a default category for later work. See A Note about the Default Category ID in Parameters for more information.
11. In the Catalog ID field, enter the Own Catalog ID established for your business on the EvolutionX platform. You can find this ID in the Catalog section of EvolutionX.
12. When you have completed these entries, choose Process (F12) to save them.
There is a monitoring service that checks to see whether the Inventory Item Sync feature is enabled. When you disable the Inventory Item Sync check box, you disable the connection between the website and the application and the review and update process shuts down.
Using Item Global Modify to Enable Ecommerce Sync for All Items
To set the Enable Item Sync for all ecommerce items individually would be time-consuming, so we have added the Cmn – ECommerce Inventory Item Sync option to the Item Global Modify list so you can set this flag for all ecommerce-enabled items in your inventory. You must have Inventory Administrator permissions to complete this work.
To set the Inventory Item Sync flag for all ecommerce items in your inventory:
1. From the Main Menu, choose Inventory > Utilities > Maintenance > Item Global Modify. The Item Global Modify form displays.
2. From the Field Name list, choose Cmn – ECommerce Inventory Item Sync.
3. In the Old Value field, enter N.
4. In the New Value field, enter Y.
5. In the Group/Section list, choose the groups and sections that include ecommerce-enabled items.
6. Choose View (F8) to collect the matching items and add the new Inventory Item Sync value to the item record.
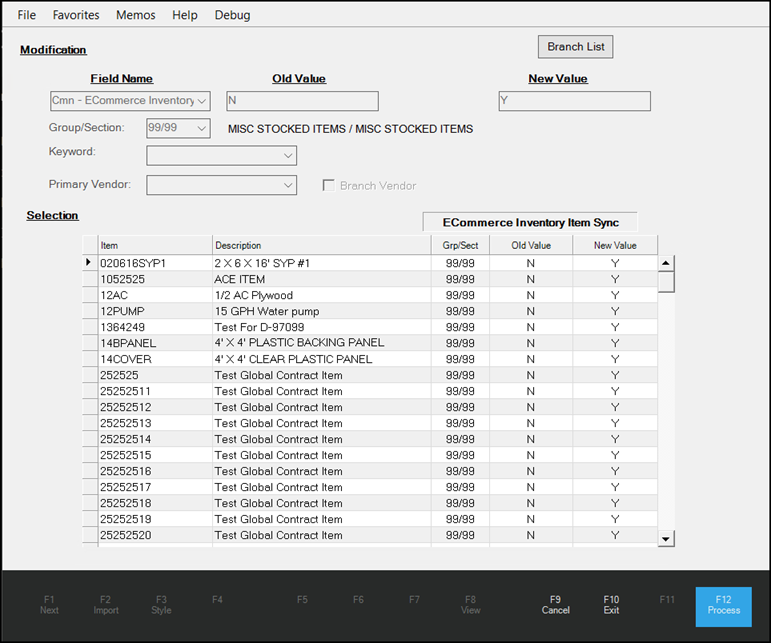
Item Global Modify > Inventory Item Sync Entries Collected
7. Repeat steps 5 and 6 until you have added all the ecommerce items you want to synchronize with your website.
8. Check the list carefully to ensure all the items you want to include in the sync process display in the list.
9. Choose Process (F12) to save the new inventory sync setting to the selected items.
After you select Process, the Inventory Item Sync feature runs in the background to send the selected items to the Spruce eCommerce data store automatically. The initial process sends all of the data in the list at once, including the pricing and item details. You should be able to see them in the Spruce eCommerce Products list shortly after you process this change.
Managing the Sync Process for Individual Items
After you complete and save your Inventory Item Sync parameters, you can update current inventory records so they can sync with the Spruce eCommerce data store individually, using the Item Maintenance form. You can enable this setting for these item types: Standard, Lumber, Sheet Goods, Clothing, Hardwoods, Manufactured items, and Food. In this way, you can set the sync option for all items and disable this setting for individual ecommerce-enabled items in your inventory.
When the Item Sync Enabled check box is selected (checked), any changes you make (description, weight, pricing, etc.) to the item’s settings are synchronized with the website’s data store. If you do not select this check box, your changes are not sent to the data store.
To send your ecommerce item to the Spruce eCommerce data store:
1. From the Main Menu, choose Inventory > Database > Item. The Item Maintenance form displays.
2. Select the item you want to send to the data store from the Item list.
3. Click the Common > Ecommerce tab.
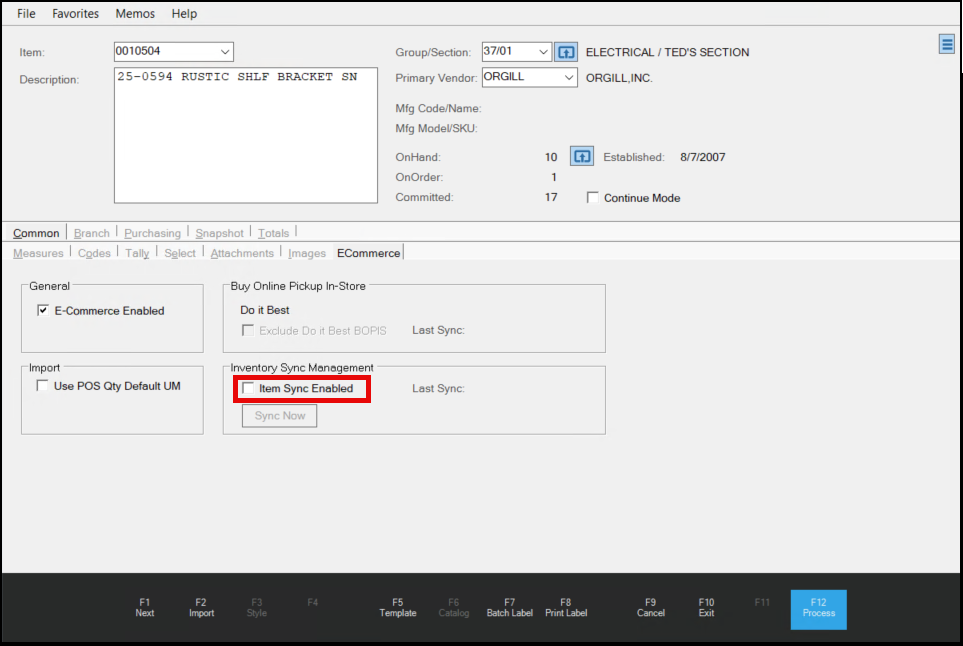
Item Maintenance > Common > ECommerce Tab > Inventory Sync Management Settings
4. Choose the Item Sync Enabled check box.
5. Choose Process (F12) to save this change.
After you select the Process key, the application sends the item information to the remote website data store automatically. When you make changes to this record subsequently, such as description, weight, pricing, etc., they are sent to the website’s remote data store within minutes of your Process (F12) key selection. The application sends:
-
Text-based or check box-type changes to the website’s data store every minute.
-
Price changes, after the initial upload, take nine minutes
Note: This update time can vary based on other background processes that may be happening concurrently, but our testing found that this schedule to be reliable.
After the initial upload of your ecommerce item data, the Sync Now button enables. This allows you to send any subsequent changes you make to the item record to the Spruce eCommerce data store right away. This button is only enabled after you complete the Inventory Item Sync parameter settings on the Point of Sale > Ecommerce tab and the initial item sync has completed.
Syncing Item Changes On-Demand
Merchants can queue individual products for inventory item sync on-demand for scenarios where the online store product record has been accidentally removed, has failed to update through the automated process, or when the merchant has disabled the Auto-publish synced items online parameter.
Note: You can only use this on-demand sync process after the item has been uploaded to the online store. You cannot sync to a record that is not there yet.
To sync product data on demand:
1. From the Main Menu, choose Inventory > Database > Item. The Item Maintenance utility screen displays.
2. From the Item list, select the inventory item you want to sync manually.
Note: The inventory item must be enabled for Inventory Item sync.
3. Click the Common > Ecommerce tab.
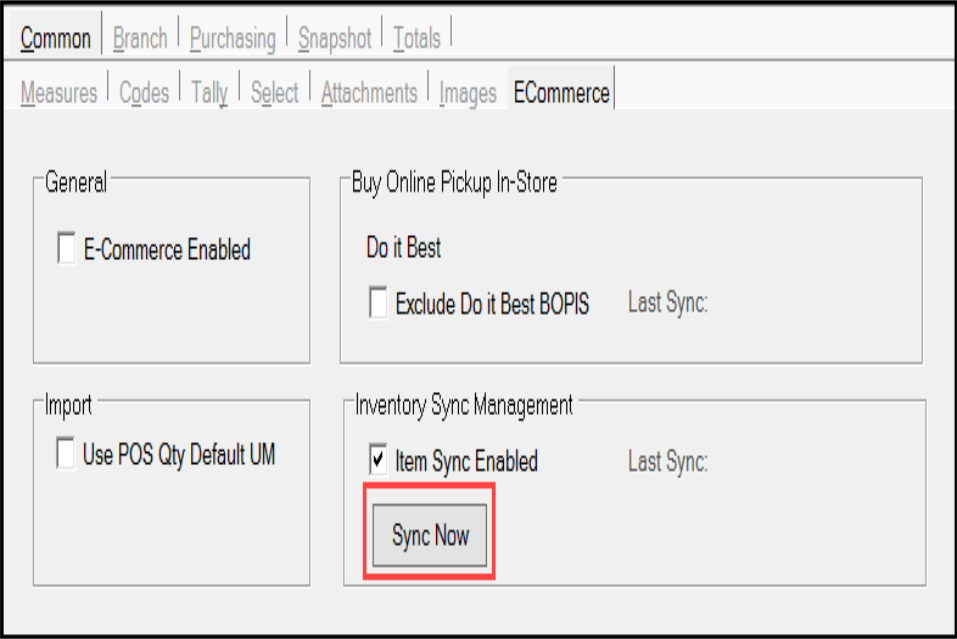
Item Maintenance > Common > Ecommerce > Sync Now
4. Click the Sync Now button to queue the product for upload to the online store.
The message, The item has been queued for inventory sync processing displays.
Adding the Inventory Item Sync Settings to Default Templates
When you use the import from the Vendor Catalog or other EDI processes to add new items to your inventory, you may want to enable these items for inventory sync as part of the template process. You can add the ecommerce settings to the default template SKU.
To add inventory item sync and ecommerce enabled settings to default templates:
1. From the Main Menu, choose Inventory > Database > Item. The Item Maintenance form displays.
2. From the Item list, choose the vendor-specific template and press Enter.
3. Choose the Common > ECommerce tab.
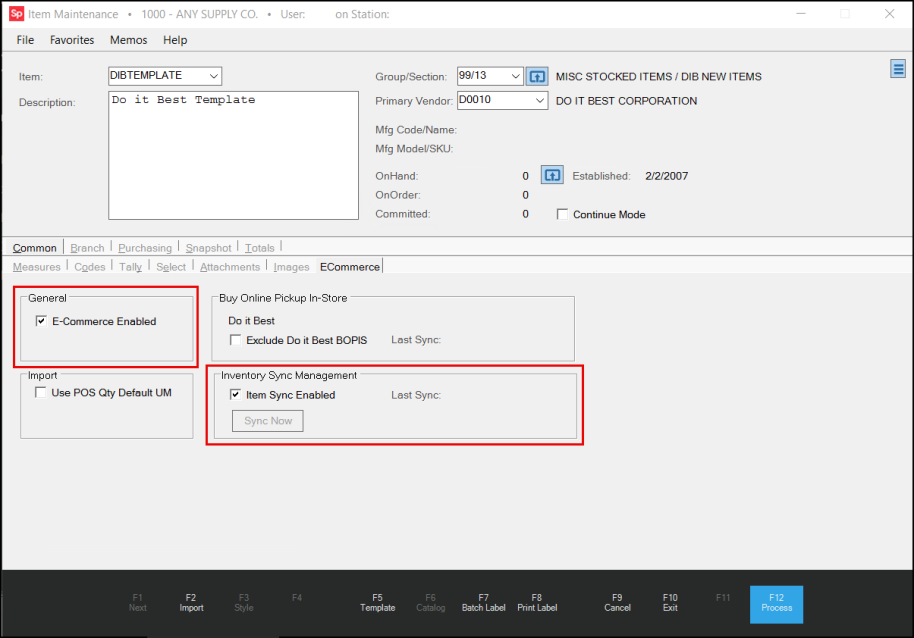
Item Maintenance > Common > Ecommerce > Ecommerce Settings Enabled
4. Choose the E-Commerce Enabled check box to enable all subsequent items for ecommerce and choose Item Sync Enabled to ensure that all items you add using this template are synched with the online store.
These settings are not required and you don’t have to choose both of them. Consider how you want to add new vendor items to your system before making these choices.
5. Choose Process (F12) to save these changes to the database.
By adding these ecommerce settings to the vendor’s item template, the newly added inventory records will include the ecommerce-enabled and inventory sync-enabled settings by default and will upload to the online store as part of the import process. These template SKUs are defined for specific vendors and branch locations and are specified for the branch settings in the EDI tab’s Template item list.

Maintenance > Branches > Branch ID > EDI Tab > Template Item Field
When Merchants import items using the vendor catalog if there is no branch settings defined on the EDI tab, the application uses the Import from Catalog setting in the Inventory Parameters.
Reviewing the Inventory Sync Updates in EvolutionX
After your items are synchronized with your Spruce eCommerce website data store, you can view the changes in the Products section of the EvolutionX platform.
To view item update changes in the EvolutionX system:
1. Log into EvolutionX using your administrator permissions.
2. From the Side Menu, choose Products > Products to display the list of existing items (in numerical order) that you have uploaded to the EvolutionX data store.
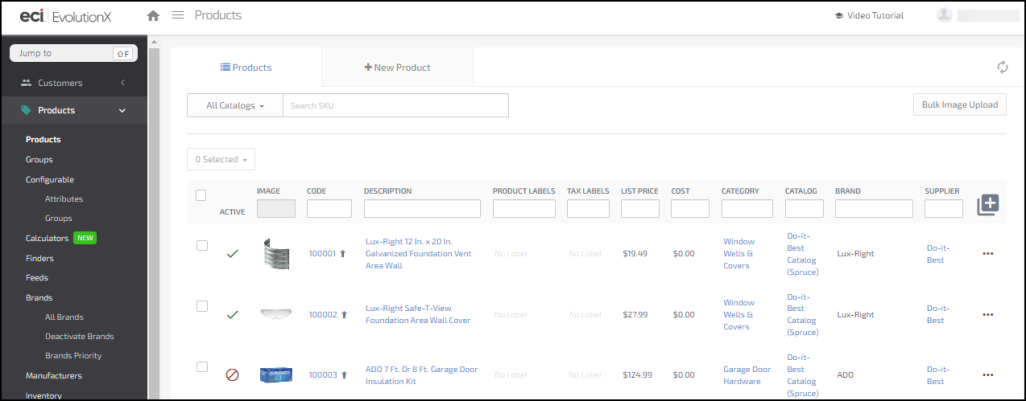
EvolutionX> Products > Products List
3. To find the item you synced to the website data store, enter the item ID in the Search SKU field and press Enter. The item displays below the search fields.

4. To review the item details, click the Code link. The item details display.
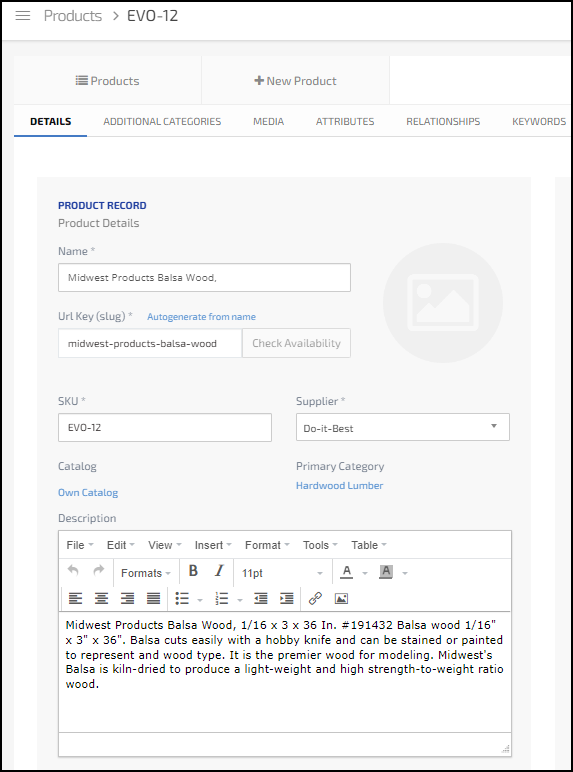
EvolutionX > EVO-12 Item Details > Title and Description
5. Scroll down to see more details that you uploaded from the item record.
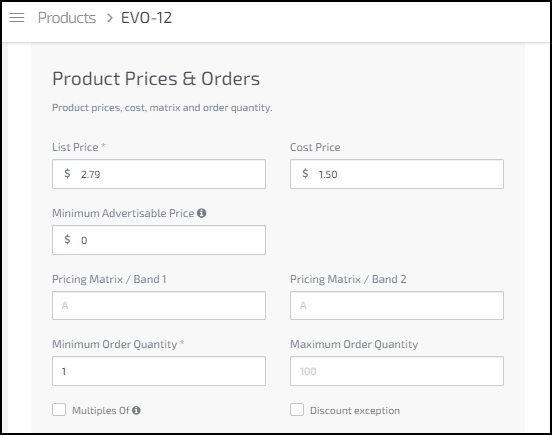
Product Prices and Orders
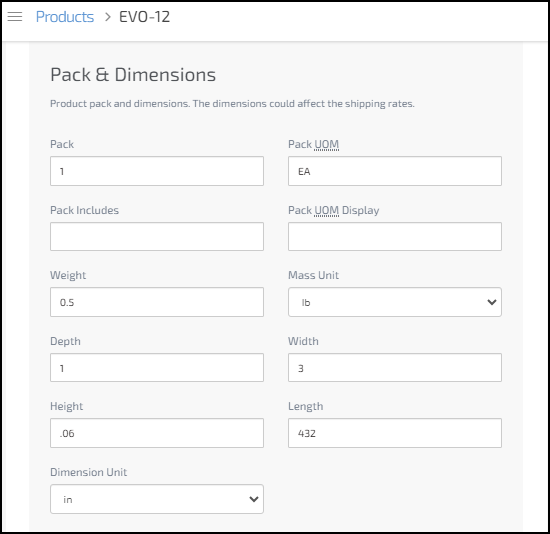
Pack and Dimensions
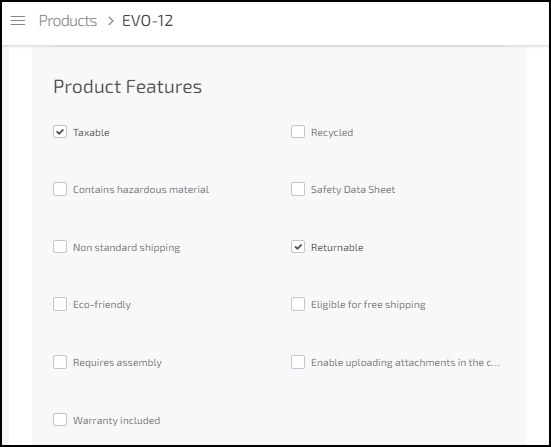
Product Features
6. At the top of the page, click the Keywords heading to display the keywords entered for this item.

Keywords
Inventory Item Sync Report Shows Item and Price Statuses
We have added a new custom ActiveReport that shows the status of Inventory Item Sync inventory changes sent to the Spruce eCommerce database. This can help you identify what additional EvolutionX changes may be needed to support your online display of these changes.
You might want to use this report to find data from different perspectives, such as:
-
Inventory changes that have occurred between a specific date range
-
Inventory changes that have occurred in a particular group/ section
-
All inventory items that begin with a specific item ID/SKU
You can combine these criteria to create a custom report that shows you the specific changes you need. To display a list of all items that have a sync history with Spruce eCommerce, leave all value fields blank.
To run the Inventory Sync Status report:
1. From the Main Menu, choose Inventory > Reports > Custom Report Library to display the ActiveReports list.
2. Choose the IN_Inventory_Sync_Status entry and choose Preview (F7). The Report Parameters display.
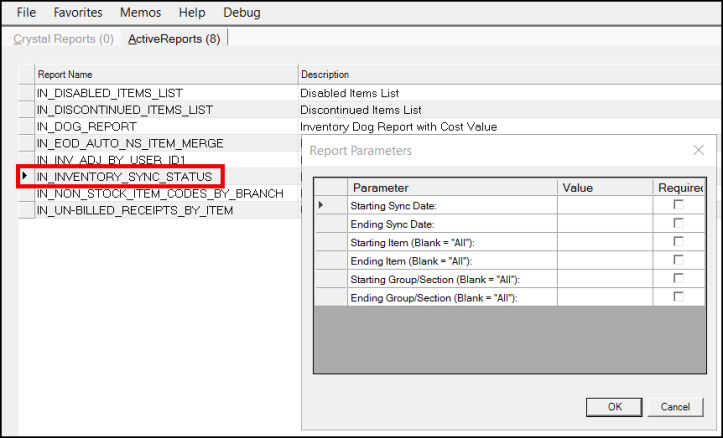
Inventory > Reports > Custom Reports Library > Inventory Sync Status Report Parameters
3. Complete the entries in this form to display the status information you need:
Note: These settings are all optional.
-
Sync Date
Enter the earliest sync date for the inventory you are looking for in this field. -
Ending Sync Date
Enter the latest sync date for the inventory you are looking for in this field. -
Starting Item
Enter the ID/SKU of the first item (numerically or alphabetically) in the range of items you are searching for in this field. Leave this field blank to collect all items that have been updated based on the other criteria. -
Ending Item
Enter the ID/SKU of the last item (numerically or alphabetically) in the range of items you are searching for in this field. Leave this field blank if you left the Starting Item field blank. -
Starting Group/Section
Enter the first Group/Section (numerically) for the items you are searching for in the report. Leave this field blank to display all groups and sections for the criteria you have already entered. -
Ending Group/Section
Enter the last Group/Section (numerically) for the items you are searching for in the report. Leave this field blank if you left the Starting Group/Section field blank.
4. When you have completed these selections, click OK preview the report. The Viewer displays the results.
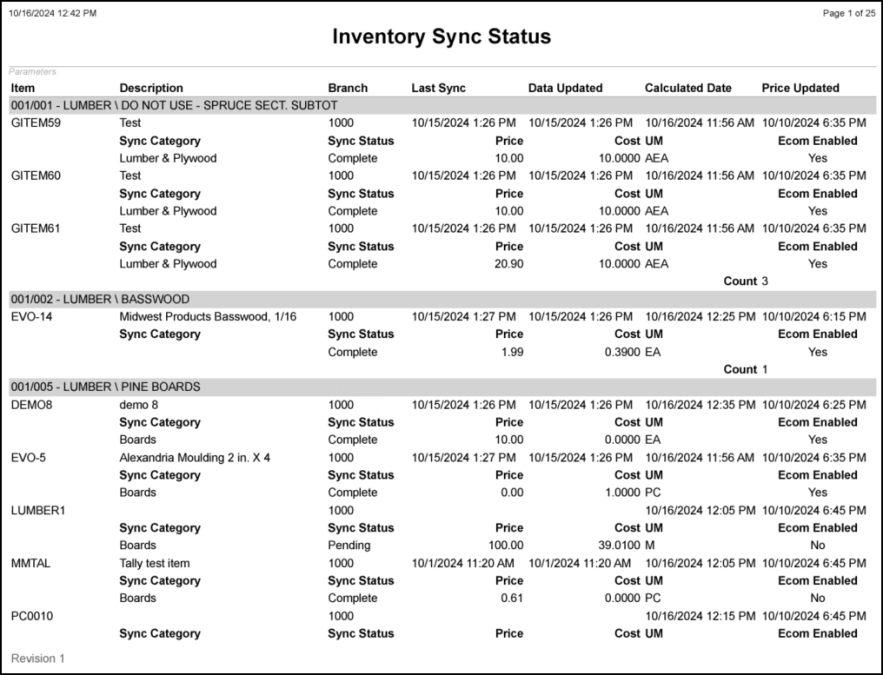
Inventory Sync Status Report
5. Review the entries you need in this report and Process (F12) or Print (F8) as needed.
See Also:
Using the EDI Log to Review Inventory Item Sync Changes
Removing Items from the Spruce eCommerce Online Store