Using the Changes in this Release
This section explains how to use the changes in the version 32.0.
-
To review changes that are coming to the platform, see What's New.
-
To review the major release changes in this release, see the Major Features.
-
To review defect resolutions for this release, see the Resolution Log.
Viewing Copies of Reports Side by Side
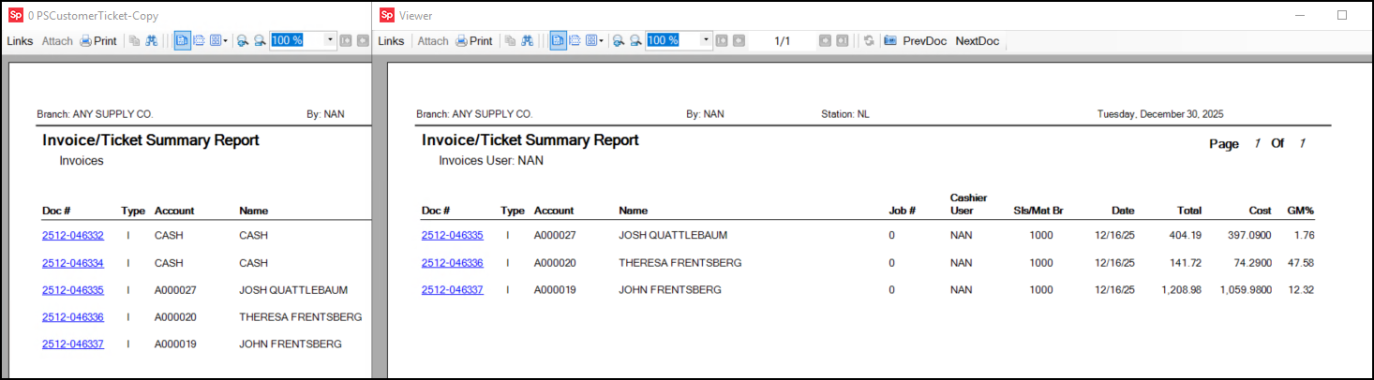
The Document Viewer includes a feature that lets you open a copy of an existing document for comparison. We added this feature to the Reports subsystems so you can generate a report preview, open a copy, change the report criteria, and then review the two reports side by side. The example we use here is the Invoice Ticket Summary report, but it works for any report in the application. You must have report access credentials to use this feature. You can create unlimited copies of these reports (and documents) for comparison.
To view reports of the same type side-by-side:
1. From the Main Menu, choose the application area > Reports > and the Report from the menu.
In this case, Point of Sale > Reports > Invoices and Tickets.
2. Choose criteria for the report.
In this case, we selected all of the Invoices for the date range 11/30/2025 to 12/30/2025.
3. Choose Preview (F8) to display the results.
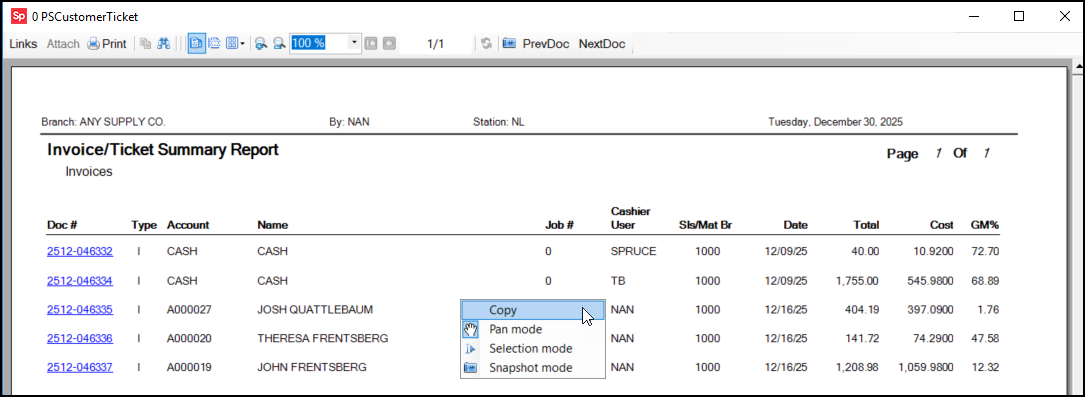
4. Right-click the report and choose Copy. Then drag the copy of the report off to the side.
5. Return to the report settings form and choose different criteria for the report.
Note: You can also open a new report that has related data to make this comparison.
In this case, we choose the same date range but a single User ID.
6. Choose Preview (F8) again and display the two reports side by side.
Note: You cannot use the Format settings to change the style of a copied document; only the original version of the document allows you to change the format.
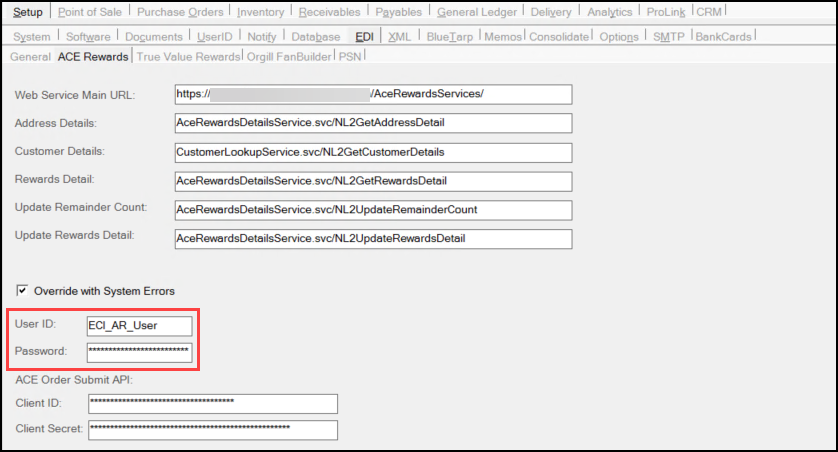
Update to ACE Rewards Web Credentials Complete
ACE has updated the web service credentials we use to connect your business to their ACE Rewards program. This change improves security and ensures continued successful system integration. If you use ACE as a supplier and participate in the ACE Rewards program, we have pushed these credentials out to your system, so there is no interruption in transmission or communication. These credentials are visible in the EDI Parameters form in the User ID and Password fields.
Update to the Vendor EDI Bulk Receive Transaction
We have improved the Bulk Receive transaction to clarify the data types we are updating. Since X12 is a standardized format used by multiple providers for data exchange, many document-type formats may be transmitted at once. Commonly, there are two data types that are the most common:
• 810 AP Invoice Data, and
• 856 Purchase Order Updates.
In some cases, your company may receive both documents for the same purchase.
When previewing Bulk Receive details, we indicate the document type for each preview row and only display the preview for the rows matching the summary (parent) row you select. In the past, clicking any row would list all documents, including those that didn’t match the Bulk Apply summary row you clicked.
It’s important to understand that an 810 AP Document will also update any associated Purchase Order, so there’s no need to process both for the same order. Processing the PO update alone updates the PO with the vendor’s shipped quantities and will not create any Payables invoice for the purchase. By default, when PO updates are selected, and AP updates are not.
In addition to displaying additional information in the preview, we now update the Preview list data based on selections in the summary (Bulk Receive) data grid. The Update check box will display either checked, unchecked, or an intermediate state (in cases where only some matching preview documents are selected for update). Previously, the Summary check boxes didn’t necessarily correspond to the preview selections.
Finally, when processing, the application displays a warning when different update types are selected for the same Purchase Order document. This can be elevated to an error to prevent duplicate processing if needed. For more information, see the Bulk Receive/Apply topic.
Ecommerce Updates
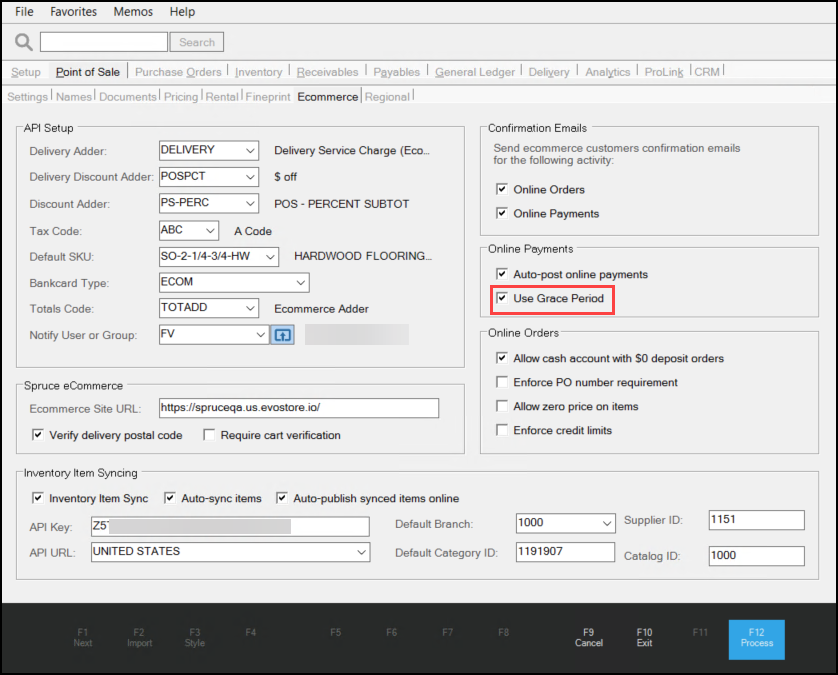
New Parameter Manages Grace Period for Auto-Posted Payments
Some ecommerce customers asked us to allow them to avoid applying the standard Grace Period to auto-posted online account payments. To accomplish this, we added a new check box to the Parameter Settings > POS > Ecommerce tab called Use Grace Period. This check box will be checked (True) by default. To prevent the Grace Period from applying to these payments, System Administrators can uncheck this box, as described below.
Keep in Mind:
-
This parameter does not apply to manually processed online account payments.
If a customer submits a payment online but your business does not have Auto-post online payments enabled for that account, the Grace Period applies, even if the Grace Period check box is unchecked.
-
The Use Grace Period setting still applies to account payments when customers make a payment in-store or by mail. This is true even when the Use Grace Period check box is disabled.
To reset the Use Grace Period parameter:
1. From the Main Menu, choose Maintenance > Database > Parameters.
The Parameter Settings form displays.
2. Choose the Point of Sale tab and the Ecommerce tab to display the ecommerce parameter settings.
3. In this form, uncheck the Use Grace Period check box to prevent the use of the grace period for auto-posted online payments.
4. Choose Process (F12) to save this change.
Viewing Open and Posted Credits (Spruce eCommerce Only)
We added a Credits tab to your Spruce eCommerce customers’ Accounts page that shows the open and posted credits and discounts you have applied / will apply to their accounts and jobs. The information you see for each customer in the Open Credits Utility (Receivables > Utilities > Open Credits) form, is now accessible to authorized users for each customer in Spruce eCommerce.
-
Balance Forward accounts show credits as Open until the next statement runs. After the statement runs, the credit amounts show as Posted.
-
Open Item accounts credits depend on the customer’s payment of the invoice, so they are only posted when the customer makes the payment. If the customer does not pay the invoice when the statement runs, the credits remain unapplied and are considered Open.
Access to the Credits tab is determined by the user’s role and the Credits settings enabled for that role (discussed here). When a customer with an authorized user role clicks the Credits tab, this page displays.
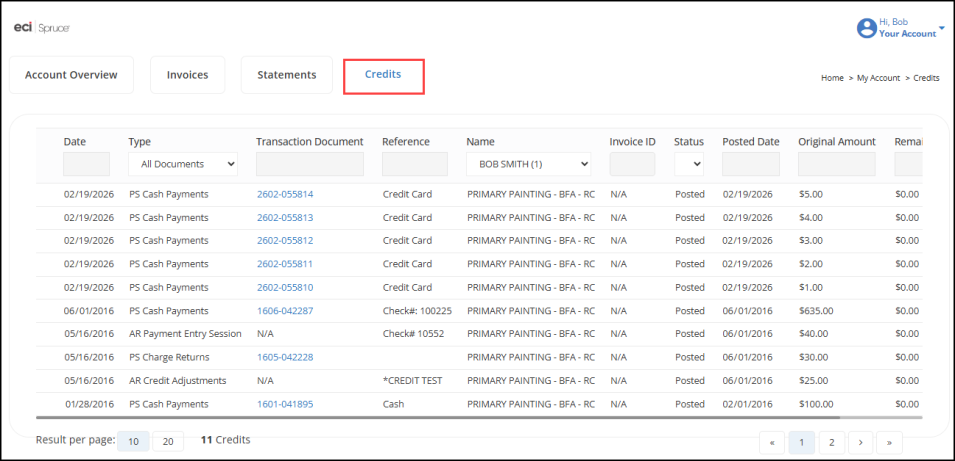
The Credits tab displays open and posted credits associated with payments, discounts, AR credit adjustments, and returns (credit memos) on the account. It does not currently include debit adjustments. The tab displays the following information related to each credit and is restricted based on the user’s credentials.
-
Date
The date the credit was added to the account. -
Type
The credit document type (including PS Cash Payments, PS Charge Returns, AR Credit Adjustments, AR Payment Entry Session, and PS Payment Posting Session). -
Transaction Document
The credit document ID of the credit (returns and payments only). This entry includes a link to the document when available, or this field might be blank for transactions associated with other credit types. -
Reference
Explains the type of credit that was or will be applied, including Credit Card, Check, Cash, etc. -
Name
The job name associated with the credit. For accounts with multiple jobs, this defaults to the Account level, but authorized users can view credits for specific jobs. -
Invoice ID
The invoice ID associated with the credit memo or charge return (when the credit applies to a specific transaction). This entry includes a link to the invoice, when applicable. This field is blank for credit adjustments and discounts that are not part of a transaction or for payments without discounts or adjustments. -
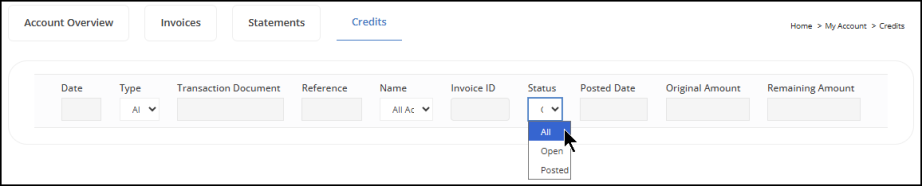
Status
The transaction's credit status (All, Open, or Posted). All is selected by default, but users can choose Open or Posted to display the credits with those statuses only. -
Posted Date
This entry shows the posting date of the credit, or it is blank if the posting has not occurred yet. You may see Open credits with a date posted here. This includes partially-applied credits with a remaining balance greater than zero. -
Original Amount
The original amount of the open credit. -
Remaining Amount
The amount that will be posted in the future (for Open credits).
If the account has multiple jobs, the user can restrict the list of credits by choosing a specific Job Name from the Name list.
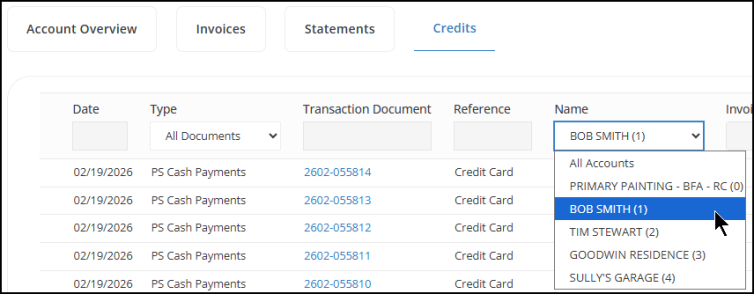
If the user’s credentials restrict their view of the account, they will only see the credits associated with their job.
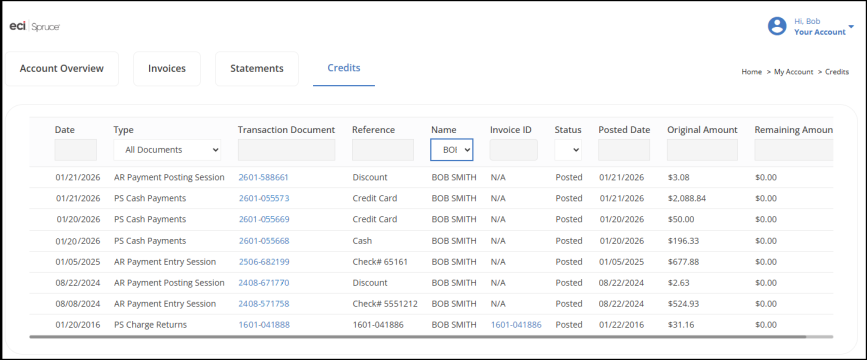
For any credit entry that is associated with an Invoice ID or a Transaction document, there is a link to the original document in the Invoice ID list. Authorized users can click the document link to display it.

Customers can limit the type of entries that display to Posted or Open credits by selecting the status from the Status list.
Enabling Credits Credentials for a User Role
EvolutionX administrators can enable the display of the Credits tab by user role. This feature is turned off by default.
To add the Credits tab to a Spruce eCommerce role:
1. From the Left Menu, choose the Customers > Roles options to display the list of roles.
2. Choose the role you want to add the Credits tab to. The Role permissions list displays.
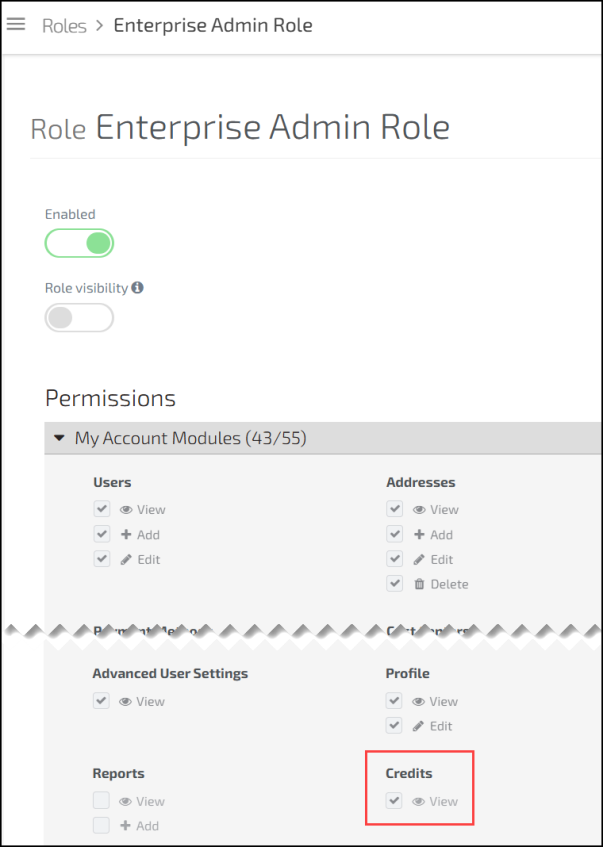
3. In the Permissions list, scroll down to the Credits entry and click the View check box to enable this feature for the customer role you selected.